Blog

  • 7 Things You Never Knew You Could Do With Windows 11

    7 Things You Never Knew You Could Do With Windows 11

    Microsoft is back with Windows 11 operating system and that is having a roaring enthusiasm to deliver a modernized version of the Windows user experience that is easy to use, elegantly designed, and well-connected in an effort to increase your productivity in your professional or creative processes.

    In a world where more and more people are returning to using PCs in their daily lives, Microsoft believed it was crucial to release a new operating system (OS) designed from the ground up for working from home, while also catering to a new generation of people who have and are still using smartphones and tablets as their primary “computer.”

    There are already a few things that you might not be aware of that could improve your workflow with Windows 11 approaching its first significant update in the shape of “Sun Valley 2.”
    Some might be tucked away in the System Settings app or out of the way in plain sight. Nevertheless, all of these technologies work to make it simpler to access an app or to produce a document.

    In order to help you feel like a true Windows wizard, we’ve highlighted seven secret features of Windows 11 that you might not be aware of. Believe me, the 7 features will increase your productivity and make your life easy as well. So let’s get into the article to check out the secret features of the windows 11 operating system.

    1. Typing by Voice

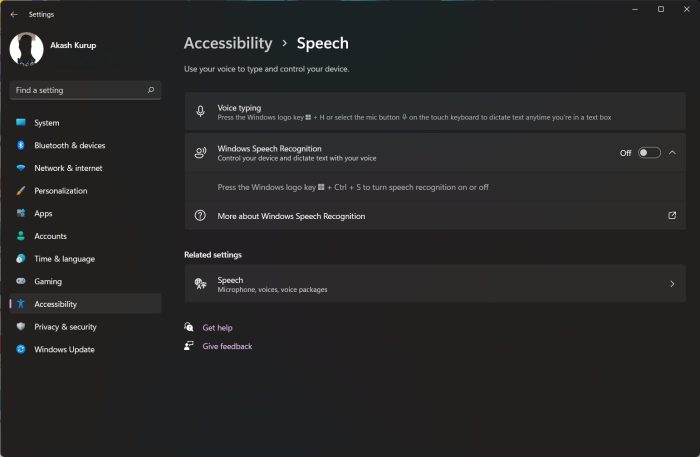
    Dictation on Windows has greatly improved in recent years, with Windows 11 making it easier and more accessible with commands and punctuation capabilities. Regardless of which screen you are on Windows 11, just click WIN + H simultaneously on your keyboard to shout out a message and, if desired, a command to open an app. This particular feature will also help those who have a locomotor disability as well. The users can simply talk with the computer and the machine will carry out the work.

    2. Picking Emoji & GIF

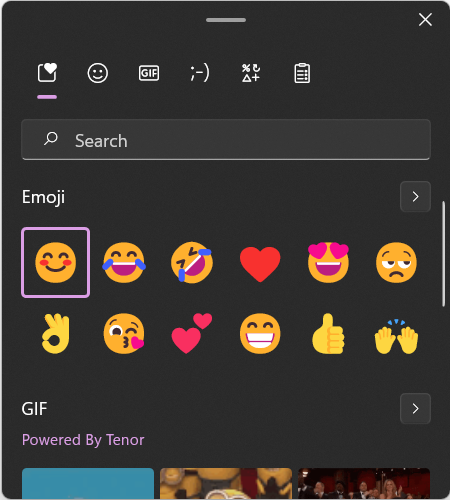
    Emojis make the conversation more creative and interesting and if you wish to swiftly insert an emoji or a GIF into a document or chat, simply press the WIN +. keys together, and you will get a pop-up window. The window will allow you to search for the appropriate picture or emoji. From this window, you can effortlessly switch between images and GIFs (although we did find the former to be relatively limited in terms of the number of emojis available). It is worth mentioning that you can do the same by right-clicking on the screen and the same will bring the pop-up menu from where you can select the same option.

    3. Hiding Start Menu

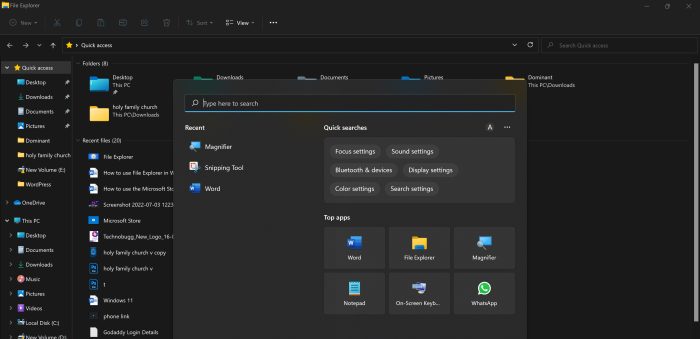
    If you’ve upgraded from a previous version of the Windows operating system and are struggling to understand the new start menu, there’s a hidden menu that can bring up the majority of what you need.

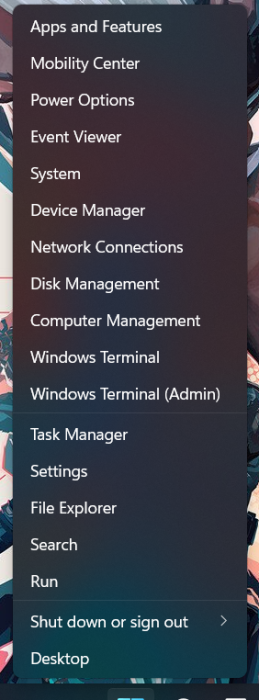
    When you right-click on the Start menu icon, you’ll be greeted with a list of ready-to-use apps. So you can definitely check out this particular feature.

    4. Hiding Context Menu

    The right-click menu in Windows 11 was one of many updates that Microsoft made to the operating system, but it may still be accessed if you require a different action.

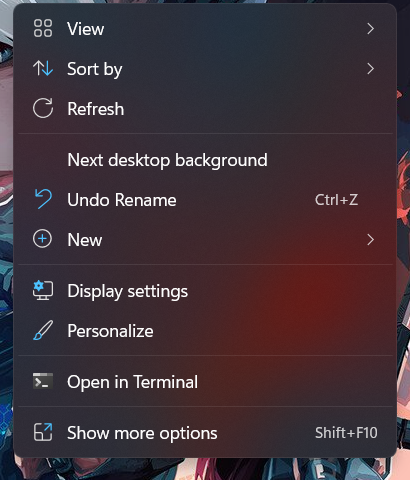
    Simply select ‘More Options’ or press Shift + F10 buttons together on your keyboard to bring up the original context menu.

    5. Layouts in a Snap

    This is one of my personal favourite features in the Windows 11 operating system and the company allows you to make the layout according to your wish with this particular feature. Microsoft has activated some of these layouts, but you still need to do more to make sure they can all maximize your monitor.

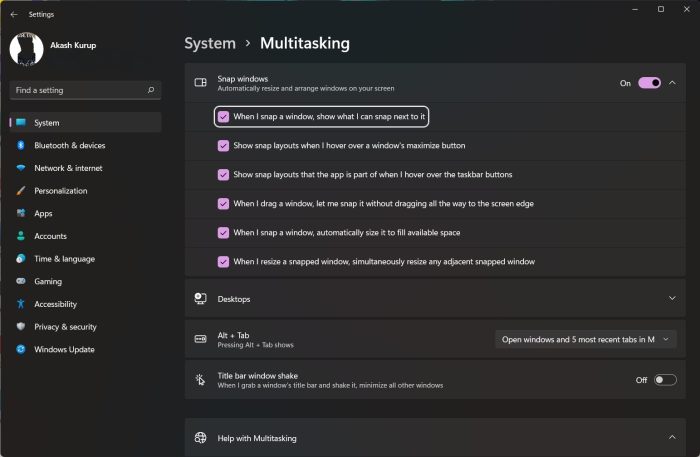
    Be sure to turn on all of the layouts by going to the Start Menu > Settings > System > Multitasking. The next time, you’ll be able to stack apps next to one another. Alternatively, you can hold a window and shake it to close all other windows and concentrate only on the one you’re currently using. This feature will increase your productivity and there is no doubt in that.

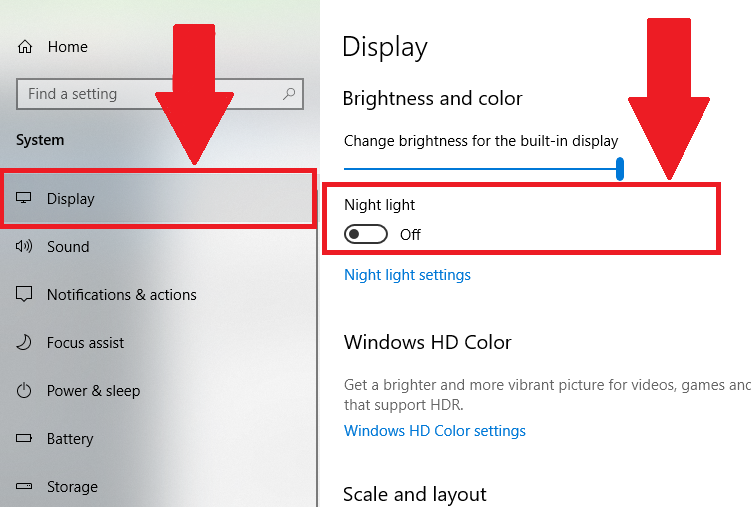
    6. Volume controls only for apps

    A valuable but difficult to locate feature in Windows 11 is the ability to lower the volume in one app, such as YouTube or any other application, while keeping it higher in another, such as Google Chrome.

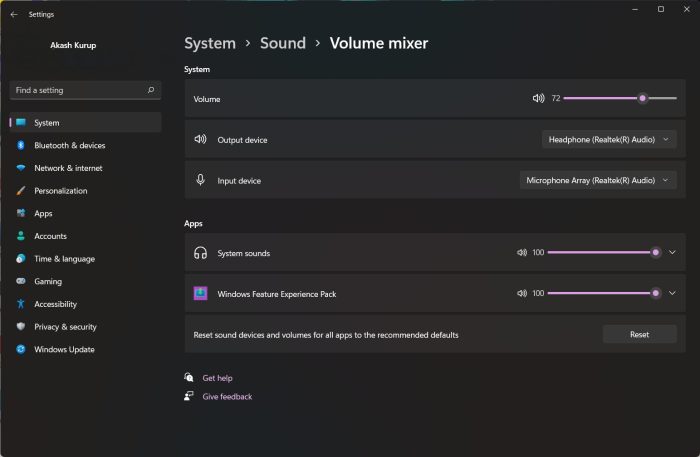
    You may adjust the volume for each active app and the same can be done by going to Settings > System > Sound > Volume Mixer.
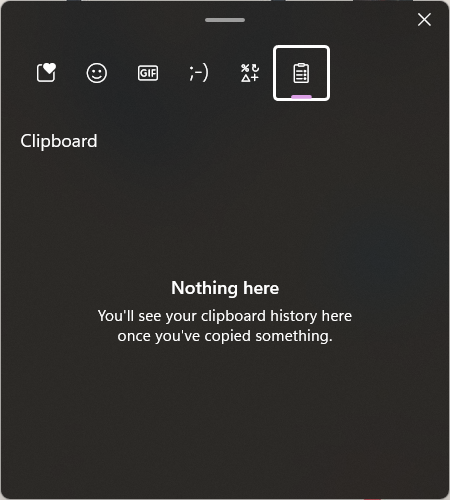
    7. Clipboard

    The latest Windows 11 operating system has enhanced the speed with which you may copy and paste text by pressing CTRL + C and CTRL + V. A pop-up window with previously copied text that you can paste in will display when you press WIN + V.

    If you have a computer that can easily support it, using Windows 11 has been a terrific experience. The experience won’t be as good if you don’t have a computer that complies with the system requirements.

    So guys use the 7 secret Features of the Windows 11 operating system and increase your productivity. By the way, don’t forget to share the article with your near and dear ones as well.

  • How To Get The Best Out Of Accessibility Features In Windows 11

    How To Get The Best Out Of Accessibility Features In Windows 11

    When you consider accessibility features of any kind, you might assume that they are solely for those who have vision or hearing impairments, restricted mobility, or other challenges that might make using a computer more difficult.

    Even though it’s clear that Windows 11 offers a wide range of options and tools for individuals who fit into these and many more categories, the accessibility features built into the operating system can actually be helpful to almost everyone. So, without further ado let’s get into the article to find more features of windows 11.

    1. Text Size

    The accessibility settings for Windows 11 are all unified in one page. The Accessibility area can be reached by opening the Settings app from the Start menu or by pressing the Windows key and I keyboard shortcut.

    Click Text size and use the slider to increase it if the text on the screen is too small for you to read. Use the preview box to see how it will look before you make any changes.

    You can choose to make scrollbars always visible (rather than only appearing when the cursor is above them), disable distracting effects, and extend the duration of notifications by going back a screen and opening Visual effects.

    2. Modifying the Mouse Pointer

    Customizing the appearance of the cursor can be done in the Mouse pointer and touch section. To make sure the pointer is always visible, regardless of what else is on the screen, you can select a white pointer, a black pointer, a custom colour, or use the inverted colour option.

    You can use the slider to enlarge the mouse pointer below, exactly like you were able to do with the text size. If you’re running Windows 11 on a touchscreen device, you can choose whether to show or hide the touch indication. If it’s enabled, you can also adjust the circle’s size and brightness to make it easier to see.

    3. Making Use of the Magnifier Tool

    People with problems with vision will definitely love the Magnifier tool in Windows 11 is an incredibly helpful function that can be activated by pressing Windows + +. You can zoom in on anything on your screen by pressing the keyboard shortcut yet again, and you may keep pressing it for even more magnification.

    While pressing Windows + Esc will totally turn off the magnifier, pressing Windows + – will cause it to zoom out. You can select to have the magnification tool activated when Windows starts and to have the colours reversed whenever the magnifier is in use to help with visibility. Both options can be found in the Magnifier section of the Accessibility settings.

    4. Making use of the colour filters

    The Color filters section can be useful if colour blindness or any comparable problem makes it difficult for you to distinguish between specific colours. You can see the effects of different colour combinations in the Color filter preview section by switching the Color filters toggle to the On position before making a choice from the range of filtering options. You will notice a difference on your screen right away.

    If you don’t need the colour filter to be on all the time, the settings keyboard shortcut for toggling it on and off comes in handy. Toggling filtering is activated by pressing Windows + Ctrl + C.

    5. The Narrator’s Use

    Applications 11 has a tool for describing what is on your screen and which windows and dialogues are now active. The Narrator is a feature that you may turn on and off by pressing Windows+ Ctrl + Enter; you can then continue to use Windows and you will be informed about everything that shows on your screen and any window under your cursor.

    You can have the Narrator notify you every time a key is pressed by clicking Caps Lock + 1. The Narrator can be enabled automatically at startup and the narration voice can be modified using the Narrator part of the Settings menu.

    6. Opening up the audio accessibility options

    For those who have hearing problems, Windows 11 offers a number of useful alternatives. You can enable mono sounds and on-screen notifications in connection with audio notifications by opening the Audio section under Hearing in Settings.
    These on-screen notifications can be received in three ways: flashing the title bar of the active window, flashing the entire active window, or flashing the full screen, and you can choose which you want from the drop-down box. Back in the Captions area, you may customise the appearance of video captions.

    7. The use of Sticky Keys

    You can discover several useful functions under the Keyboard section of Settings. Your keyboard is an essential tool for interacting with Windows and the programmes you use.

    Sticky keys allow you to type shortcuts on the keyboard one key at a time, while Filter keys come in helpful if you find that you unintentionally press keys more frequently or for longer than you meant. When you enable Caps Lock, Scroll Lock, or Num Lock, toggle keys play an audio notice so you know if you mistakenly press one of these keys.

    You can activate and deactivate the on-screen keyboard by pressing Windows + Ctrl + O.

    8. Increasing the mouse’s functionality

    You may get a comparable range of choices for your mouse by going to the Mouse section of Settings. The numeric keypad on your keyboard can be used to control your mouse cursor if you enable the Mouse keys option.

    You can modify speed and acceleration for Mouse keys in the same way that you do for your mouse’s default settings. You can enable an option that will speed up movement when the Ctrl key is hit and slow it down when you press the Shift key if you need to adjust the pace of the mouse on the fly.

    9. Making Use Of Speech Recognition

    The Windows Speech Recognition option, which is located under the Speech area of Settings, is intriguing for anyone who finds it hard to use a mouse and keyboard or for anyone who is simply looking for a different means of input. If you’d rather, you may use the Windows + Ctrl + S keyboard shortcut to activate the function instead of this Settings page.

    When you initially enable speech recognition, you will be taken through the process of teaching Windows to recognise your voice; once this process is through, you will be able to use a sequence of voice commands to operate every element of using your computer.

    10. Voice-based typing

    Voice typing is a related voice control feature. As you might have guessed, this function allows you to type without using a keyboard instead of dictating any text you want to input using your voice.

    By tapping the microphone button on a touchscreen device’s touch keyboard or the Windows + H keyboard shortcut, you can activate voice typing.

    You can adjust settings like automatic punctuation of text and having the tool available anytime you’re in a text field by clicking the cog button on the Voice typing dialogue. The microphone button can then be pressed to begin dictation.

    If you know someone who really needs the above mentioned accessibility features then do recommend this article as the tools will make their life easy and they can able to work on the computer with comfort and that will result in more productivity.

  • How To Install A Linux Operating System Such As Ubuntu In Windows 11

    How To Install A Linux Operating System Such As Ubuntu In Windows 11

    Using a virtualization tool like VirtualBox made it possible to run Ubuntu and other Linux distributions inside of Windows powered computer. However, with Windows 11 operating system, you can utilize the built-in Windows Subsystem for Linux (abbreviated WSL) to run your preferred Linux distribution without the usage of either virtualization or emulation.

    WSL is referred to be a “compatibility layer,” which enables native Linux operation within Windows. WSL is here to assist you whether you have a professional requirement for Linux or simply enjoy the idea of checking out the software made for a different operating system. Although the procedure is quite similar for other Linux distributions as well, we’ll explicitly teach you how to install Ubuntu in Windows 11 in this post. So let’s get into the article to know more without further ado.

    1. Verify that your computer is up to date.

    It’s important that Windows 11 is installed on your computer in its most recent iteration and that all available updates are installed before you begin. By pressing Windows + I, select Settings from the menu, then click Windows Update, then Check for updates. If Windows asks you to restart, do so after downloading and installing all updates.

    Windows features can be turned on or off by selecting Turn Windows features in the search results after clicking the Start button. Scroll down the list of choices and tick the box next to “Virtual Machine Platform. Then click OK and restart your computer if necessary.

    2. In the Store, type “Windows Subsystem”

    You must first make sure that the Windows Subsystem for Linux is installed before installing Ubuntu, or any other version of Linux you may be interested in. Launch this software from the Start menu or by clicking the taskbar shortcut to access it from the Microsoft Store.

    Type “windows subsystem” into the search bar at the top of the store, then click on “Windows Subsystem for Linux Preview.” After clicking the Get button and letting the programme download, click the Open button. In the future, you can also use the Start menu to start the software.

    3. Techniques of Command Prompt

    When Windows Subsystem for Linux Preview launches, you’ll note that it looks quite similar to the Command line if you’re familiar with it. The next step is to install a Linux distribution, as the displayed message instructs you to do. There are a few different ways to tackle this.

    Using the Command Prompt to access a distro is the first choice, and you can check to see what’s available by clicking Start, typing cmd, and then press the enter button to launch the Command Prompt.

    4. Input of commands

    By entering wsl.exe —list —online and clicking Enter, you can quickly examine which distros are accessible to install in this way in the Command Prompt window that appears. Along with the name of Ubuntu, you’ll also see the names of some well-known Linux distributions like Debian and openSUSE.
    There are two columns of text, as you’ll see. The entire names of the distros are listed under Friendly Name, and the command to install each one is listed under Name.

    5. Installation of Linux distro

    You could install Kali Linux by running wsl.exe -install kali-linux and press Enter, or you could install openSUSE Leap 42 by typing wsl.exe —install openSUSE-42 and press Enter.

    A progress bar will be visible while the download is ongoing if you choose to install a distro in this manner. The installation will start as soon as this is done. Just adhere to the presented instructions as the installation procedure differs slightly between distro.

    6. Searching Ubuntu in Microsoft Store

    Installing Linux versions via the Microsoft Store is a simpler choice, especially for beginners. Launch the Microsoft Store app, perform a search for Ubuntu, and then click the Get button, exactly as you did when installing Windows Subsystem for Linux. Ubuntu is one of the distributions you may install in this manner.

    Ubuntu is less than 500MB in size, so the download won’t take very long. Once it’s finished, a shortcut to Ubuntu will be added to the Start menu so you can instantly run it like any other app.

    7. Installing Ubuntu using the Terminal

    You will be directed through the process of setting up the OS when you first load Ubuntu, which is listed as Ubuntu on Windows in the Start menu. The procedure begins with selecting a username and configuring a password. Even if you just installed Ubuntu, it’s a good idea to check for updates.
    Enter sudo apt update at the terminal to update the package. Start by typing sudo apt full-upgrade and clicking Enter. Then, proceed by pressing Y to continue and any other on-screen instructions.

    8. Setting up a graphical user interface

    Although the terminal offers a wealth of functionality, the majority of users will be more interested in using WSL to run graphical Linux applications. This is a fantastic place to start because the GIMP image editor is among the most well-known Linux applications available.

    Enter sudo apt install gimp -y in the terminal, then wait for the programme to download and install. You can start the app when the installation is finished by simply entering gimp and pressing Enter. You’ll see that GIMP will begin and be accessible in the taskbar alongside other currently running programmes.

    9. Installing Linux applications

    Additionally, you can install the X11 programmes collection, which includes a number of features like a clock, calculator, and clipboard. Press Enter after inputting sudo apt install x11-apps -y. Once it has been installed, you can use the shortcut keys xcalc, xclock, etc. to start the calculator, clock, and other programmes.
    You will be taken back to the console if you put a space and & following the command to open an app (for example, xcalc &). Other helpful applications to install are the Gedit text editor, the VLC media player, and the Nautilus file manager (sudo apt install nautilus -y will install and run nautilus) (sudo apt install gedit -y to install and gedit to run).

    10. Setting up a desktop environment

    There is no possibility to quickly install a desktop environment with Ubuntu. The same apps and more can be installed along with the option to run Kali itself with a separate desktop utilizing Win-KeX if you decide to install Kali Linux instead.

    Launch Kali, enter sudo apt update and press Enter, then press Enter again to enter sudo apt install -y kali-win-kex. By using the command kex —win -s and pressing Enter, the distribution can then be executed in a window with sound support. This demonstrates the elegance of Linux and the adaptability of WSL—.


  • How To Use File Explorer In Windows 11

    How To Use File Explorer In Windows 11

    The Windows 11 is the latest version of the operating system by Microsoft and the developers of the company have made massive changes and improvements in this version of the operating system. We can able to see the changes and improvements in every section of the operating system and the company have also improved File Explorer massively and the same now enables you to access various sections comfortably.

    If you are new to this, then the File Explorer is a window in Windows 11 and the same enables you to browse and manage the files and folders on your computer and in your OneDrive account. When you open a library folder in Windows 11, for example, the contents are displayed in a File Explorer window.

    The latest Windows 11 operating system has significantly enhanced the app, most recently providing tabs to prevent you from having numerous windows open at once. It enables you to access and manage files and folders while navigating through the content which you have saved on your hard drive. However, there is much room for modification, and there is more to it than this. We’ll cover all you need to know in this tutorial.

    Using File Explorer in Windows 11

    1. Click the “File Explorer” app icon on the Windows taskbar to launch File Explorer in Windows 11 operating system. You can also open the same by using the keyboard shortcut – Windows button + E.

    2. You can also access the same by clicking on the Start menu in the Windows taskbar.
    3. Then, if the “File Explorer” icon displays in the “Pinned” part of the Start menu, click it.
    4. If it’s not there, click the “All applications” button in the upper-right corner of the “Pinned” area, scroll down to the “F” apps in the alphabetical listing of all the applications, and then click on the “File Explorer” app icon.
    5. File Explorer in Windows 11 includes buttons within a toolbar at the top of the window known as the Ribbon. These buttons allow you to perform a variety of actions and activities on the files and folders that you pick in the main File Explorer window.
    6. The File Explorer window’s Navigation pane is used to pick folders and drives, as well as browse to computers, folders, and documents on your network.
    7. Click the arrows to the left of the names of the sections and folders visible in the Navigation pane to expand and collapse it.
    8. To travel through the various windows in File Explorer, use the Back, Forward, and Up buttons.
    9. To return to the previous folder, click the Back button.
    10. After using the Back button, click the Forward button to move forward again.
    11. Click the Up button to move up a level in the File Explorer window’s in hierarchy.
    12. The Ribbon, or toolbar at the top of the File Explorer window, contains basic file and folder management commands. When you choose an item from the Files and Folders list in File Explorer, the available buttons on the Ribbon for that item become active.
    13. The Address Bar displays the location of the currently chosen folder on your computer or network.
    14. Click into the Address Bar, input a folder location, and then press the “Enter” key on your computer to show a folder in File Explorer by typing.
    15. The Files and Folders list displays the contents of the currently selected Address Bar folder location.
    16. When you select the “Details” view of a folder location in the Address Bar, the details of its files and folders appear in columns in the main File Explorer window. Each column has a column name that indicates the type of information that appears in that column.
    17. Click into the Search field in File Explorer and input the name of the file or folder or the first few letters in the name of the file or folder to search within the currently selected folder location for the text that you enter. Searching begins as soon as you begin entering into the Search Box.

    Lot More Interesting Features


    1. A Folder expansion?

    Although the left and right panels have slightly distinct functions, both let you browse your files.
    You can expand your C: drive in the navigation pane by double-clicking it, hovering over it, or clicking the arrow just as you did to view this PC’s contents.

    You can drill down to view sub-folders when your C: drive is selected and you can see its contents in the right-hand pane, which includes folders like Windows, Users, and Program Files.

    2. Modifying the views

    While browsing, you may navigate back and forth using the back and forward arrows in the navigation bar exactly like you would in a web browser. In addition, pressing the up button will take you to the parent folder.

    The Sort button is the first of many options for modifying how files and folders are shown. You can decide whether to use ascending or descending sorting as well as the criteria that should be used to organise files and folders, such as name, size, creation date, and so on.

    To further modify things, you can also use the Group by submenu.

    3. Altering the View options

    The View menu offers additional settings, including the ability to select different icon sizes and decide whether or not to display item-specific details like file size next to each item.

    You can turn on and off Compact view using the View menu. The Preview pane and the equally helpful Details pane are two optional components that you can choose to display or remove using the Show submenu.

    It’s also important to draw attention to the two tiny buttons on the far right of the File Explorer status bar, which let you switch between the Detail and Large icon views rapidly.

    4. Usage of Context menu

    When you right-click a file or folder, a context menu will appear with these similar toolbar options in a row above other options.

    The rest of the context menu depends on whether you right-clicked on a file or a folder. In the case of files, you will notice an Open option that will allow you to open the document in the associated app’s default. You can also select another programme from the Open with submenu. Both context menus have options like Properties, Compress to Zip file, and Copy as path.

    5. Using tabs

    The developers also introducing a new capability in the File Explorer and the same is the tabs, much like those in a web browser.

    To open a new tab, press CTRL + T or choose Open in New Tab from the context menu when you right-click. If you need to keep a folder open while searching your cloud storage for a file to add to that folder, this feature can be quite helpful.

    That’s it! This is how you can able to use File Explorer on Windows 11 powered computer. If you find any doubts then do let us know in the comments section below and we will be happy to help you.

  • How To Use The Microsoft Store In Windows 11

    How To Use The Microsoft Store In Windows 11

    Just like the Google Play Store on Android smartphones or App Store on iOS devices, Microsoft is also featuring a built-in store on Windows operating system dubbed Microsoft Store. It enables you to download applications along with games and more. With the latest Windows 11, the developers of the store improved the user interface and now you can able to locate the apps and media you need more quickly.

    You can also download third-party applications from the Microsoft Store, and Microsoft is also bringing the support of Amazon Appstore and the same will enable you to download the Android applications on your Windows 11 computer. If you or someone new to the Microsoft Store then this article is meant for us today I will guide you on the same in a detailed manner and you can able to use this store comfortably. So without making any further delay let’s check out the complete details of the Microsoft Store.

    Steps to use the Microsoft Store

    First of all, you need to open the Microsoft Store by clicking on the start menu or circling the same by clicking on the search icon on your Taskbar. After opening the Microsoft Store, you will find various sections and that will enable you to find your needed application comfortably. You will able to find the sections on the home screen including Apps, games, movies, and TV shows.

    To view and download both free and premium apps, click the Apps icon in the left sidebar. Special deals, top apps, productivity, and collections areas can all be found on the same page.

    You can view both free and paid games to download by selecting the gaming icon on the left and scrolling down the screen. The page covers collections, top-grossing games, top-free games, top-paid games, and promoted games.

    You can also able to watch a movie or a television show

    The store will also enable you to download movies and television stores as well and you can scroll down the screen and select your favourite movie or TV show to watch the same on your computer.

    You can able to search for your favourite stuff on the store as well and you will also find the filters and categories to get the needed things quickly.

    Getting the stuff from the store

    If you want to download a game for example chess and you can able to search for the game on the store and if the game is available for free then use simply click on the Get button. If it is a paid application and you will find the pricing of the same.

    You can also track all of you are downloaded applications by clicking on the library and receive is available on the left side of the square. You can also able to share on Pinterest any of the downloaded applications from the store itself. You can also update the new version of applications using the store as well.

    Setup your Microsoft Store Account

    You can set up your account by clicking on your profile symbol at the top right corner of the screen and that will enable you to access Microsoft account and choose Manage account and devices to access all of your Microsoft Store apps, devices, and accounts.

    It is also allowing you to unlink any linked devices from your account as well as cancel or renew subscriptions as well.

    You can also able to choose payment methods to setup or manage your payment method for Microsoft Store purchases. After that, you may see your transactions and add or remove a certain payment method.

    Microsoft is also enabling users to Redeem code or gift cards to use a code or gift card to enjoy stuff without spending money as well. This section is also available in the profile section of the store.

    You can also set up the settings for every application and the same can be managed in the profile and by selecting app settings. You can able to specify whether application should be updated automatically or not.

    So this is how you can able to use the store of Microsoft and if you are facing any issues then do let us know in the comments section below and we will be happy to help you. If this helps you then don’t forget to share the article with your near and dear ones as they will be beneficial as well.

  • Windows 11’s Best App Gets Better At Searching Your Smartphone

    Windows 11’s Best App Gets Better At Searching Your Smartphone

    A Windows powered computer and an Android phone is a combination of every user in the digital world and Microsoft tries really hard to offer the best experience to its every user. Microsoft offers Phone Link application and the application allows users to manage his or her phone on the computer which means you can able to make and receive phone calls and also check the messages. The application also allows users to view photos on the big screen as well. That means you don’t need to access your phone to carry out various activities and this can be done in between your work as well.

    Having said that, the Phone Link application is compatible with only Android smartphones and the application connects with the device via Bluetooth.

    The technological giant Microsoft is working on this particular application very seriously and makes it better with every updates. It is now capable to help you in various things and you don’t need to touch your phone as well. With the latest updates, you can also search for your messages on this application as well.

    It is worth mentioning that the phone Link application will also offer some extra capabilities with the selected Samsung smartphones as well.

    There is no doubt that Phone Link is one of the best applications which is developed by Microsoft in the recent time and the same will definitely offer you a good experience while working on your PC.

    It is one of the highly recommended applications and it is safe to use as well and you can trust Microsoft.

    So if you are having a smartphone that is running on the Android operating system and a PC with the Windows 10 or Windows 11 operating system then you can use the application and carry out various things without taking the phone out from your pocket. You guys can able to download the application from the official store of Microsoft.

    If you are a regular user of this particular application then do let us know your thoughts on the same in the comments section below.

  • How to Edit the WinX Menu in Windows 11 (Power User Menu)?

    How to Edit the WinX Menu in Windows 11 (Power User Menu)?

    Are you looking to edit the Win X menu in Windows 11 (Power User Menu)?

    The “Windows” key + “X” key shortcut on the keyboard gives you access to a set of very useful options and features within the operating system.

    As a power Windows user, having access to commonly used features, settings, and applications without really searching for them is a blessing.

    So, if you’re seeking to improve the efficiency of the Win X menu by customizing the options available in it, then today we are here with a guide on the same.

    Also Read -> How to Reset Windows 11 Without Losing Files?

    What is the Win X Power User Menu in Windows 11?

    As we mentioned above, the Win X menu is a series of options, apps, and features that you get access to, by clicking on the “Windows” key + “X” key on your keyboard.

    Some of the available options include “Apps and Features”, “Power Options”, ”Disk Management”, “Task Manager”, “Settings”, etc.

    How to Edit the WinX Menu in Windows 11 (Power User Menu)?

    Microsoft Windows 11 doesn’t have an option to edit the WinX Power User menu by default.

    However, with the help of a third-party free software tool called the “Win+X Menu Editor” by WinAero, we can do the same.

    Below is how you can use WinAero Win+X Menu Editor software to edit the Power User menu options in Windows 11.

    1. Visit the official Win+X Menu Editor page here and download the software on your PC.
    2. Once the download finishes, you’ll see a ZIP file with the name “WinXMenuEditorRelease”.
    3. Extract the ZIP file.
    4. Inside the extracted folder, double-click and launch the “WinXEditor.exe” file.
    5. Now, you’ll see all the Win+X items that are currently present in your Power User menu.

    How to Add a New Win+X Menu Option?

    1. Launch the Win+X Menu Editor software.
    2. Select the group to which you like to add a new option.
    3. Now, click on the “Add a Program” option from the top menu bar.
    4. Within the drop-down menu that appears, click on the “Add preset” option.

      win+x-menu-editor-windows-11

    5. Now, select the option you wish to add to the Power User menu.
    6. Click on the “Restart Explorer” option in the bottom right corner of the window to reflect changes.

    To add a third-party application to the Win+X menu, follow these steps.

    1. Launch the software.
    2. Click on “Add a program” from the menu bar.
    3. Within the options, click on “Add a program” again.
    4. Now, navigate to the path where the “.EXE” file of the app exists.
    5. Click on the “Open” button.
    6. In the next “Rename” window that appears, give a name that will appear as the app name within the Win + X Power User menu.
    7. Click on “Ok”.
    8. Now, click on the “Restart Explorer” button in the bottom right corner.

    How to Reorder Power Menu Options with Win+X Menu Editor?

    If you wish to reorder of the Power User menu options in Windows 11, follow the below steps.

    1. Launch the “Win+X Menu Editor” software.
    2. Select the group with your menu options.
    3. Click on the app/feature icon within the group that you wish to rearrange.
    4. Now, click on the arrow keys to the left centre corner of the Win+X Menu Editor window to rearrange the icon within the Power Menu.

    Final Words

    We hope you found this article informative and helpful.

    Got any questions? Feel free to ask us as comments below.

  • How to Reset Windows 11 Without Losing Your Files?

    How to Reset Windows 11 Without Losing Your Files?

    Are you wondering how to reset Windows 11 without losing your files?

    Well, search no more. Today we bring you a well-explained guide on how to easily reset Windows 11 computers and laptops without facing any hassles.

    Also Read -> How to Set and Configure Location Services in Windows 11?

    Why Do You Need to Reset Your Windows Computer?

    Windows 11 reset will remove all apps, settings, files, etc. on your computer.

    So, why do you need to do it?

    Well, no matter how aggressive you’re with file management and maintaining your PC, it does get cluttered and sluggish over time.

    Resetting your Windows 11 PC is a great way to start over with the best OS performance.

    Also, when you choose to reset Windows 11, you can remove bloatware applications and settings you applied by mistake to get a fresh start again.

    How to Reset Windows 11 Without Losing Your Files?

    As we mentioned above, resetting your Windows 11 PC will remove all the settings, applications that aren’t Windows pre-installed, as well as all the files on your computer.

    However, there are various ways to reset Windows 11 PC without losing your files.

    Below we have listed those methods.

    Method 1: Reset Windows 11 from Settings App

    1. Launch the “Settings” app on your computer.
    2. From the left side menu options, click on “System”.
    3. On the right side of the window, click on “Recovery”.

      recovery-settings-windows-11

    4. Within the “Recovery” menu, under “Recovery Options”, you will find the option titled “Reset this PC”.
    5. Next to the “Reset this PC” option, you’ll find a button labeled as “Reset PC”. Click on this button.

      reset-this-pc-windows11

    6. Within the new window that appears, choose the “Keep my files” option. It is important that you choose this option to not lose any files on your computer.

      Reset-Windows-11-without-losing-your-files

    7. On the next screen, select either the “Cloud download” or “Local reinstall” option depending on whether you have an ISO file on your PC or if you need to download the Windows ISO from the internet.
    8. Now, click on the “Next” button from the next screen.
    9. You now have to click on the “Reset” button to begin the procedures.

    Wait for the reset operation to complete successfully.

    Once reset is done, you can set up the Windows 11 PC as a new installation.

    Even though all apps & settings will be restored to defaults, all files will be retained on your PC.

    Method 2: Reset Windows 11 from Windows Recovery

    If there are some apps/files that are not allowing you to boot into your Windows 11 PC, then you can reset Windows 11 from Windows Recovery by following the below steps.

    1. Restart your PC and during the restart, press the “F11” key on your keyboard to boot into the Windows Recovery Environment (RE).
    2. Within the Windows RE, click on “Troubleshoot”.
    3. Now, click on the “Reset this PC” option.
    4. You now have to select the “Keep my files” option.
    5. Select either the “Cloud download” or “Local reinstall” option depending on whether you need to download the Windows 11 ISO from the internet or have the ISO already on your PC.
    6. Now, click on the “Reset” option.

    And that is it. The reset process will now begin.


  • How to Set and Configure Location Services in Windows 11

    How to Set and Configure Location Services in Windows 11

    Are you wondering how to set and configure location services in Windows 11? Today we bring you a detailed article on how you can do the same.

    Why Do You Need Location Services in Windows 11?

    The location service helps to determine the precise location of your Windows device. Lots of applications running on your Windows 11 computer require location data to function properly and offer all the features.

    With the help of the Windows location service, such apps will be able to read your device’s current location and provide the features.

    Applications that provide navigation and maps information are one prime example of Windows apps requiring location information. Apps can provide you location-specific information only with accurate location data from your computer.

    Moreover, essential features such as “Find My Device” require precise location data to function.

    With the location service enabled on your Windows 11 device, data such as GPS information, closest wireless point data, cell tower information, IP address, etc. is utilized to identify the device’s location.

    How to Enable/Disable Location Service in Windows 11?

    Below are the methods to enable/disable location service in Windows 11.

    Method 1: Enable/Disable Windows 11 Location Service from Quick Settings

    1. Press the “Windows” key + “A” key on your keyboard to launch the Quick Settings window.
    2. Here, you can find an option labeled as “Location”. Click on this option to enable location services on your Windows 11 computer.enable-location-service-from-quick-settings-windows-11
    3. You can tap on the same icon again to disable the feature

    Method 2: Enable/Disable Location Services from Settings

    1. Press the “Windows” key + “I” key to launch the Settings app.
    2. From the options on the left side, click on “Privacy & Security”.
    3. On the left side, enable the “Location services” feature.
    4. You can also turn ON the “Let apps access your location” feature and then control the apps that can access location data on your computer.Set-and-Configure-Location-Services-in-Windows-11
    5. You can follow the same steps above to disable location services as well.

    How to Set and Configure Location Services in Windows 11?

    Below we discuss the ways you can configure location services in Windows 11.

    How to Enable/Disable Location Access for Cortana in Windows

    1. Launch the Settings app.
    2. Click on “Cortana”.
    3. Select the option that says “Permissions”.
    4. Click on “Manage the information Cortana can access from this device”.
    5. Enable/disable location access as per your wish.

    How to Set Default Location in Windows 11?

    To set a default location in Windows 11, follow these steps:

    1. Launch “Settings”.
    2. Click on “Privacy & Security”.
    3. Under “Location” settings, scroll down to find the “Default location” title.
    4. Click on the “Set default” option next to it.
    5. The “Maps” app will now launch.
    6. Click on the “Set default location” on the prompt that appears.
    7. Either manually enter your address or auto-detect the location by clicking on the “Choose location” option.
    8. Press “Enter” on the keyboard.
    9. You can also clear/change the default location later.

    Final Words

    We hope you found this article helpful.

    Got any doubts?

    Do get in contact with us and we will help you out.

  • How to Use the Night Light in Windows 11?

    How to Use the Night Light in Windows 11?

    Windows 11 brings new features and updates to existing Windows 10 functionalities.

    Out of all the available features in Windows 11, the “Night Light” feature is definitely a user favorite.

    If you’re new to using Windows 11 and want to enable Night Light on your computer, then we’re here with a guide that will explain to you how to do the same.

    Also Read -> How to Use and Customize Windows 11 Quick Settings

    What is the “Night Light” Feature in Windows 11?

    Night Light is a feature that helps reduce strain on the eyes while using the computer, thus helping you avoid any sleeping discomforts caused due to long hours working on the computer.

    Normally, computer displays produce blue lights, which won’t be much of a problem during the daytime.

    However, for long-time computer users, blue light can adversely affect their body clock by decreasing the creation of melatonin, which is a hormone that regulates the sleep cycle in our human body.

    With the Night Light feature enabled, it decreases the blue light emission from the computer display.

    As a result, the display emits warmer colors that help reduce eye strain and thus improve sleep.

    Blue light filter features are available on modern smartphones for quite some time now.

    The Night Light feature is available on Windows starting the Creators Update, and now an updated version is available with Window 11.

    How to Use Night Light Feature in Windows 11?

    Now that you know what the Night Light feature actually is, let us now explain to you how to use the feature.

    Method 1: Enable/Disable Windows 11Night Light from Settings

    Below are the steps you need to follow to enable/disable the Night Light feature.

    1. Launch the Settings window on your computer.
    2. From the left-side menu pane, click on “System”.

      enable-night-light-in-windows-11-from-settings

    3. Within System Settings, click on “Display” from the right side of the window.
    4. Inside the Display Settings, turn the slider next to the “Night light” option to enable/disable the feature.

    Method 2: Enable/Disable Night Light from Quick Settings

    Instead of choosing to enable/disable the Night Light feature from the Settings app, you can also do the same using the Quick Settings option on your Windows 11 computer.

    Below is how you can enable/disable Night Light from Quick Settings in Windows 11.

    1. Press the “Windows” key + “A” key on your computer.
    2. The Quick Settings window will pop up now.

      enable-night-light-from-quick-settings

    3. From the Quick Settings pane, turn on the icon that represents the “Night Light” feature.

    If the button is not visible in the Quick Settings pane, you can click on the “Edit” button and then click on the “Add” button to select the “Night Light” feature and add it to the Quick Settings pane.

    How to Tweak Color Temperature in Night Light?

    You can also control the color temperature of the Night Light feature on your computer.

    Below is how you can do the same.

    1. Launch Settings.
    2. Click on “System” from the left pane.
    3. On the right side of the window, click on “Display”.
    4. Click on the “Night Light” option.
    5. On the next screen, you can see a slider next to the “Strength” option. You can move this slider to tweak the strength of the warmer of the display colors.

    How to Schedule Night Light Feature in Windows 11?

    Windows 11 also allow users to schedule the Night Light feature to turn ON/OFF automatically based on the time of the day.

    Below is how you can schedule Night Light on your computer.

    1. Launch the “Settings” app and then click on “System”.
    2. Click on “Display” from the right side of the window.
    3. Now, click on “Night Light”.
    4. Scroll down to find the option that says “Schedule night light” and enable the same.

      customize-night-light-settings-windows-11

    5. Now, you have options to schedule the Night Light feature. You can either set the feature to turn ON automatically from sunset to sunrise. Alternatively, you can also specify the time to turn ON and turn OFF the feature.

    Once you set the ON/OFF schedule, the Night Light feature will automatically turn ON/OFF based on the schedule.