Are you wondering how to set and configure location services in Windows 11? Today we bring you a detailed article on how you can do the same.
Why Do You Need Location Services in Windows 11?
The location service helps to determine the precise location of your Windows device. Lots of applications running on your Windows 11 computer require location data to function properly and offer all the features.
With the help of the Windows location service, such apps will be able to read your device’s current location and provide the features.
Applications that provide navigation and maps information are one prime example of Windows apps requiring location information. Apps can provide you location-specific information only with accurate location data from your computer.
Moreover, essential features such as “Find My Device” require precise location data to function.
With the location service enabled on your Windows 11 device, data such as GPS information, closest wireless point data, cell tower information, IP address, etc. is utilized to identify the device’s location.
How to Enable/Disable Location Service in Windows 11?
Below are the methods to enable/disable location service in Windows 11.
Method 1: Enable/Disable Windows 11 Location Service from Quick Settings
- Press the “Windows” key + “A” key on your keyboard to launch the Quick Settings window.
- Here, you can find an option labeled as “Location”. Click on this option to enable location services on your Windows 11 computer.
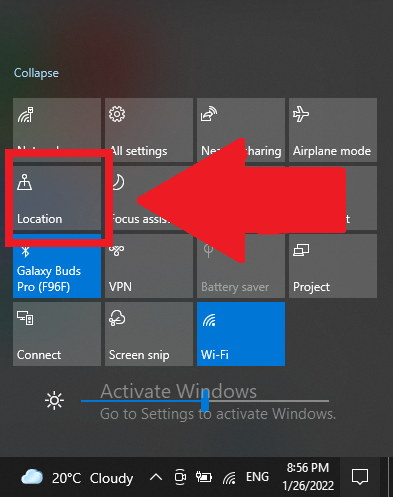
- You can tap on the same icon again to disable the feature
Method 2: Enable/Disable Location Services from Settings
- Press the “Windows” key + “I” key to launch the Settings app.
- From the options on the left side, click on “Privacy & Security”.
- On the left side, enable the “Location services” feature.
- You can also turn ON the “Let apps access your location” feature and then control the apps that can access location data on your computer.
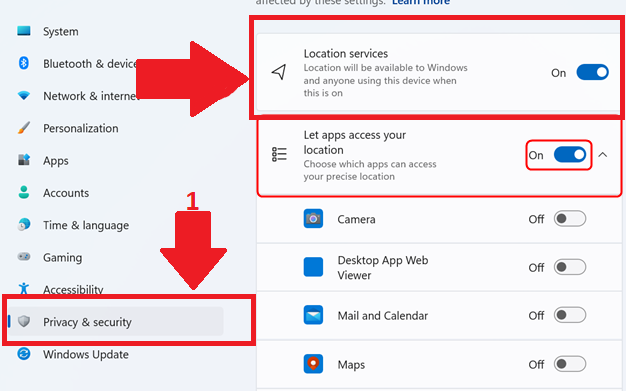
- You can follow the same steps above to disable location services as well.
How to Set and Configure Location Services in Windows 11?
Below we discuss the ways you can configure location services in Windows 11.
How to Enable/Disable Location Access for Cortana in Windows
- Launch the Settings app.
- Click on “Cortana”.
- Select the option that says “Permissions”.
- Click on “Manage the information Cortana can access from this device”.
- Enable/disable location access as per your wish.
How to Set Default Location in Windows 11?
To set a default location in Windows 11, follow these steps:
- Launch “Settings”.
- Click on “Privacy & Security”.
- Under “Location” settings, scroll down to find the “Default location” title.
- Click on the “Set default” option next to it.
- The “Maps” app will now launch.
- Click on the “Set default location” on the prompt that appears.
- Either manually enter your address or auto-detect the location by clicking on the “Choose location” option.
- Press “Enter” on the keyboard.
- You can also clear/change the default location later.
Final Words
We hope you found this article helpful.
Got any doubts?
Do get in contact with us and we will help you out.