Blog

  • Is Windows 11 Product Key Necessary to Install and Use the OS?

    Is Windows 11 Product Key Necessary to Install and Use the OS?

    Is Windows 11 product key necessary to install and use the OS?

    This is a question that most people have in their minds right now.

    Nowadays, most people are trying to update their systems to Windows 11.

    Windows 11 features several functionalities that make it a worthy upgrade from Windows 10.

    Moreover, this time Microsoft has given Windows 11 a fresh look that looks modern and interesting.

    Following Windows 11 launch, people were very confused about upgrading.

    For starters, there were hardware limitations for Windows 11.

    According to official documents, only certain hardware could upgrade to Windows 11.

    A simple online search will give you details about ways to bypass Windows 11 hardware requisites.

    If you’re not able to bypass the Windows 11 hardware requirements, then you cannot install the latest Windows version as of now.

    Now, let us come to the topic of this article.

    Also Read —> How to Open PSD Files in Windows 10?

    Is Windows 11 Product Key Necessary?
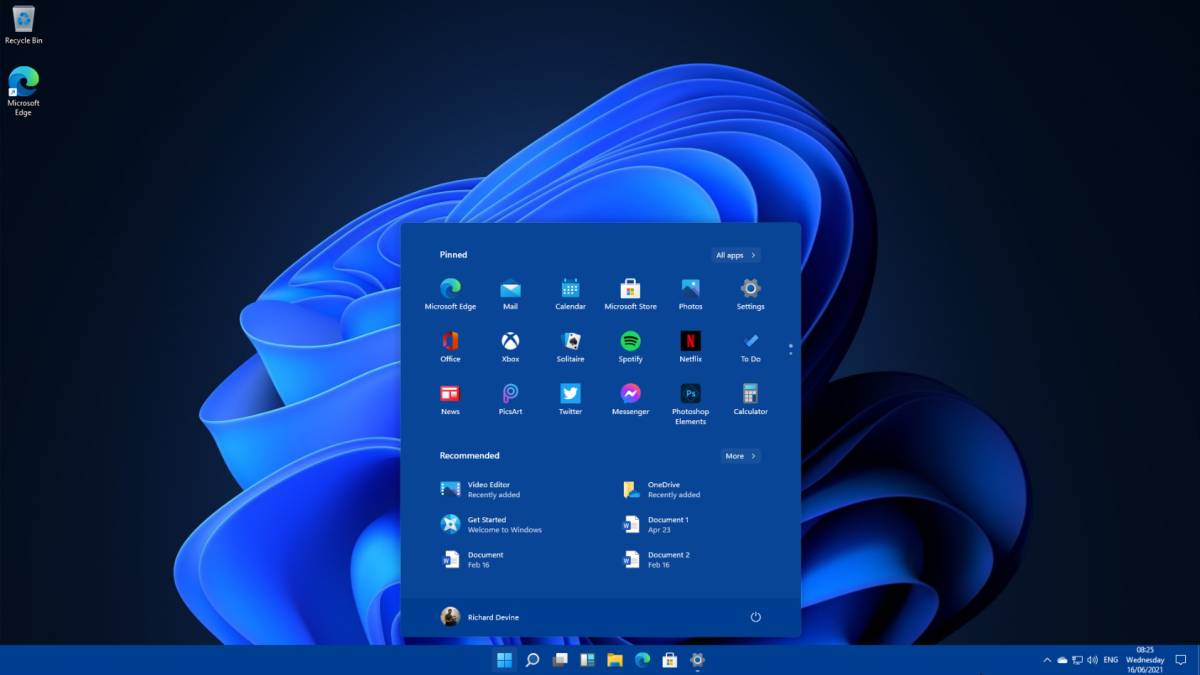
    Is-Windows-11-Product-Key-Necessary

    The short answer is Windows 11 doesn’t require a product key to install and use.

    There are two ways you can install Windows 11 on a PC.

    Either you can upgrade from an existing Windows 10 machine or freshly install Windows 11.

    In either case, Microsoft doesn’t require you to have a product key to install Windows 11.

    Method 1: Install Windows 11 on a PC running Windows 10

    To install Windows 11 on a PC either running on Windows 10, follow these steps:

    1. Download the Windows 11 Installation Assistant from here.
    2. Run the tool once it finishes downloading.
    3. It will then check your current Windows 10 system for compatibility.
    4. If it finds your system to be compatible, it will ask you to proceed.
    5. Click on the “Accept and Install” button.
    6. When the installation files are ready, click on “Restart Now”.
    7. Your PC will now restart and take you through the installation steps.
    8. Wait for the installation to complete.

    The installation may take a while. Once it’s done, then you can proceed with the setup of Windows 11.

    Method 2: Install Windows 11 on a Fresh PC

    To install Windows 11 on a fresh system, you first need to create bootable media for the OS.

    Below are the steps to install Windows 11 on a new PC.

    1. Download the Windows 11 Installation Media tool from here.
    2. Run the tool.
    3. Click on “Accept” after you read the license terms.
    4. On the next screen, select the “Create installation media for another PC” option and then click on “Next”.
    5. Select the Windows 11 version for your new PC.
    6. Now, select the media (preferably USB) to create the media file.
    7. After the installation media is flashed to the USB, insert it to the new PC to install Windows 11.
    8. Restart the PC.
    9. The installation setup must automatically begin during restart.
    10. Follow the on-screen procedures to finish the installation.

    And that’s all.

    After installation completes, you can begin the setup of your new Windows 11 PC.

    Final Words

    Microsoft no longer needs you to enter a product key to use Windows 11.

    You can click the “I don’t have a product key” option during installation to install Windows 11 without a product key.

    There won’t be any major functional differences even if you don’t activate Windows 11.

    Below are a few differences you will see:

    1. the “Activate Windows” symbol on the bottom right corner of the screen.
    2. Personalization features will be disabled.
    3. Notifications will be displayed inside the Settings menu asking you to activate Windows.

    That’s it.

    Got any doubts?

    Feel free to ask us by leaving a comment below.
  • How to Open PSD Files in Windows 10?

    How to Open PSD Files in Windows 10?

    In this article, we will explain to you how to open PSD files in Windows 10.

    Apart from opening PSD files, this article also focuses on the ways you can edit and convert PSD format files easily.

    Also Read —> How to Open DDS Files in Windows 10?

    What is a PSD File?

    People who have used the Adobe Photoshop software will have definitely come across the PSD file format.

    This is because PSD is the default file format that all Photoshop files are saved in.

    PSD stands for Photoshop Document and is the official Adobe Photoshop file format developed by the company itself.

    In PSD files, the different aspects of an image are saved as layers. Thus making it quite easy to edit the file.

    However, once the image is saved and just opened for viewing, then it will look just like any other image file.

    You’ll be able to see the different layers only when you open the PSD file with a compatible PSD editor.

    How to Open PSD Files in Windows 10?

    how-to-open-PSD-files-in-Windows-10

    Here we will discuss the different methods to open PSD files in Windows 10 without any hassles.

    Method 1: Open PSD Files with Adobe Photoshop

    PSD is the standard file format by Adobe, it comes as no surprise that the Adobe Photoshop software can open such files.

    There are three easy ways to open PSD files using Photoshop.

    Open PSD Files from within Photoshop

    1. First, launch the Adobe Photoshop software on your PC.
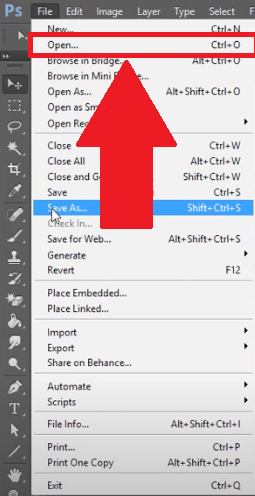
    2. On the top menu bar, click on the “File” option.
    3. Now, click on the “Open” button.
    4. Within the new window that now appears, navigate and select the PSD file that you wish to open.

    The PSD file will now open within the Photoshop window.

    Open PSD Files by Drag and Drop

    Alternatively, you can simply drag and drop a PSD file into the Photoshop window to open it.

    Simply open the Adobe Photoshop software on your PC.

    Now, explore and navigate to the PSD file you need to open.

    Using your mouse, drag the file to the Photoshop window and drop it there.

    Viola! The file will open the instant you drop it into the Photoshop window.

    Directly PSD Open Files using Photoshop

    Here’s how you can directly open PSD files using Adobe Photoshop.

    1. Navigate to the file you wish to open.
    2. Right-mouse-click on the file and select “Open With”.
    3. From the options that appear, select “Adobe Photoshop”.

    That’s all. The file will now open by launching Adobe Photoshop.

    Method 2: Alternatives to Open PSD files in Windows 10

    Adobe Photoshop isn’t the only software that opens PSD files.

    There are several other alternatives to open such files.

    File Viewer Plus, ACD Systems Canvas X, GIMP, Paint.NET, XnView, and IrfanView are a few best examples of software to open PSD format files.

    All of these software products are compatible with a wide variety of file formats including PSD.

    So, you won’t have any problem to open PSD files using any of the suggestions above.

    Final Words

    Found this article helpful?

    Then do consider sharing it with others to help them out.

    Moreover, if you know of other software products to open PSD files, do share them in the comments below.

  • How to Open DDS Files in Windows 10?

    How to Open DDS Files in Windows 10?

    Are you looking for ways to open DDS Files in Windows 10?

    In this article, we take you through all the methods to open DDS files in Windows 10.

    Also Read —> How to Remove Annoying Ads from Windows 11?

    What is the DDS File Format?

    Before going through the different methods to open DDS files in Windows 10, let us explain to you a bit about the format itself.

    DDS files are basically raster images that are saved within the DirectDraw Surface container format, hence the format named DDS.

    The DDS format files are capable of storing both uncompressed as well as compressed pixel data and are widely used by graphic designers, video game developers, animators, etc.

    Microsoft first developed the DDS file format to be used along with the DirectX Software Development Kit to help with the development of 3-dimensional games and other rendering applications that process data in real-time.

    How to Open DDS Files in Windows 10?

    open-DDS-files-Windows

    Now that you know about the DDS format, let us take you through methods to open such files.

    Method 1: Use XnSoft XnViewMP

    The XnSoft XnViewMP software for Windows allows opening files of various formats.

    Apart from the commonly used formats such as JPG, PNG, etc., you can also use the software to open DDS files as well.

    The software also comes with basic photo editing functionalities such as:

    • Resize/crop/rotate images.
    • Adjust the brightness/contrast.
    • Modify color palette/depth.
    • Apply effects/filters, and more.

    Not just DDS files, this software supports over 500 common and specific-use file formats.

    You can also use this software to convert DDS files to other popular file formats.

    If you wish to use the XnSoft XnViewMP software, click here and visit the official site.

    A single-user license of the software can be downloaded for free.

    However, if you need multi-user licenses, then you need to pay for the same.

    Method 2: Use NVIDIA Texture Tools Plugin for Adobe Photoshop

    The Adobe Photoshop software is also capable of opening DDS format files without any issues.

    However, the software cannot open such files out of the box and needs a separate plugin to do so.

    The plugin required to open DDS files in Adobe Photoshop is called the NVIDIA Texture Tools plugin.

    Below is how you can open DDS files using Adobe Photoshop and the NVIDIA Texture Tools plugin.

    1. Download & Install Adobe Photoshop from here.
    2. You also need to download & install the NVIDIA Texture Tools plugin from here.
    3. After both the above installations are done, launch the Photoshop app on your computer.
    4. Click on the “Filter” option from the top menu.

      open-DDS-files-in-Windows-10

    5. Now, click on “NvTool” and then click on “NormalMapFilter”.
    6. A new window will now open.
    7. Within this window, you can view the various options related to DDS files and open such files.

    Final Words

    We hope you found this content on how to open DDS files easy and informative.

    Both the methods mentioned are simple and do not require effort.

    Have you got a better way to open DDS files?

    Do share it with us by leaving a comment below.


  • How to Remove Annoying Ads From Windows 11

    How to Remove Annoying Ads From Windows 11

    Are you wondering how to remove annoying ads from Windows 11?

    Nobody likes advertisements.

    Especially when the ads are displayed on products that you paid your hard-earned money on.

    Even though ads were not so much of an issue in earlier Windows versions, people are now annoyed with the ads on Windows 11.

    Also Read —> How to Open EXR Files on Windows 10?

    Why does Windows 11 Shows Ads?

    Windows 11 shows ads from first-party installed apps and other pre-installed services.

    Also, all the pop-up messages, suggestions, and notifications you see from third-party applications/software installed on your computer as well as websites that you visit, are also advertisements.

    How to Remove Annoying Ads from Windows 11?

    remove-ads-from-windows-11

    Now to the best part.

    Do you wish to remove the advertisements shown on your Windows 11 system?

    Well, here are the various methods to remove all sorts of ads on Windows 11.

    Method 1: Disable Ads from Third-Party Software in Windows 11

    Below are the steps to disable ads displayed by third-party installed apps on Windows 11.

    1. Launch the Settings menu on your computer.
    2. Click on “System”, and then click on “Notifications”.
    3. Within the list of applications, find the application(s) whose notifications are annoying you. Simply click on the slider next to that particular application and turn the notification OFF.

    And that’s it. Now, the notifications from the application(s) you chose will no longer be shown to you.

    Method 2: Disable Ads on Windows 11 Lock Screen

    Another place where advertisements are commonly shown within Windows 11 is within the lock screen.

    Here’s how you can easily remove ads from being shown on Windows 11 lock screen.

    1. Press the “Windows” key + “I” key to launch the Settings application.
    2. Click on “Personalization” from the left-side menu.
    3. Now, on the right side of the window, click on “Lock Screen”.
    4. Disable the option that says “Get fun facts, tips, tricks, and more on your lock screen.

    And that is it. Now ads will no longer be visible on your Windows 11 lock screen provided that you use static pictures or a slideshow as your lock screen.

    If you have the “Windows Spotlight” feature enabled, then the ads will still be visible.

    Method 3: Disable First-Party Apps Ads on Windows 11 using Command Prompt

    If first-party applications show ads on your Windows 11 computer, then a Windows service controls them.

    You can easily disable first-party ads on Windows 11 by using Command Prompt and here’s how to do it.

    1. Search for the “Command Prompt” application within your Windows 11 PC.
    2. When you find Command Prompt from the search results, right-mouse-click on the search result and click on “Run as Administrator”.

      Remove-Annoying-Ads-From-Windows-11

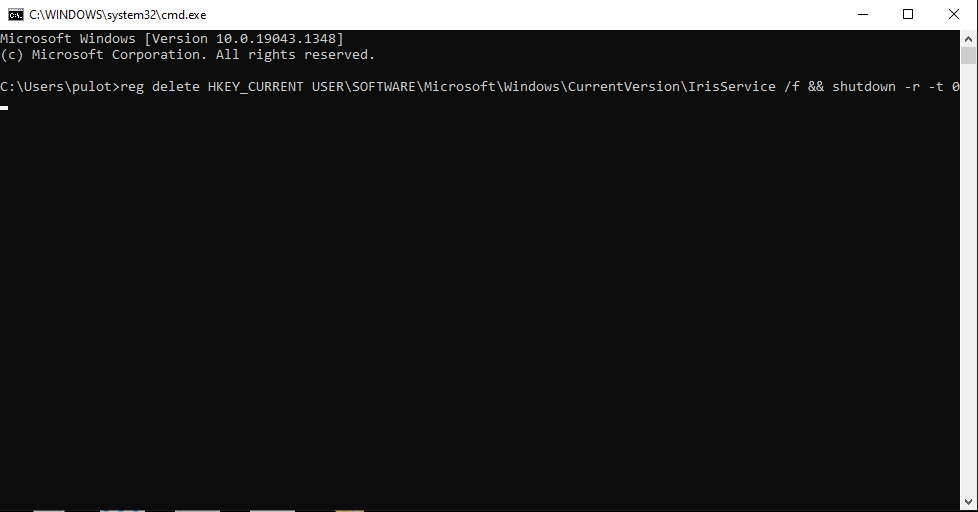
    3. Within the Command Prompt window, copy & paste the below command and press “Enter”:

      reg delete HKEY_CURRENT USER\SOFTWARE\Microsoft\Windows\CurrentVersion\IrisService /f && shutdown -r -t 0

    Your computer will now restart and once it’s done, all ads will be gone.

    Method 4: Completely Turn OFF All Notifications on Windows 11

    As a continuation of Method 1 above, if you wish to completely turn OFF notifications from all applications on Windows 11, then follow these steps:

    1. Press the “Windows” key +”I” key to launch the Settings app.
    2. Click on “System”.
    3. Now, click on “Notifications”.
    4. Toggle the slider to OFF next to the “Notifications” option.

    And that’s it! No more Windows 11 notifications.

    Method 5: Disallow Windows 11 to Show You Personalized Ads

    Windows 11 shows you personalized advertisements based on your system usage. You can disable personalized ads on Windows 11 by following the below steps.

    1. Launch the “Settings” app on your computer.
    2. Click on the “Privacy & Security” option and then click on “General”.
    3. Disable the option that says “Let apps show me personalized ads by using my advertising ID”.

    Now, all personalized ads on Windows 11 are on your computer.

    Final Words

    Found this article helpful?

    Then do consider sharing it with other Windows 11 users in your circle to help them stay away from advertisements.

  • How to Open EXR Files in Windows 10

    How to Open EXR Files in Windows 10

    Are you wondering about how to open EXR files in Windows 10?

    We’re here to help you out!

    The EXR format (.EXR) is a common type of file that people who work with image files usually come across.

    Also Read —> How to Open EMZ Files in Windows 10

    For those among you worried about opening EXR files in Windows operating system, today we are here with different methods that let you do the same.

    What is EXR File Format?

    We will take you through the various ways to open EXR files on Windows 10.

    However, before we do so, it’s also important that we explain to you what EXR files actually are.

    So let’s begin by doing just that.

    An EXR file consists of data in the OpenEXR format.

    To make the explanation simpler, it is a format used to store high-quality and high-definition image files.

    The format was made by the Industrial Light & Magic (ILM) company and is available publicly under the free software license agreement.

    As you can probably guess, EXR files are commonly used by people that work in animation, photo editing, digital graphics, visual effects, etc.

    How to Open EXR Files in Windows 10?

    Now that you have an idea about EXR files and what they’re used for, it’s time to explain how to open such files in Windows.

    There are several methods to open EXR format files in Windows 10, such as:

    Method 1: Open EXR Files using Adobe Photoshop

    Adobe software solutions are commonly used for photo and video editing.

    Thus, it comes as no surprise that the company’s software products can also open EXR files.

    Following the steps below, you can open EXR files using Adobe Photoshop:

    1. Launch the Adobe Photoshop software on your computer.
    2. On the top menu bar, click on the “File” option.
    3. In the drop-down menu that appears, click on “Open”.
    4. And now, a new window will appear.
    5. Within this window, select the EXR file that you wish to open.
    6. After the selection is confirmed, the EXR file will be opened within the Photoshop window.

    The above steps open EXR files using Photoshop.

    However, the same steps can be followed to open EXR files using Adobe After Effects and Adobe Premiere Pro.

    Method 2: Open EXR Files using Autodesk 3ds Max

    The Autodesk 3ds Max is another great choice to open EXR files.

    If you’re into game development and animation, then this software lets you use EXR files in your current project without any hassles.

    Below are the steps to open EXR files using Autodesk 3ds Max.

    1. Find the file with the “.EXR” file extension you wish to open.
    2. Right-mouse-click on the file and then select “Open With”.
    3. Now, select “Autodesk 3ds Max” software from the options.

    The file will now open with the software.

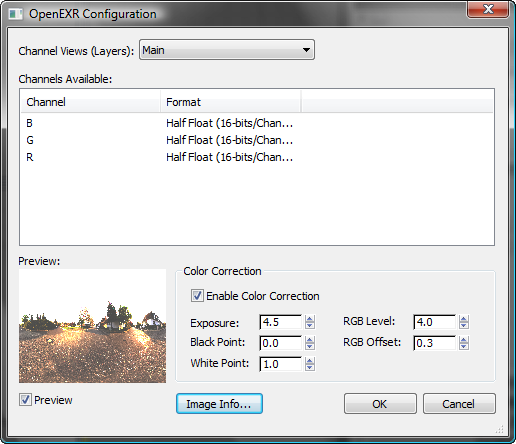
    Initially, you will see a popup as shown below that lets you select parameters related to the EXR files such as the layers to use, color correction, and the ability to preview the image.

    open-EXR-files-on-Windows-10-using-Autodesk3dsMax

    The software also lets you write EXR files, so you can create EXR files of your own or edit existing ones as well.

    Final Words

    Got any queries?

    Don’t hesitate to ask us by leaving a comment below.
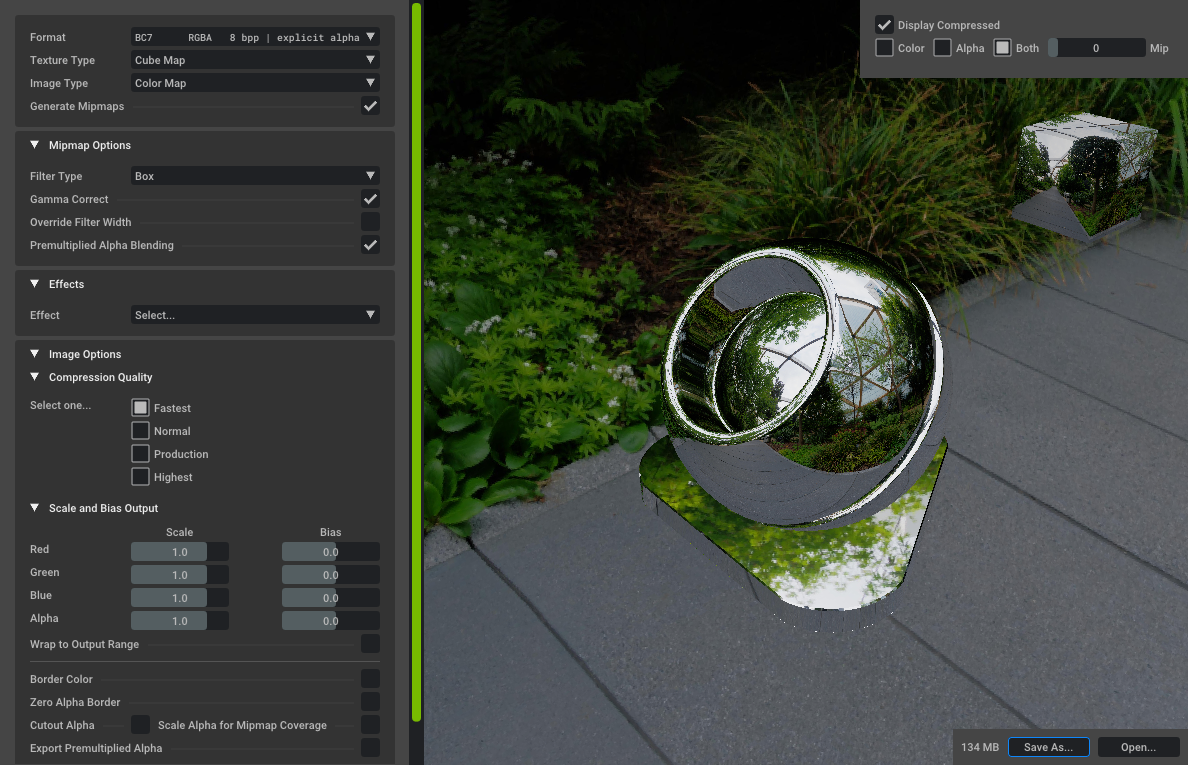
  • How to open EMZ files in Windows 10

    How to open EMZ files in Windows 10

    For those among you searching for the easiest ways on how to open EMZ files in Windows, today we bring a detailed article on the same.

    The EMZ file format is a commonly used format out there, especially among graphic artists, designers, etc.

    Therefore, it is essential that people who work with the EMZ file format have software installed on their Windows machine that can open the file type.

    Also Read —> How to Open TGA Files on Windows 10?

    What is the EMZ File Format?

    Before we take you through the various methods to open the EMZ file format, let us explain to you what the file format is actually used for.

    As we mentioned in the introduction, the EMZ file format is basically used by designers, graphic artists, and similar people who work with digital art content.

    Speaking in detail, the EMZ file format consists of basically an EMF file (Enhanced Metafile) compressed using the GZIP algorithm, thus converting the EMF file to an EMZ file.

    Files with EMZ extension usually consist of EMF data that is compressed, thus allowing to save space which makes it easier to share the files across devices and use them in other projects.

    How to Open EMZ Files in Windows 10?

    As we have explained to you what an EMZ file is, it is now time to tell you how to open EMZ files in Windows 10.

    Below are the various methods that you can follow to open files with the EMZ extension on desktops and laptops powered by the Windows 10 operating system.

    Method 1: Open EMZ Files using Microsoft Word

    Microsoft Word is one of the best software to open EMZ files.

    Most people will already have the Microsoft Word software installed on their computers, thus making it an easy option to open EMZ files.

    Below are the steps to follow to open EMZ files using Microsoft Word on Windows 10.

    1. Launch the Microsoft Word software on your computer.
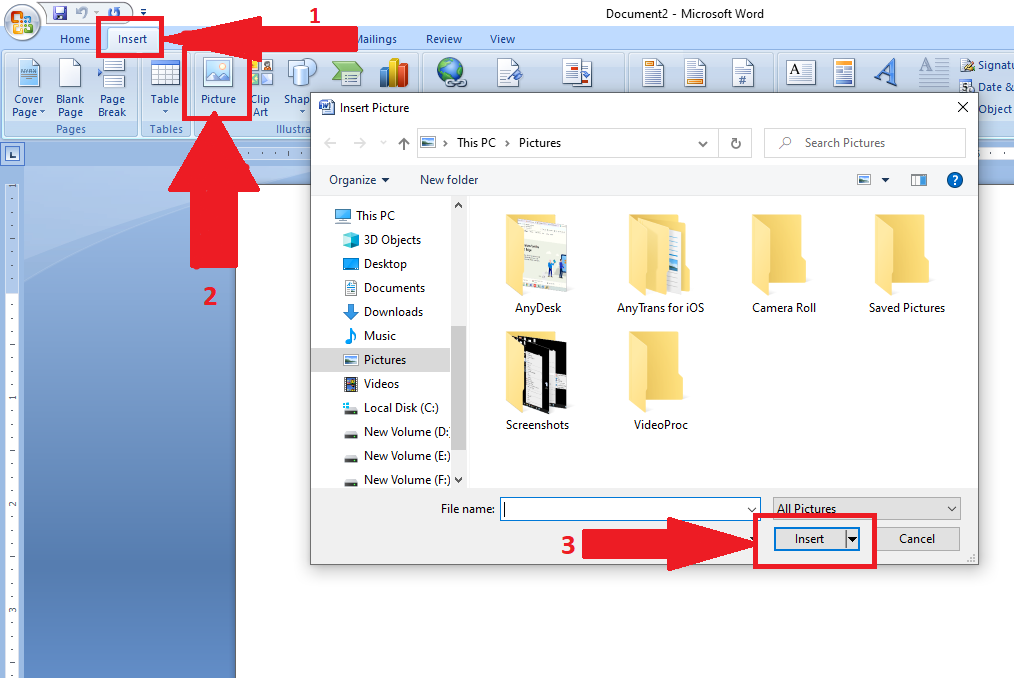
    2. On the top menu bar, click on the “Insert” tab.
    3. Now, click on the “Picture” option.
    4. Select the EMZ file that you wish to open and then click on “Insert”.how-to-open-EMZ-files-in-Windows-10
    5. Microsoft Word will now open the selected EMF file.

    You can also open EMZ files on other Microsoft software such as Microsoft PowerPoint and Microsoft Visio using the above steps.

    Method 2: Open EMF Files using Adobe Illustrator

    Adobe Illustrator is quite a popular software used by graphic designers and digital artists.

    You can also use the Adobe Illustrator software to open EMF files as well.

    Below is how you can open EMF files on systems powered by Windows 10.

    1. Launch the Adobe Illustrator software on your computer. If the software is not already on your computer, download it from here.
    2. Navigate to the EMF file that you wish to open.
    3. Right-click on the file and click on the “Open With” option.
    4. Select the Adobe Illustrator software from the list.

    Now, the Adobe Illustrator software will open the EMF file you selected.

    Final Words

    We have tried to provide you with the easiest ways to open EMF files in the Windows 10 operating system.

    In case you have any doubts, feel free to ask us by leaving a comment below.
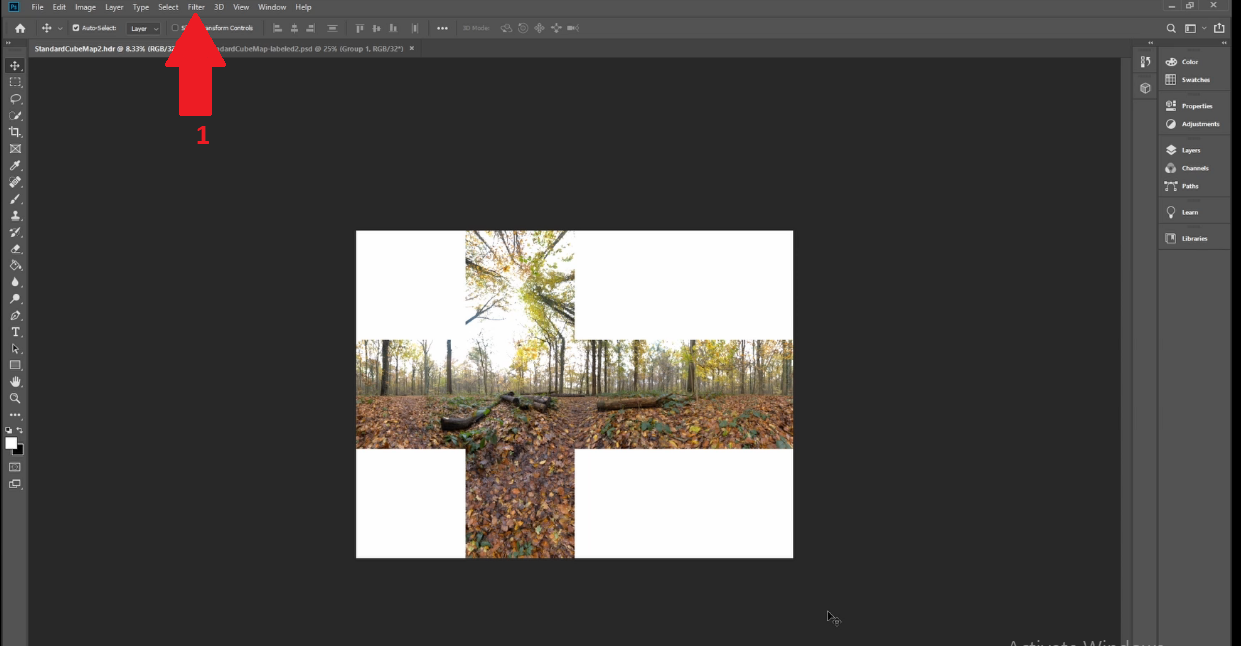
  • How to open TGA files on Windows 10

    How to open TGA files on Windows 10

    If you’re new to the TGA format and want to know about how to open TGA files on Windows 10, then today we are here with a detailed article on the same.

    Also Read —> How to Open PES Files on Windows 10

    What is the TGA File Format?

    The TGA file extension stands for the “TrueVision Graphics Adapter” file and is a raster graphics format created by the company called TrueVision Inc (now belonging to Avid Technology).

    For the unaware, raster graphics refer to the technique that represents a 2D image as a square pixel grid or rectangular matrix, thus making it possible to view the image on a display such as a computer monitor.

    Files with the TGA file format are commonly used by people creating digital art as well as for texture details for 3-dimensional video games.

    The TGA file format is also known as TrueVision TGA, TARGA, Targa Graphic File, or as TrueVision Graphics Adapter image file.

    How to Open TGA Files on Windows 10?

    Now that we explained to you about TGA files, let us also take you through the different methods that you can follow to open TGA files on computers and laptops.

    Method 1: Use Adobe Photoshop to Open TGA Files on Windows 10

    Adobe Photoshop is one of the most commonly used software to open TGA files.

    Below is how you can open any file with TGA file format using Adobe Photoshop:

    1. Make sure that your computer already has the Adobe Photoshop software installed. Else, download Photoshop officially from here.
    2. Launch Adobe Photoshop on your computer.
    3. From the top menu bar, click on “File”.

      open-tga-files-on-windows-10-using-photoshop

    4. Now, from the drop-down that appears, click on “Open”.
    5. In the new window that pops up, select the “.TGA” file that you wish to open.

    And that’s all. Now the Adobe Photoshop window will show the TGA file.

    Method 2: Open TGA Files using TGA Viewer

    If you do not wish to edit the TGA file and all you need to do is view it, then you can use the TGA Viewer software instead of Adobe Photoshop.

    Below is how you can view TGA files using the TGA Viewer software for Windows for free.

    1. First of all, download and install the TGA Viewer software on your Windows computer from here.
    2. Once the installation is completed, launch the software on your computer.
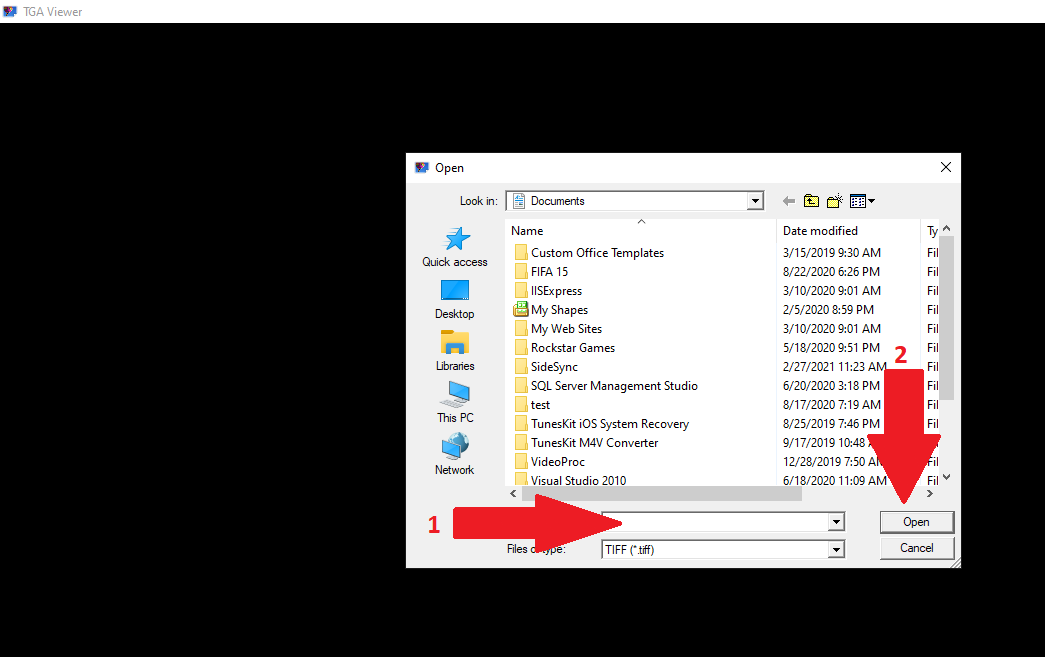
    3. When the software launches, it will instantly ask you to pick the file to open.
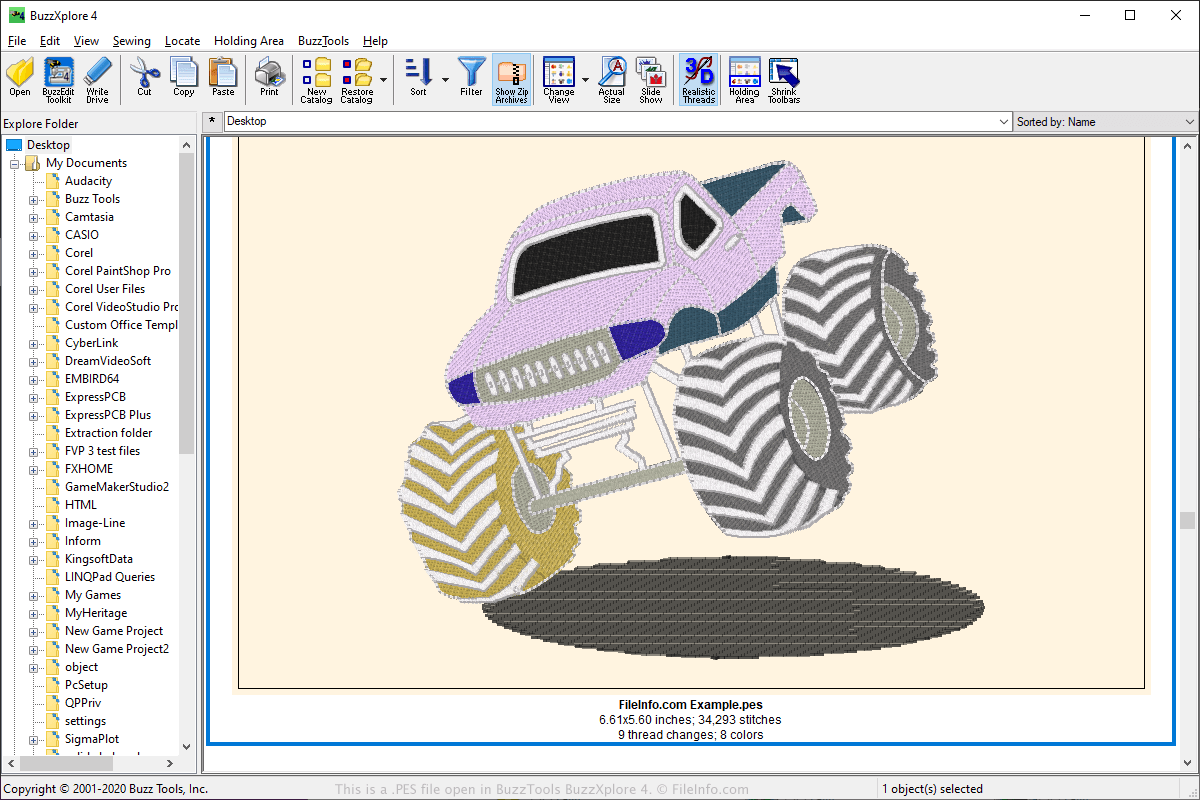
    4. Select the TGA file and click on the “Open” button as shown in the screenshot below.

      open-tga-files-on-windows-10-using-TGAViewer

    5. Now, the software will open the TGA file that you selected above.

    As we mentioned, you can only view TGA files using this software. If you wish to edit the TGA files, you have to choose alternatives such as Adobe Photoshop.

    Final Words

    We hope you found this guide on how to open TGA files on Windows 10 easy to understand.

    If you wish to ask any questions about TGA files, feel free to get in touch with us by leaving a comment below.

  • How to open PES files on Windows 10

    How to open PES files on Windows 10

    If you are using an automated embroidery machine, then you must be using a file with the “.PES” file extension. For those among you looking to know more about PES files, including what is PES files and how to open PES files on Windows 10, today we bring a detailed article on the same.

    Also Read –> How to Open TIF (TIFF) File on Windows 10?

    What is PES File Format?

    Before we take you through the various easy methods to open PES files on Windows 10 systems, let us also tell you what the PES file format exactly means.

    PES stands for “Physics Editor Sheet” and is a file format that is used by the automated embroidery machines out there. The PES files consist of instructions such as “Start”, “Jump”, “Trim”, and “Stop”, which help the embroidery machine on how to proceed with the work.

    PES files also contain additional information that helps with the embroidery work such as the details about the color, length of stitching, density of stitching, etc.

    How to Open PES Files on Windows 10?

    Below are the various ways to follow to open PES files on any desktop/laptop running the Windows 10 operating system.

    how-to-open-PES-files-on-Windows-10

    Method 1: Use the Embird Machine Embroidery Software

    The Embird machine embroidery software is a popular choice to open PES files on Windows 10 systems.

    Apart from allowing users to open PES files easily, the Embird software also supports other popular embroidery file formats such as 9MM Pfaff, BRO Bits & Volts, CSD POEM, Singer EU, DST Tajima, etc.

    If you wish to download the Embird machine embroidery software for Windows, use the below links:

    The Embird Basic software is priced at $149 and apart from letting you open PES files, it offers the below functionalities as well:

    1. Edit, print, view, split and convert existing designs.
    2. Auto-tracing.
    3. Freehand digitizing.
    4. Create new designs.
    5. Create new cross-stitch designs.

    and more.

    Method 2: Use PREMIER+ 2 Software

    PREMIER+ 2 is another software that lets you design embroidery designs.

    The software also lets you open PES files, as it is one of the most common file formats used for embroidery designs.

    There are various versions of the PREMIER+ 2 software available, and you can select the one perfect for you depending on the use cases.

    Below are the different versions of PREMIER+ 2 software available currently:

    1. PREMIER+ 2 Software.
    2. The PREMIER+ 2 ULTRA.
    3. PREMIER+ 2 EXTRA.
    4. The PREMIER+ 2 EMBROIDERY.
    5. PREMIER+ 2 ECQ.

    One advantage of the PREMIER+ 2 software is that it is available for both Windows and macOS operating systems.

    You can find out more about the PREMIER+ 2 software by visiting their official site.

    Method 3: S & S Computing Embroidery Software

    Just like the other two methods mentioned in this article to open PES embroidery files on Windows 10, the S & S Computing embroidery software is also a very popular option for the task.

    This software will run smoothly on any Windows systems running on Windows XP Service Pack 3 and above. This means that the S & S Computing embroidery software will also work on systems running the Windows 10 operating system.

    You can find out more about the S & S Computing Embroidery Software by visiting their official website.

    Final Words

    We have tried to include some of the easiest methods and reliable tools to open PES files on Windows 10.

    If you need more help in opening PES files on Windows machines, do leave a comment below with your queries and we will help you out for sure.

  • How to open .TIF files on Windows 10

    How to open .TIF files on Windows 10

    Are you looking for a detailed guide on how to open .TIF files on Windows 10?

    Then today we are here with a well-explained guide on the same.

    Before we take you through the steps to open .TIF format files on Windows 10 systems, let us explain to you what .TIF format actually means.

    Also Read –> How to Open AVI Files on Windows 10

    What is .TIF File Format?

    The TIF image file format stands for “Tagged Image Format”, and is also known as TIFF (Tagged Image File Format).

    The TIF file format was initially created by the Aldus Corporation for image files that contain high-quality graphic images. The rights to the TIF file format were later acquired by Adobe.

    What makes the TIF format appealing is its ability to store both lossless picture data as well as lossy jpeg compression. The format is also capable of storing vector-based graphics data.

    TIF file format is mainly used to edit the images using the photo editing software tools. Thus, people such as photographers and graphic artists prefer to use the TIF (TIFF) format to edit their images.

    How to Open TIF Files on Windows 10?

    Now that we have explained to you about the TIF (TIFF) file format, let us now take you through the different methods to open TIF files on Windows 10 computer/laptop.

    Method 1: Open TIF File on any Windows 10 System using Windows Photo Viewer

    Windows Photo Viewer is the default application installed on all Windows 10 systems to open image files. Below are the steps to follow to open TIF files on any Windows 10 system using the Windows Photo Viewer tool.

    open-TIF-file-on-Windows-10

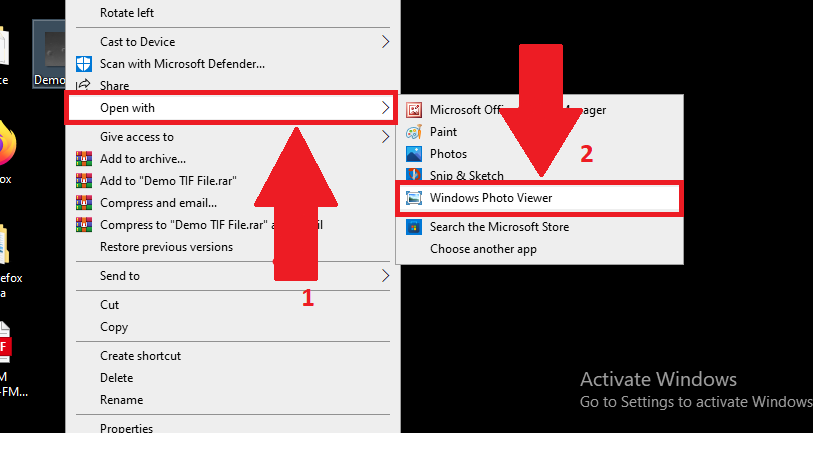
    1. Right-mouse-click on the TIF file that you wish to open with the Windows Photo Viewer tool.
    2. From the drop-down menu that appears, click on “Open With”.
    3. In the extended menu that appears, click on “Windows Photo Viewer”.

    If the Windows Photo Viewer option is not present as shown in the screenshot above, then click on the “Choose another app” option and select the Windows Photo Viewer option from the list of installed software on your computer.

    The only downside with opening TIF files using Windows Photo Viewer is that you won’t be able to edit the image file. If you wish to edit the TIF image file, then you can follow the same steps as above and then choose to open the image file using other pre-installed Windows software such as “Paint” or “Photos”.

    Method 2: Open TIF File on Windows 10 using Adobe Photoshop

    If you wish to edit TIF files, then Adobe Photoshop is a great tool to do so.

    Below are the steps to follow if you wish to open TIF files using Adobe Photoshop on Windows 10.

    1. Launch the Adobe Photoshop software on your computer.
    2. Click on the “File” option on the top taskbar of the Photoshop software window.
    3. From the drop-down menu that appears, click on “Open”.
    4. Now, select the TIF file that you wish to open using Photoshop software.
    5. From the pop-up menu that appears at the bottom of the Open menu, click on “Camera Raw”, and finally click on “Open”.

    The selected TIF file will now open on Adobe Photoshop. You can edit the image and overwrite the existing file or save it as a new one.

    Final Words

    We hope you found this article on how to open TIF on Windows 10 as informative and helpful.

    In case you have any doubts about the steps mentioned above, feel free to ask us by leaving a comment below.
  • How to Open AVI files on Windows 10 Using Inbuilt Media Player?

    How to Open AVI files on Windows 10 Using Inbuilt Media Player?

    For anyone seeking a detailed guide on how to open AVI files on Windows 10, then you’re at the right place. After our recent guide on how to open RTF files on Windows 10, lots of people asked about the easiest way to open AVI files on Windows 10. If you are among them, then below we are here with a detailed guide on the same.

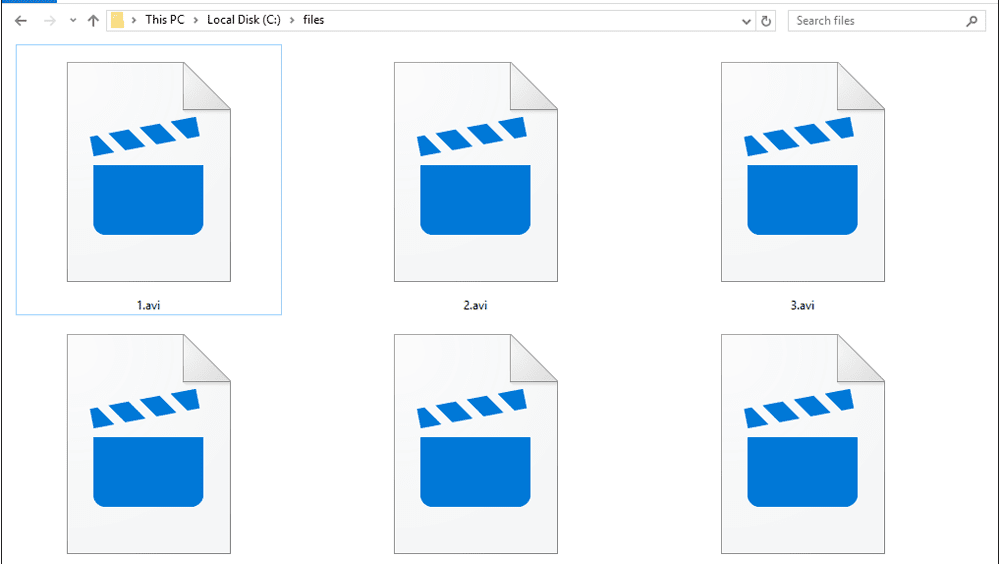
    AVI is a file format developed by Microsoft and used primarily on the Windows operating system. The AVI file format has existed for over 2 decades and is a very popular video file format even in 2021.

    What is AVI File Format?

    As we described above, the AVI file format is used as an extension for video files.

    But do you know what AVI stands for?

    AVI stands for Audio Video Interleave.

    Commonly, the AVI file format is used on video files that also have audio content in them.

    How to Open AVI Files on Windows 10?

    play-avi-files-on-windows-10

    Now that you know about the AVI file format and its use, let us take you through the guide on how to open AVI files on Windows 10.

    Actually, there are various ways to open files with the “.AVI” file extension on the Windows 10 operating system. However, the easiest way to do so is using the Windows Media Player software.

    How to Install Windows Media Player on Windows 10?

    Windows Media Player is an audio & video playback software developed by Microsoft and is installed by default on the Windows 10 operating system.

    As Windows Media Player is developed by Microsoft, it also supports all the file formats that are also developed by Microsoft and also the ones that are supported on the Windows operating system.

    In case Windows Media Player is not already installed on your Windows 10 computer, follow the below steps to do the same.

    1. Launch the Settings window on your computer.
    2. Within the Settings window, click on “Apps”.
    3. Now, click on “Apps & Features”.
    4. In the next screen, click on “Optional features”.
    5. Now, click on “Add a feature” and in the next window, search for “Windows Media Player”.
    6. Select the “Windows Media Player” option from the results, and click on “Install”.

    Wait for the installation to complete. Once done, the Windows Media Player will be available on your Windows 10 computer.

    Steps to Open AVI Files on Windows 10 using Windows Media Player:

    If you have the Windows Media Player installed on your computer running Windows 10, all you have to do is open the file using the Windows Media Player to play AVI files.

    In case the AVI file(s) are opening via other video playback software tools installed on your PC, then follow the simple steps below to open the AVI file(s) using Windows Media Player.

    1. Navigate to the AVI file that you wish to launch using the Windows Media Player.
    2. Using your mouse, right-click on the file.
    3. From the drop-down menu that appears, click on “Open With”.
    4. In the side drop-down menu that appears, select “Windows Media Player”.

    And that is it. Now the AVI file will be launched using the Windows Media Player software.

    What Are the Alternatives to Windows Media Player to Open AVI Files on Windows 10?

    Not everyone is a fan of the Windows Media Player software.

    Moreover, if you’re running any operating system other than Windows, then you cannot use the Windows Media Player either.

    In such cases, you can try alternatives to Windows Media Player such as the VLC Player, JetVideo, KMPlayer, etc.