Using a virtualization tool like VirtualBox made it possible to run Ubuntu and other Linux distributions inside of Windows powered computer. However, with Windows 11 operating system, you can utilize the built-in Windows Subsystem for Linux (abbreviated WSL) to run your preferred Linux distribution without the usage of either virtualization or emulation.
WSL is referred to be a “compatibility layer,” which enables native Linux operation within Windows. WSL is here to assist you whether you have a professional requirement for Linux or simply enjoy the idea of checking out the software made for a different operating system. Although the procedure is quite similar for other Linux distributions as well, we’ll explicitly teach you how to install Ubuntu in Windows 11 in this post. So let’s get into the article to know more without further ado.
1. Verify that your computer is up to date.
It’s important that Windows 11 is installed on your computer in its most recent iteration and that all available updates are installed before you begin. By pressing Windows + I, select Settings from the menu, then click Windows Update, then Check for updates. If Windows asks you to restart, do so after downloading and installing all updates.
Windows features can be turned on or off by selecting Turn Windows features in the search results after clicking the Start button. Scroll down the list of choices and tick the box next to “Virtual Machine Platform. Then click OK and restart your computer if necessary.
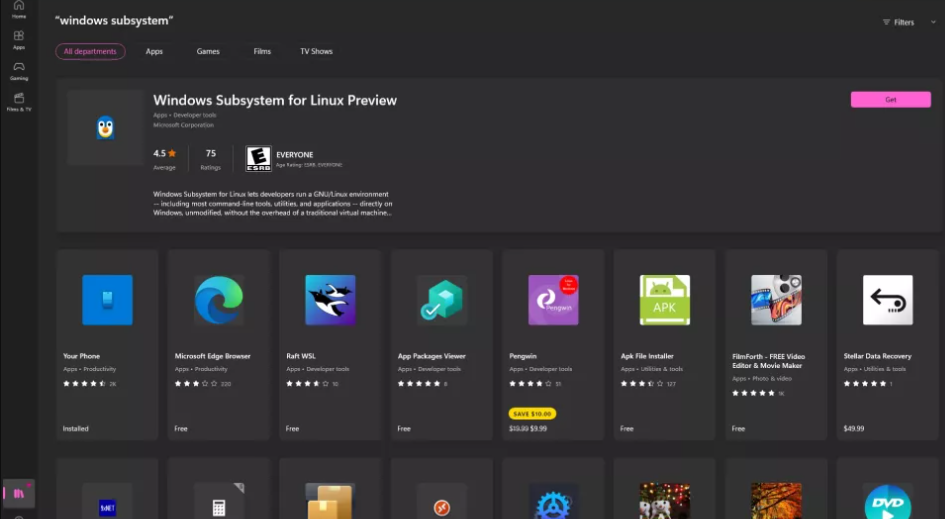
2. In the Store, type “Windows Subsystem”
You must first make sure that the Windows Subsystem for Linux is installed before installing Ubuntu, or any other version of Linux you may be interested in. Launch this software from the Start menu or by clicking the taskbar shortcut to access it from the Microsoft Store.

Type “windows subsystem” into the search bar at the top of the store, then click on “Windows Subsystem for Linux Preview.” After clicking the Get button and letting the programme download, click the Open button. In the future, you can also use the Start menu to start the software.
3. Techniques of Command Prompt
When Windows Subsystem for Linux Preview launches, you’ll note that it looks quite similar to the Command line if you’re familiar with it. The next step is to install a Linux distribution, as the displayed message instructs you to do. There are a few different ways to tackle this.
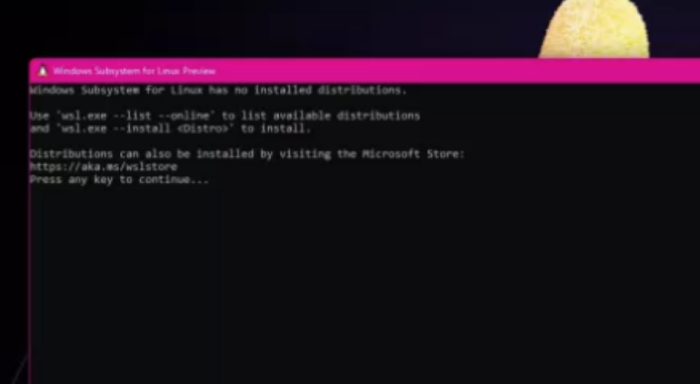
Using the Command Prompt to access a distro is the first choice, and you can check to see what’s available by clicking Start, typing cmd, and then press the enter button to launch the Command Prompt.
4. Input of commands
By entering wsl.exe —list —online and clicking Enter, you can quickly examine which distros are accessible to install in this way in the Command Prompt window that appears. Along with the name of Ubuntu, you’ll also see the names of some well-known Linux distributions like Debian and openSUSE.
There are two columns of text, as you’ll see. The entire names of the distros are listed under Friendly Name, and the command to install each one is listed under Name.
5. Installation of Linux distro
You could install Kali Linux by running wsl.exe -install kali-linux and press Enter, or you could install openSUSE Leap 42 by typing wsl.exe —install openSUSE-42 and press Enter.
A progress bar will be visible while the download is ongoing if you choose to install a distro in this manner. The installation will start as soon as this is done. Just adhere to the presented instructions as the installation procedure differs slightly between distro.
6. Searching Ubuntu in Microsoft Store
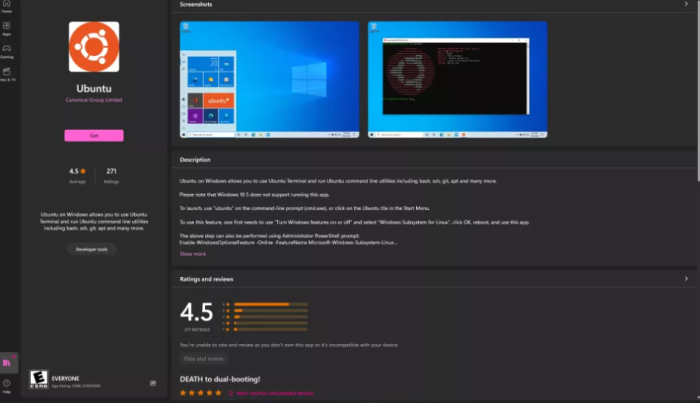
Installing Linux versions via the Microsoft Store is a simpler choice, especially for beginners. Launch the Microsoft Store app, perform a search for Ubuntu, and then click the Get button, exactly as you did when installing Windows Subsystem for Linux. Ubuntu is one of the distributions you may install in this manner.
Ubuntu is less than 500MB in size, so the download won’t take very long. Once it’s finished, a shortcut to Ubuntu will be added to the Start menu so you can instantly run it like any other app.
7. Installing Ubuntu using the Terminal
You will be directed through the process of setting up the OS when you first load Ubuntu, which is listed as Ubuntu on Windows in the Start menu. The procedure begins with selecting a username and configuring a password. Even if you just installed Ubuntu, it’s a good idea to check for updates.
Enter sudo apt update at the terminal to update the package. Start by typing sudo apt full-upgrade and clicking Enter. Then, proceed by pressing Y to continue and any other on-screen instructions.
8. Setting up a graphical user interface
Although the terminal offers a wealth of functionality, the majority of users will be more interested in using WSL to run graphical Linux applications. This is a fantastic place to start because the GIMP image editor is among the most well-known Linux applications available.
Enter sudo apt install gimp -y in the terminal, then wait for the programme to download and install. You can start the app when the installation is finished by simply entering gimp and pressing Enter. You’ll see that GIMP will begin and be accessible in the taskbar alongside other currently running programmes.
9. Installing Linux applications
Additionally, you can install the X11 programmes collection, which includes a number of features like a clock, calculator, and clipboard. Press Enter after inputting sudo apt install x11-apps -y. Once it has been installed, you can use the shortcut keys xcalc, xclock, etc. to start the calculator, clock, and other programmes.
You will be taken back to the console if you put a space and & following the command to open an app (for example, xcalc &). Other helpful applications to install are the Gedit text editor, the VLC media player, and the Nautilus file manager (sudo apt install nautilus -y will install and run nautilus) (sudo apt install gedit -y to install and gedit to run).
10. Setting up a desktop environment
There is no possibility to quickly install a desktop environment with Ubuntu. The same apps and more can be installed along with the option to run Kali itself with a separate desktop utilizing Win-KeX if you decide to install Kali Linux instead.
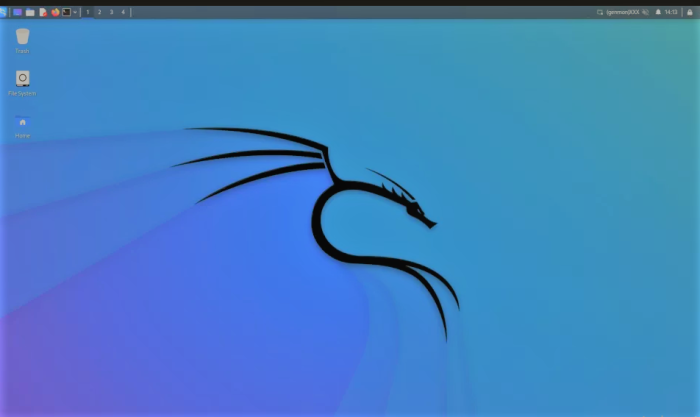
Launch Kali, enter sudo apt update and press Enter, then press Enter again to enter sudo apt install -y kali-win-kex. By using the command kex —win -s and pressing Enter, the distribution can then be executed in a window with sound support. This demonstrates the elegance of Linux and the adaptability of WSL—.
Leave a Reply