The Windows 11 is the latest version of the operating system by Microsoft and the developers of the company have made massive changes and improvements in this version of the operating system. We can able to see the changes and improvements in every section of the operating system and the company have also improved File Explorer massively and the same now enables you to access various sections comfortably.
If you are new to this, then the File Explorer is a window in Windows 11 and the same enables you to browse and manage the files and folders on your computer and in your OneDrive account. When you open a library folder in Windows 11, for example, the contents are displayed in a File Explorer window.
The latest Windows 11 operating system has significantly enhanced the app, most recently providing tabs to prevent you from having numerous windows open at once. It enables you to access and manage files and folders while navigating through the content which you have saved on your hard drive. However, there is much room for modification, and there is more to it than this. We’ll cover all you need to know in this tutorial.
Using File Explorer in Windows 11
1. Click the “File Explorer” app icon on the Windows taskbar to launch File Explorer in Windows 11 operating system. You can also open the same by using the keyboard shortcut – Windows button + E.
2. You can also access the same by clicking on the Start menu in the Windows taskbar.
3. Then, if the “File Explorer” icon displays in the “Pinned” part of the Start menu, click it.
4. If it’s not there, click the “All applications” button in the upper-right corner of the “Pinned” area, scroll down to the “F” apps in the alphabetical listing of all the applications, and then click on the “File Explorer” app icon.
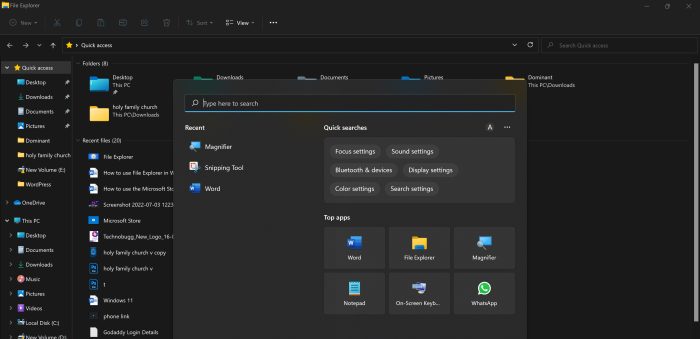
5. File Explorer in Windows 11 includes buttons within a toolbar at the top of the window known as the Ribbon. These buttons allow you to perform a variety of actions and activities on the files and folders that you pick in the main File Explorer window.
6. The File Explorer window’s Navigation pane is used to pick folders and drives, as well as browse to computers, folders, and documents on your network.
7. Click the arrows to the left of the names of the sections and folders visible in the Navigation pane to expand and collapse it.
8. To travel through the various windows in File Explorer, use the Back, Forward, and Up buttons.
9. To return to the previous folder, click the Back button.
10. After using the Back button, click the Forward button to move forward again.
11. Click the Up button to move up a level in the File Explorer window’s in hierarchy.
12. The Ribbon, or toolbar at the top of the File Explorer window, contains basic file and folder management commands. When you choose an item from the Files and Folders list in File Explorer, the available buttons on the Ribbon for that item become active.
13. The Address Bar displays the location of the currently chosen folder on your computer or network.
14. Click into the Address Bar, input a folder location, and then press the “Enter” key on your computer to show a folder in File Explorer by typing.
15. The Files and Folders list displays the contents of the currently selected Address Bar folder location.
16. When you select the “Details” view of a folder location in the Address Bar, the details of its files and folders appear in columns in the main File Explorer window. Each column has a column name that indicates the type of information that appears in that column.
17. Click into the Search field in File Explorer and input the name of the file or folder or the first few letters in the name of the file or folder to search within the currently selected folder location for the text that you enter. Searching begins as soon as you begin entering into the Search Box.
Lot More Interesting Features
1. A Folder expansion?
Although the left and right panels have slightly distinct functions, both let you browse your files.
You can expand your C: drive in the navigation pane by double-clicking it, hovering over it, or clicking the arrow just as you did to view this PC’s contents.
You can drill down to view sub-folders when your C: drive is selected and you can see its contents in the right-hand pane, which includes folders like Windows, Users, and Program Files.
2. Modifying the views
While browsing, you may navigate back and forth using the back and forward arrows in the navigation bar exactly like you would in a web browser. In addition, pressing the up button will take you to the parent folder.
The Sort button is the first of many options for modifying how files and folders are shown. You can decide whether to use ascending or descending sorting as well as the criteria that should be used to organise files and folders, such as name, size, creation date, and so on.
To further modify things, you can also use the Group by submenu.
3. Altering the View options
The View menu offers additional settings, including the ability to select different icon sizes and decide whether or not to display item-specific details like file size next to each item.
You can turn on and off Compact view using the View menu. The Preview pane and the equally helpful Details pane are two optional components that you can choose to display or remove using the Show submenu.
It’s also important to draw attention to the two tiny buttons on the far right of the File Explorer status bar, which let you switch between the Detail and Large icon views rapidly.
4. Usage of Context menu
When you right-click a file or folder, a context menu will appear with these similar toolbar options in a row above other options.
The rest of the context menu depends on whether you right-clicked on a file or a folder. In the case of files, you will notice an Open option that will allow you to open the document in the associated app’s default. You can also select another programme from the Open with submenu. Both context menus have options like Properties, Compress to Zip file, and Copy as path.
5. Using tabs
The developers also introducing a new capability in the File Explorer and the same is the tabs, much like those in a web browser.
To open a new tab, press CTRL + T or choose Open in New Tab from the context menu when you right-click. If you need to keep a folder open while searching your cloud storage for a file to add to that folder, this feature can be quite helpful.
That’s it! This is how you can able to use File Explorer on Windows 11 powered computer. If you find any doubts then do let us know in the comments section below and we will be happy to help you.
Leave a Reply