Are you looking to edit the Win X menu in Windows 11 (Power User Menu)?
The “Windows” key + “X” key shortcut on the keyboard gives you access to a set of very useful options and features within the operating system.
As a power Windows user, having access to commonly used features, settings, and applications without really searching for them is a blessing.
So, if you’re seeking to improve the efficiency of the Win X menu by customizing the options available in it, then today we are here with a guide on the same.
Also Read -> How to Reset Windows 11 Without Losing Files?
What is the Win X Power User Menu in Windows 11?
As we mentioned above, the Win X menu is a series of options, apps, and features that you get access to, by clicking on the “Windows” key + “X” key on your keyboard.
Some of the available options include “Apps and Features”, “Power Options”, ”Disk Management”, “Task Manager”, “Settings”, etc.
How to Edit the WinX Menu in Windows 11 (Power User Menu)?
Microsoft Windows 11 doesn’t have an option to edit the WinX Power User menu by default.
However, with the help of a third-party free software tool called the “Win+X Menu Editor” by WinAero, we can do the same.
Below is how you can use WinAero Win+X Menu Editor software to edit the Power User menu options in Windows 11.
- Visit the official Win+X Menu Editor page here and download the software on your PC.
- Once the download finishes, you’ll see a ZIP file with the name “WinXMenuEditorRelease”.
- Extract the ZIP file.
- Inside the extracted folder, double-click and launch the “WinXEditor.exe” file.
- Now, you’ll see all the Win+X items that are currently present in your Power User menu.
How to Add a New Win+X Menu Option?
- Launch the Win+X Menu Editor software.
- Select the group to which you like to add a new option.
- Now, click on the “Add a Program” option from the top menu bar.
- Within the drop-down menu that appears, click on the “Add preset” option.
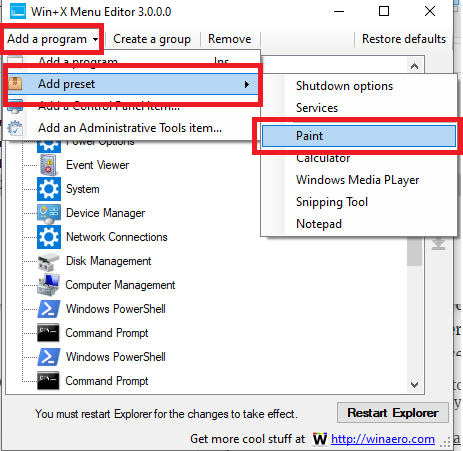
- Now, select the option you wish to add to the Power User menu.
- Click on the “Restart Explorer” option in the bottom right corner of the window to reflect changes.
To add a third-party application to the Win+X menu, follow these steps.
- Launch the software.
- Click on “Add a program” from the menu bar.
- Within the options, click on “Add a program” again.
- Now, navigate to the path where the “.EXE” file of the app exists.
- Click on the “Open” button.
- In the next “Rename” window that appears, give a name that will appear as the app name within the Win + X Power User menu.
- Click on “Ok”.
- Now, click on the “Restart Explorer” button in the bottom right corner.
How to Reorder Power Menu Options with Win+X Menu Editor?
If you wish to reorder of the Power User menu options in Windows 11, follow the below steps.
- Launch the “Win+X Menu Editor” software.
- Select the group with your menu options.
- Click on the app/feature icon within the group that you wish to rearrange.
- Now, click on the arrow keys to the left centre corner of the Win+X Menu Editor window to rearrange the icon within the Power Menu.
Final Words
We hope you found this article informative and helpful.
Got any questions? Feel free to ask us as comments below.