Blog

  • Windows 11 22H2 startup sound quality is getting lowered by Microsoft

    Windows 11 22H2 startup sound quality is getting lowered by Microsoft

    Microsoft is nearing the completion of the first major update to Windows 11: version 22H2. The update is expected to be released between July and October 2022, and it appears that the operating system’s new features and changes have been finalised. If you don’t want to be a Microsoft beta tester but are interested in what’s new in Windows 11. Windows 11 (version 22H2) is scheduled to be released in late September 2022. It will be the first major update of the new Windows generation, introducing a new set of features and enhancements to improve security, productivity, and the overall user experience.

    Although the release is still many weeks away, the development team has already baked everything that will be included in version 22H2.

    It is believed that the upcoming version of the Windows 11 is coming with lots of improvements and in this article, we will check out the improvements in the next version of the operating system. So without making any further delay let’s get into the article to check out the complete details.

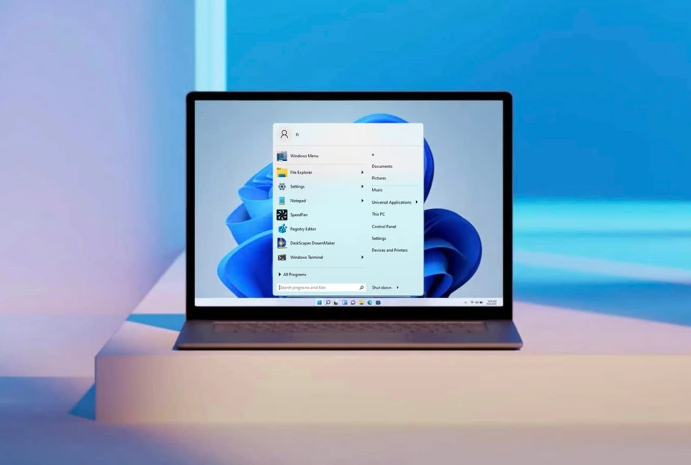
    1. Improvements in the Start Menu

    The “Recommended” section of the Start menu can now be customised with new settings in Windows 11 22H2. You can now choose between “More pins,” “Default,” and “More recommendations” in the Start settings page to display fewer recommended items and more pins, even though it is still not possible to disable or remove the feature.

    1.1 The “More pins” option only displays a single row of items and allows you to display additional pins. The “Default” option displays three rows of recommended items and three rows of pin items, while the “More Recommendations” option displays two rows of pins and more recommended items.
    1.2 Furthermore, this new version adds another entry in the right-click context menu for the “Recommended” and “More” buttons in the Start menu to refresh the items.
    Windows also adds a quick access button to the power menu settings that opens the “Sign-in options” page.
    1.3 Folders are another important feature of the Start menu Now, you can make folders by piling apps on top of one another. More apps can be added to a folder, apps within a folder can be rearranged, and apps can be removed from a folder.

    2. Voice Recognition

    Voice Access is a new feature in Windows 11 22H2 that allows anyone to control their laptop or desktop computer with their voice.

    When using Voice Access, you can speak to open and close apps, navigate the web, narrate emails, and more. Microsoft says that voice access “utilises contemporary, on-device speech recognition to precisely recognise speech and is backed without an internet connection.”

    Windows should be configured with the English-U.S. display languageOtherwise, voice access might not function as intended.

    Voice Access can be found under Settings > Accessibility > Speech. You must download a speech model for the on-device speech recognition before you can enable it for the first time. You can select a microphone and use your voice to control Windows 11 after the package has been downloaded.
    You can enable Voice Access to launch automatically when you sign in again in the Settings app. Voice commands or keyboard shortcuts (Alt + Shift + C and Alt + Shift + B) can also be used to control whether or not voice access is listening.
    “Voice access wake up” and “Unmute” will enable voice access once the feature has been turned on To silence voice access, type “Mute” after “Voice access sleep.” To prevent voice access from listening to you, you can also “Turn off microphone.”In order to learn how to use Voice Access and locate all the commands, the system even offers an interactive guide.

    The Windows 11 interface is very easy to use. You could say “Open,” for example, “Open Edge” or “Open Word,” to start an app. For instance, “Switch to Edge” will direct you to a running application.or the window management commands “Minimize window,” “maximise window,” and “close window.” Or you can “Click” something, like To name a few, “click Start,” “click Cancel,” or a button or link.

    Voice access is also now compatible with the touch keyboard. You can type numbers, punctuation, emojis, and even spell words.

    3. Encounter with startups

    As part of the boot experience, a progressive ring animation will now be displayed instead of an animated circle of dots. (This new animation will be used throughout the OS by Microsoft.)

    Additionally, the progress ring animation for Windows 11 has been updated and now aligns with the new progressive ring animation rather than the previous animated circle of dots animation.

    After the computer restarts automatically to install updates, the Windows startup sound no longer plays. Additionally, Windows 11 ships with the.NET Framework 4.8.2, which adds runtime support for the ARM64 architecture.

    So let’s wait for the upcoming changes on the new Windows 11 operating system and we would like to know your thoughts on the upcoming changes in the comments section below.

  • 6 Ways to Fix No Sound Output Devices Found in Windows 11

    6 Ways to Fix No Sound Output Devices Found in Windows 11

    Microsoft has introduced the latest Windows 11 operating system with the notes of new features and a massive makeover but the same is also featuring some challenging issues and identifying the root cause of all the sound on your Windows 11 computer has suddenly stopped working. Fortunately, there are a few typical causes that you can look into, including incorrect audio output device configuration, missing sound device drivers, and incorrect audio enhancement. So let’s go over how to fix a Windows 11 computer that has no audio.

    Why is my computer suddenly devoid of sound in Windows 11?

    It’s possible that outdated or broken sound drivers are to bear responsibility for the error message “No output devices found in Windows 11.”This error is not an exception; many device problems are caused by their drivers. Reinstalling or updating sound drivers are therefore likely fixes.

    Other potential causes of this error include Windows 11 disabling your PC’s audio device or not adding/installing it as the message instructs. If so, you may need to enable it using the Device Manager or Settings options.

    How can I resolve Windows 11’s issue with No output devices found?

    1. Verify the sound settings in Windows 11

    1.1 Click Start to open that app, then select Settings.
    1.2 Under the System tab, select Sound.
    1.3 Click the Add device button if there isn’t a sound device listed in the Output section. Then, pick a relevant category to which you can add your sound output device.
    1.4 Double-click any of the sound devices listed in the Output section to bring up the options shown below:


    1.5 If your PC’s output audio is set to Don’t Allow, select Allow. Check that all of your computer’s output sound devices are permitted. This is how you fix it. Windows 11 found no output devices.

    Check the Device Manager to see if sound devices are enabled

    2.1 To open the Device Manager functionality, right-click the Start menu button and select the Device Manager option.
    2.2 Then, in Device Manager, double-click the Sound, video, and game controllers category.


    2.3 If any of the audio devices listed there are disabled, right-click them and select the Enable options.
    2.4 To broaden the Audio inputs and outputs category, double-click it.
    2.5 Then, if any of the listed sound output devices are disabled, right-click them and select their Enable options. The error “No output devices found in Windows 11” should be fixed.

    Run the Audio Playing Troubleshooter

    3.1 Press the Windows + I keyboard shortcut to open Settings.
    3.2 On the System tab of Settings, select Troubleshoot.


    3.3 Then click on the Other troubleshooters button.
    3.4 For the Playing Audio troubleshooter, click the Run button.


    3.5 Apply any potential fixes that the troubleshooter recommends after that. The No output devices found in Windows 11 error can be fixed using this method as well.

    Perform a system file check

    4.1 Select the taskbar icon for the magnifying glass.
    4.2 Type cmd into the search box to bring up the Command Prompt.
    4.3 To run as administrator, right-click the Command Prompt search result and choose Run as.
    4.4 Next, enter the following System File Checker command:
    sfc /scannow

    4.5 Start the scan by pressing the Return key.
    4.6 Fix the No output devices found problem after the scan has completed completely.

    5. Sound driver update

    5.1 open Device Manager.
    5.2 Double-click the “Sound, video, and game controllers” category.
    5.3 Then choose Update driver by right-clicking the sound device on your PC, such as High Definition Audio Device.
    5.4 Select the option to automatically search for drivers.
    5.5 If that option does not install a new driver, choose Search for updated drivers on Windows Update.
    5.6 Next, on the Windows Update tab that appears, click the Check for updates button.
    5.7 Select the option to download and install any available updates.
    5.8 Furthermore, select Advanced options, then Optional updates.
    5.9 Check the boxes for optional driver updates.
    5.10 Click the Download and Install button after that.
    Some users prefer to use third-party driver updater software, such as DriverFix, to update their drivers. A third-party driver updater will scan your PC and show you which devices require new drivers. If your sound device is among them, you can use the software to download and install the most recent driver for it.

    6. Install the audio driver once more

    6.1 open the Device Manager window.
    6.2 To view the devices for that category, double-click Sound, video, and game controllers.


    6.3 Afterward, right-click the sound device on your PC and choose Uninstall device.
    6.4 On the confirmation window that appears, check the box that says “Delete the driver software for this device.”
    6.5 Next, select Uninstall.
    6.6 Select Start from the menu.
    6.7 Choose the Power and Restart options from the Start menu.

    What should I do if none of the aforementioned solutions resolve the problem?

    If none of the aforementioned fixes resolved your PC’s No audio output device installed error, there might be a hardware problem. This might be a problem with your computer’s sound card or audio output device.

    Try connecting your PC’s external sound device—such as its speakers—to a different computer if it has one. Test the output sound device on the other PC to see if it functions as it should.

    Additionally, verify the integrity of the cables connecting any external sound output devices to your computer. Ensure that the appropriate ports are fully plugged in.

    In any case, to resolve hardware-related sound issues, the majority of users will likely need to contact repair services. If your PC or its external audio output device needs repairs, think about sending it back to the manufacturer. If the computer or sound device is still covered by its warranty, you might be able to do it without paying anything.

    So this is how you can able to fix the problem on your Windows 11 powered computer and if you find any issues then do let us know in the comments section below and stay tuned with us for more interesting tutorials at your fingertips.

  • Fix DistributedCOM error 10005 on Windows 11

    Fix DistributedCOM error 10005 on Windows 11

    DistributedCOM error 10005 in Windows is a problem that appears on devices running Windows 10 or Windows 11. The issue occurs frequently, and users are bothered by it. When there are problems with Windows Search, the problem appears.

    The error code 10005 indicates that the programme is attempting to access the DCOM server without the necessary permissions. This is a very common problem with Windows devices, and it cannot be resolved with a system upgrade. In some cases, the problems can be resolved by deleting some registry keys and changing settings related to the Windows Search service, which can cause this error code.

    DCOM, or Distributed Component Object Model, is a Microsoft proprietary technology that allows COM software to communicate across a network. To communicate with the Component Object Model (COM) components on other computers, Component Services requires the DCOM wire protocol. Network computers in a Windows-based system are initially configured to enable DCOM.

    What exactly is COM? It’s a sophisticated configuration and troubleshooting tool. Some cyber infections or file and programme corruption can cause problems with the machine. And this guide below, which will assist you in resolving DistributedCOM error 10005 in Windows. This error occurs when there are problems with the Windows Search.

    Follow these steps to resolve DistributedCOM error 10005 on a Windows 11 PC:

    • Start the Windows Search service again.
    • Check the Group Policy settings
    • Check the Registry values

    Read on to discover more about these actions;

    1. Start the Windows Search service again

    The most practical answer to this issue is this. You can resolve this issue by restarting the Windows Search service, regardless of whether you are experiencing it on Windows 11 or Windows 10. You must bear one thing in mind, though, when restarting. Automatic is not an option. The Manual option under Startup type must be selected instead. Otherwise, your computer will continue to produce the same error.
    You must perform the following actions in order to restart the Windows Search service:

    • Use the Taskbar search to look up services.
    • Select the specific search result by clicking it.
    • Locate the Windows Search service.
    • Click the Stop button after double-clicking it.
    • Extend the Startup type drop-down menu.
    • Select Manual.
    • Press the Start button.
    • Press the OK button.

    To apply the change, you must restart your computer. Once completed, the problem won’t recur.

    2. Check the Group Policy settings

    Another setting in the Group Policy called Turn off display of recent search entries in the File Explorer search box may also be to bear responsibility for this error. There’s a chance you might experience the same error if you unintentionally enabled this setting. You must therefore turn it off or set it to the default setting.

    To that end, take the following actions:

    • To access the Run prompt, press Win+R.
    • Click the OK button after entering gpedit.msc.
    • Go to this path by navigating: User Configuration > Administrative Templates > Windows Components > File Explorer
    • Double-click the File Explorer search box setting that says “Turn off display of recent search entries.”
    • Select Not Configured.
    • Press the OK button.
    To make the change effective, you must sign out and re-sign into your user account.

    3. Check the Registry values

    Using Registry Editor, the same Group Policy setting could also be changed. To change this setting back if you used the Registry Editor to make the change, follow these instructions:

    • To access the Run dialogue, press Win+R.
    • Type regedit > click OK > click Yes.
    • Go down this path: HKEY CURRENT USER\Software\Policies\Microsoft\Windows\Explorer
    • Double-click on the REG DWORD value DisableSearchBoxSuggestions.
    • Set the Value data to a value of zero.
    • Select OK.
    • You should restart your computer.

    You can also remove this REG DWORD value. To do so, right-click on it, choose Delete, and then press the Yes button. Finally, you must close all windows and restart your computer to see the change.

    4. How can I resolve the DistributedCOM error 10005?

    You must restart the Windows Search service to resolve the DistributedCOM error 10005 in Windows 11/10 PC. To begin, open your computer’s Services panel. Then, double-click the Windows Search service and select the Stop option. Then, from the drop-down menu, select Manual and press the Start button. Finally, click the OK button.

    5. How do you troubleshoot a DistributedCOM error?

    DistributedCOM or DCOM errors can occur for a variety of reasons. However, if you encounter DCOM error 10005 on a Windows 11/10 computer, the solution is provided above. Simply restarting the Windows Search service from the Services panel will resolve the issue in a matter of moments.

    We believe that this guide will help you to solve the problem and if you find any doubts then do let us know in the comments section below.

  • Diskpart Virtual Disk Service Error, The object is not found

    Diskpart Virtual Disk Service Error, The object is not found

    Virtual Disk Service, according to Microsoft, is a Windows service that responds to end users’, scripts’, and applications’ requests for query and configuration operations. Through the use of the DiskPart command prompt, users are able to manage disc hard drives, volumes, etc.

    While using the DiskPart command to manage your disc partition, such as formatting the disc to FAT32, cleaning the disc, deleting partitions, converting MBR to GPT or vice versa, etc., you may occasionally encounter a DiskPart virtual disc service error.

    In light of this, the solutions to various DiskPart errors may vary. The common Virtual Disk Service errors are listed on this page, along with their fixes.

    1. Reason behind the Virtual Disk Service Error The Object is not Found?

    Some of the causes of the error are listed below:

    • if the disc has a problem and cannot support a partition.
    • because of a virus that is affecting the system.
    • because the virtual machine was acting improperly.
    • since the virtual hard disc is fatal.
    • if you attempt to alter the OEM Recovery Partition.
    • Deleted important files accidentally due to human error.
    The disc partition platform may exist for a variety of reasons. However, the virtual disc service error always appears to be the same.

    2. Diskpart Virtual Disk Service Error, The object is not found

    When attempting to create a partition using CMD, if you encounter the Diskpart Virtual Disk Service Error, The object is not found, the following advice might be helpful:

    • Start over by restarting your device.
    • Use the Rescan Command to Refresh the Object
    • Use the free version of AOMEI Partition Assistant Standard
    • Use the free software DiskGenius.

    2.1 Try again after restarting your device.

    If you receive a Diskpart virtual disc service error message, If the object is not found error occurs, the simplest solution is to restart your computer. It will reload all resources and clear out any temporary errors. After restarting your computer, try running Diskpart to see if the problem persists. If restarting the computer does not resolve the problem, proceed to the next solution.

    2.2 To refresh the object, use the Rescan command.

    If your command prompt encounters an error while partitioning your hard disc, use the Rescan command to refresh the object. Rescan rescans the SCSI bus for disc changes. It also performs the refresh command’s equivalent, updating information on the drive letter, file system, volume, and removable media. When you make disc changes, such as adding or removing a disc, you can use the Rescan. The steps for running the Rescan command are listed below.

    • Enter Command Prompt in the Search field.
    • Open the Command Prompt, type Diskpart, and press the Enter key.
    • Now, type the rescan command and press Enter once more.

    2.3 Use the free AOMEI Partition Assistant Standard software.

    A free hard drive partitioning programme with a focus on managing disc partitions is called AOMEI Partition Assistant Standard. Millions of users worldwide have trusted it because it is powerful and free. You can easily fix the Diskpart the object is not found error with this use, and you can easily create a primary partition and logical drive on that disc. To create a partition on the hard drive, follow the steps listed below.

    • After you’ve launched and installed this free programme on your computer, Make sure it can be detected by connecting it to your computer.
    • Go to the main interface, right-click the area you want to partition, and select Create partition.
    • Now, on the Create Partition page, enter the new partition’s drive letter, location, size, and file system.
    • To set the partition label, partition type, unallocated space before/after, and SSD partition alignment as shown, click Advanced in the lower-left corner of the screen.
    • The process will be finished soon after you click OK.
    You can now use the newly created partition on your hard drive to store data.

    3. How can I turn on the virtual disc services?

    The actions to activate virtual disc services are listed below:

    • Open the Run box by pressing the Window + R keys.
    • To launch the Windows service manager, enter services.msc in the Run box and press Enter.
    • You can access the Virtual Disk service by scrolling down.
    • Double-click the service now to launch it.
    • Select either Automatic or Manual as the Startup type.
    • To save the changes, click OK now.

    4. DiskPart has referenced an out-of-date object; how can this be fixed?

    To fix stuff, An out-of-date object has been referenced by DiskPart. Following that, use the RESCAN command to refresh the object. Run this command by following the steps below:

    • Click the Search icon and enter cmd.
    • Launch the Command Prompt.
    • Enter DiskPart as the search term.
    • Now, type rescan and press Enter once more.

    Following the completion of the rescan command If the problem persists, exit DiskPart, then restart DiskPart or restart the computer.

    We believe that now you can able to fix the issues and understood the thing in a nice manner and if you find any issues then do let us know in the comments section below. If you find this article helpful then don’t forget to share the same with your near and dear ones.

  • How to Ungroup Taskbar Icons in Windows 11

    How to Ungroup Taskbar Icons in Windows 11

    Windows has undergone significant change over time, losing some of its more traditional features in the process. Windows used to give you the option to get the old ungroup icon style, despite the fact that window grouping on the taskbar is a relatively new feature.

    The Windows 11 PCs group not only the interfaces and settings but also the icons. Giving all the controls a single location is undoubtedly a better feature, but some users find it irksome. This change was made for the better. This article is especially for you if you fall into that category because it discusses ExplorerPatcher, a programme that enables you to ungroup Taskbar Icons in Windows 11. In essence, this tool allows you to separate the WiFi, Sound, and Battery icons and access each one’s individual settings.

    This article will guide you how to remove groups of taskbar icons in Windows 11.

    1. How to separate the taskbar icons for WiFi, Sound, and Battery in Windows 11

    A simplistic tool called ExplorerPatcher is accessible for free download on Github. This programme can substantially alter the appearance of your Windows 11 computer. Once the programme is downloaded and installed on your computer, the taskbar will immediately move to the left corner of your screen, just like it did in Windows 10.

    Additionally, you can now access each icon’s settings separately after the icons in your System Tray are automatically ungrouped.

    ExplorerPatcher can help you group or ungroup the other icons on your taskbar in addition to the system tray icons. The option to combine taskbar icons was available in earlier versions of Windows, but Microsoft has since removed it from the taskbar settings.

    2. How to Make Use of ExplorerPatcher

    The ExplorerPatcher is the first application you can use to ungroup the Wi-Fi, Sound, and Battery Charging taskbar icons in Windows 11. This is a freeware application that allows you to restore the previous Windows taskbar that you were used to.

    This is a free app that is very easy to use; with a few clicks, you can access the old taskbar and File Explorer. This is a patch created by the community for those who want to continue using Windows 11, but in the old style and design. One of the reasons is that this old style promotes productivity, making it more appealing to those seeking a productive working environment on their computer.

    The ExplorerPatcher allows you to tailor the classic functionality to your specific preferences and needs. It only downloads and install the files required on your computer. Aside from the taskbar, it has a plethora of other customised options through which you can choose how you want your Windows 11 OS to appear.

    Here’s a tutorial for downloading and installing the ExplorerPatcher, as well as some tips for using it:

    2.1 The first thing you should do is download ExplorerPatcher. Make sure to get the most recent version.

    2.2 Once the ExplorerPatcher installer has been downloaded to your computer, run it to begin the installation process.

    2.3 The User Account Control (UAC) will ask you to confirm that you want to allow this app to make changes to your computer. If you want to proceed, select Yes.

    2.4 The taskbar will automatically switch to the previous appearance, which includes the ungrouped icons, after a brief period of time.

    2.5 The Wi-Fi, Sound, and Battery Charging icons are ungrouped by default, so if that’s all you want to change, the process is finished.

    2.6 If you want to make additional changes to your Windows 11 operating system, right-click on the taskbar and select Properties to access the customization options.

    2.7 All the customization options that the patch enables you to change will be visible to you once you are inside the Taskbar Properties menu. Look through each one and make the desired changes.

    2.8 After finishing that, you must click the Restart File Explorer button in the bottom left corner to make your changes effective.

    2.9 The new changes will be evident when the File Explorer reappears a short while later.

    2.10 The Programs and Features menu is one place to start if you choose to uninstall the ExplorerPatcher because you no longer want to use it. Open the Run dialogue box by pressing Windows key + R, then type “appwiz.cpl” into the search bar, followed by the Enter key, to access it.

    2.11 ExplorerPatcher can be found by browsing the list of apps in the Programs and Features. Click on it with the right mouse button and then select Uninstall.

    2.12 The default Windows 11 design will return once the uninstallation process is finished.

    3. combine the taskbar icon feature

    One feature that was eliminated from Microsoft’s most recent operating system, Windows 11, was the ability to combine the taskbar icons. We could combine the taskbar icons from the Taskbar settings in earlier versions of Windows, but not any longer. Users who previously used Windows 10 and have upgraded to Windows 11 are already adjusting to the new, center-aligned taskbar, making the absence of the “Never Combine” feature all the more annoying.

    Don’t worry, though. That is also a feature of ExplorerPatcher. With this tool, you can easily combine the taskbar icons or never combine them.

    Get the ExplorerPatcher for your computer and install it. When the programme is installed, launch it on your computer and select Combine taskbar icons on the main taskbar from the Taskbar section. Now decide if you want to combine them always, only when the taskbar is full, or never.

    4. Why can’t I see Windows 11’s Never combine taskbar icons setting?

    Microsoft recently updated Windows 11 to remove the option to “never combine taskbar icons.” Your taskbar icons can no longer be mixed and matched. To do that, though, you can use a third-party application. One such tool that can restore this functionality to your Windows 11 computer is ExplorerPatcher.

    5. How do I view seconds in the computer clock?

    You can accomplish that using a programme like ExplorerPatcher. With ExplorerPatcher, you can also see the seconds. By default, Windows displays the time as hours:minutes. Install the programme on your computer, then launch it. Go to the System Tray section and select the “Show seconds in the clock” checkbox.

    So this is how you can able to ungroup taskbar icons in the Windows 11 computer and if you find any doubts then do let us know in the comments section below.

  • How to change Four-finger Tap Gestures in Windows 11

    How to change Four-finger Tap Gestures in Windows 11

    It’s fairly typical for laptop users to choose an external mouse over their device’s touchpad. Aside from familiarity, many people assert that the mouse is more accurate and simpler to use. However, the majority of laptops today have precise trackpads that can support sophisticated touchpad gestures.

    Windows has a good number of potent touchpad gestures, but it is one of the most underutilized tools. While many more users are completely ignorant of the gestures’ existence, some users are aware of them but do not personalize them. By that users can able to carry out various things easily and quickly.

    In this article, we will look at how to change Four-finger Tap Gestures on Windows 11 powered computers. This feature is ideal for anyone who wants to create shortcuts and improve the efficiency of their operating system. The feature can be set up very easily and the same can be done without any third party application. So without making any further delay let’s get into the guide and see how you can set this up for your touchpad.

    Setting up the four-finger tap gestures In Windows 11 powered computers

    The three ways to set up the Four-Finger Tap Gesture in Windows 11 powered computers by following the steps which are listed below.

    • Utilizing Windows Settings
    • Using the Registry Editor
    • Using the Advanced Gestures

    Let’s go over each one individually.

    1. Utilizing Windows Settings

    Let’s begin customizing with a concept you must be familiar with. We’re going to set the gestures and customize Windows Settings. However, Windows 11 and 10 have different procedures. To accomplish the same, take the recommended actions in your Windows 11 PC.

    • Use Win + I to open settings.
    • Click on Bluetooth & devices.
    • Go to Touchpad, then select Four-finger gestures.
    • Choose one of the following strategies.
    i. Nothing
    ii. Open the search
    iii. Notification center, Play/pause
    iv. Middle mouse button
    v. Exit settings

    2. Using the Registry Editor

    Let’s use the Registry Editor to modify the FourFingerTapEnabled registry next. However, you must first make a backup before continuing. If something goes wrong, this is for the time being. You can then restore the backup in that situation. It is crucial to create a backup because of this. Once the backup has been made, launch Registry Editor and navigate to the following location.

    Computer\HKEY_CURRENT_USER\Software\Microsoft\Windows\CurrentVersion\PrecisionTouchPad

    • 00000000 for Nothing
    • 00000001 for Open search
    • 00000002 for Notification center, Play/pause
    • 00000003 for Middle mouse button

    The feature will be activated once you close the Registry Editor after configuring the registry.

    3. Using the Advanced Gestures

    If you thought the first method was jarring and didn’t understand how to configure the Four-finger gesture, don’t worry! You can use a different method in Windows Settings instead of the first one.

    To do the same, follow these steps.

    • Use Win + I to open settings.
    • Click on Bluetooth & devices.
    • Go to Advanced gestures by clicking Touchpad, then.
    • Make the necessary changes from the window by going to Four-finger Swipe Gesture.

    So, you are now aware of every single configuration option for the four-finger swipe gesture.

    4. How can my touchpad shortcuts be changed?

    On your Windows computer, a lot of Touchpad shortcuts can be modified. For Windows 11, you must navigate to Settings > Bluetooth & devices > Touchpad and Settings > Devices > Mouse & touchpad. You can then set up any of the shortcuts from there.

    We believe that now you can able to set up Four-finger Tap Gestures. If you find this helpful then don’t forget to share with your near and dear ones and stay tuned with us for more helpful tutorials.

  • How to Turn On or Off Pinch to Zoom on Touchpad in Windows 11

    How to Turn On or Off Pinch to Zoom on Touchpad in Windows 11

    The touchpad of the laptop now has a new feature called Pinch Zoom with the latest Windows 11 operating system, which enables you to zoom in or out of a picture by moving two fingers in close proximity to or away from one another. Although this is a useful feature for experienced Windows users, if you find a problem within that in which the page zooms in and out whenever you move the mouse over it automatically, you may want to disable this feature.

    Using two fingers, you can pinch your Touchpad to zoom in or out. However, many users find this feature annoying and want to turn it off. However, some users have expressed frustration that the problem is not resolved on their computers. Whatever the situation, you can enable or disable Pinch to Zoom on Touchpad on your Windows computer. In this article, we’ll exemplify the process for you.

    You can enable or disable pinch to zoom on the touchpad. Try any of the following methods to enable or disable Pinch to Zoom on Touchpad:

    • From the Windows Settings menu
    • From the Registry Editor

    Let us go over them in depth.

    1. From the Windows Settings menu

    We’ll start by looking at how you configure the Touchpad Zoom option in Windows Settings. It is obviously the simplest method because Settings is designed to make system configuration easier.

    Try the steps below to enable pinch to zoom.

    For Windows 11

    a) By pressing Win + I, you can access the Settings menu.
    b) From the right panel, select Bluetooth & devices.
    c) Select Touchpad.
    d) Select Scroll & Zoom.
    e) Uncheck the box next to Pinch to Zoom.

    Simply check the box next to Pinch to Zoom to enable it.

    2. From the Registry Editor

    Try turning on Pinch to Zoom in Registry Editor if you want to show off your technical prowess in front of everyone. There are other reasons you might want to use Registry Editor.

    Before changing your right-click option, we advise you to make a backup of your registries.

    Open Registry Editor and go to the location below to accomplish the same:
    Computer\HKEY_CURRENT_USER\Software\Microsoft\Windows\CurrentVersion\PrecisionTouchPad

    Look for ZoomEnabled now. If you can’t find it, right-click an empty space and choose New > DWORD (32-bit) Value from the menu. The newly generated key’s is named as ZoomEnabled.Then, double-click it and change the Value data to 0 (to disable it) orffffffff (to enable it).

    After you’ve made your changes, exit Registry Editor and you’re ready to go.

    3. How do I make Windows 11’s pinch zoom functional?

    On a computer running Windows 11 you can turn on Pinch to Zoom using the Windows Settings or Registry Editor. Both approaches have been discussed above. So read that section if you want to enable pinch to zoom. You’ll be able to use Pinch to Zoom on your Windows 11 computer.

    4. Why does my touchpad zoom rather than scroll?

    When you use two fingers on the touchpad, the zoom feature activates as well as the scroll feature. You can easily zoom instead of scrolling, so. Simply turn off Pinch to Zoom if you don’t want that and don’t need to zoom. Two approaches to accomplishing the same thing were mentioned above. Just a quick tip: hold Ctrl while pressing + to zoom in a browser. This will fulfil your needs.

    5. How can I get my Touchpad zoom fixed?

    In order to save the changes you have made to the settings, try restarting your computer first if your Touchpad still won’t zoom even after you enabled the feature. If restarting doesn’t work, try updating your Touchpad drivers because the problem might just be a glitch. Reinstalling your Touchpad drivers should solve the problem for you if even updating wasn’t successful.

    6. If your computer does not have a precision touchpad?

    To get a Precision touchpad if you don’t already have one, simply follow the instructions. Even so, they won’t provide as many benefits as the built-in one, which includes a customization feature to specify how each gesture should be used. In order to proceed, you must use a tool that the manufacturer has provided, such as the synaptic control panel.

    • You need to go to Settings and select the Control panel.
    • Now you need to continue, select Hardware and Sound.
    • After that, select Click pad settings
    • You can choose whatever you want from there after seeing all the gestures and options that are available.

    That’s it! This is how to turn on or off pinch to zoom in Windows 11. If you find any issues then do let us know in the comments section below and stay tuned with us for more tutorials.

  • Fix High DPC Latency on Windows 11

    Fix High DPC Latency on Windows 11

    Windows 11 is the latest version of the operating system for computers which is running on Windows and the same is coming with lots of exciting features. Microsoft has also updated the user interface with the new Windows 11 operating system as well. Many users are getting confused and facing issues with the new version of the Windows operating system and if you are someone who is looking to get a solution with your system, use Deferred Procedure Call (DPC) to perform high-priority tasks first and low-priority tasks later. However, if it causes a problem or if you experience high DPC latency on your Windows 11 or Windows 10 computer, here’s how to troubleshoot it.

    Device drivers are the root of the problem with high DPC latency. However, once the issue arises, simply updating them might not be sufficient. They must be updated on schedule to avoid such problems.

    To fix the High DPC Latency issue, attempt the following fixes in order:

    1. Turn off D0 Packet Coalescing

    1.1 To launch the Run command, use the keyboard shortcut Windows key + R.

    To open the Network connections window, enter ncpa.cpl in the Run command search box and hit OK.

    1.2 Right-click your network adapter again and select Properties.

    1.3 Choose Configure.

    1.4 Go to the Advanced Tab.

    1.5 Select D0 Packet Coalescing by clicking on it, and then click disabled.

    2. Revise the power plan

    Since the balanced power mode makes the system unsure of which tasks to prioritise and which not to, the power plan may be the primary cause of DPC latency. The high performance plan would expedite all tasks, while the power saver plan would shift attention to high-priority tasks.

    2.1 Open the Run window by pressing Win + R, then enter the command powercfg.cpl. To open the Power options window, press Enter.

    2.2 Plan should be changed to a high performance plan.

    3. The display drivers must be updated

    Although updating the drivers would be more of a preventative measure than a cure, we could still give it a shot and see if the problem is successfully fixed.

    3.1 Use the Windows search box to look up Device Manager.

    3.2 To open device manager, click on “Device Manager” now.

    3.3 Expand the Display Adapters section by double clicking on it.

    3.4 Next, select Update Driver from the context menu of your display driver.

    3.5 Simply then Click on Search automatically for drivers.
    The driver will automatically update.

    4. Update the graphic card drivers and turn off dynamic ticking

    The real cause is thought to be the graphic drivers, as was previously suggested, and DPC latency could be attributed to drivers more than anything else. To achieve the same result, use the following process:

    4.1 Open the Run window by pressing Win + R, then type the command cmd. To launch the Command Prompt, press Enter.

    4.2 Input the command as follows:
    bcdedit /set disabledynamictick yes

    4.3 Wait until the command has been successfully executed after pressing Enter.

    4.4 Close the Command Prompt

    5. Utilize TCP Optimizer

    5.1 Install TCP Optimizer.

    5.2 To open it, right-click and select Run as administrator.

    5.3 Choose “Optimal settings” and then “Apply changes.”

    6. Turn off the Firewall momentarily

    Another likely cause of DPC latency is the firewall. While we cannot eliminate IoT for security reasons, it would be prudent to see if it is interfering in order to identify the root of the problem. Temporarily disable the Firewall and see if that changes anything.

    7. Switch off Internet Protocol 6

    While IPv6 may be necessary in the future, many system functions are currently interfered with by it. It would be a good idea to disable it and switch to IPv4. The steps are as follows:

    7.1 To launch the Run window, press Win + R, then type ncpa.cpl. To display the Network Connections window, press Enter.

    7.2 Select Properties by double-clicking on your network adapter.

    7.3 Uncheck the box next to Internet Protocol version 6 in the following list.

    7.4 To save the settings, click Apply, followed by OK.

    8. Deactivate the Bonjour programme

    It is known that Windows systems can experience problems with the Apple Bonjour application.

    8.1 Open the Run window by pressing Win + R, then type command control panel. To access the Control Panel, hit Enter.

    8.2 From the list of choices, select Open Programs and Features. The list of programmes that were installed would be shown.

    8.3 Right-click to uninstall Bonjour.

    9. Using the registry, disable a specific process

    Use Registry to stop a process by performing the following actions:

    9.1 Press Win+R, type regedit, and then click OK.

    9.2 Follow this path:
    HKEY_LOCAL_MACHINE\SYSTEM\CurrentControlSet\Control\Video\{DEB039CC-B704-4F53-B43E-9DD4432FA2E9}\0000

    9.3 Select New > DWORD (32-bit) Value with the right click on 0000.

    9.4 Give the file the name PerfLevelSrc.

    9.5 You can change the Value data to 3322 by double-clicking it.

    9.6 Make three more REG DWORD values with the names PowerMizerEnable, PowermizerLevel, and PowermizerLevelAC by repeating these steps.

    9.7 To set the Value data to 1, double-click PowermizerLevel and PowermizerLevelAC.

    9.8 Now you need to restart your computer after pressing the OK button and the problem should no longer now.

    10. What are the effects of DPC latency

    DPC latency primarily has an impact on your computer’s audio and graphics. Regarding these two devices, there are various problems. For instance, you might experience a low frame rate, crackling audio, different popups, hang, or lag. Whether you experience high latency on Windows 11 or Windows 10, these issues are common in both.

    That’s it! This is how you can able to solve the problem and if you find any issues then do let us know in the comments section below. If you find this guide helpful then don’t forget to share the same with your near and dear ones.

  • Windows 11 Update/Download Stuck? Try 4 Fixes Here!

    Windows 11 Update/Download Stuck? Try 4 Fixes Here!

    The latest iteration of the Microsoft operating system, Windows 11, is undoubtedly the most technologically advanced. The majority of those still using the previous iteration i.e. Windows 10 operating system consequently wanted an upgrade. But if you are facing the problem which many others have already claimed that the download of Windows 11 has now become stuck.

    The download of the latest Windows 11 operating system could be frozen at any percentage, such as 0%, 99.9%, or even 100%. However, when it’s closer to the last two, users wait hours for it to finish in the hope that it would, but the download doesn’t move forward.

    As a result, we made the decision to dedicate this article to assisting users who are having trouble updating or downloading the latest Windows 11 and are experiencing a stuck download issue.

    1. How long should it take for Windows 11 to update?

    Depending on the computer’s compatibility with Windows 11, update times could range from minutes to hours. In comparison to a slower machine with an HDD and a lot of data, a fast system with a high-speed SSD will install feature upgrades quickly in about 15 minutes. Your data and settings are all transferred to Windows 11, so the upgrades have no impact on them.

    If you are directly upgrading from Windows 10 to Windows 11, the download size is approximately 3.5 GB. You’ll need at least 5.37 GB of space, though, if you want to install Windows 11 using an ISO file.

    In addition, your speed may differ based on your location and the speed of the server to which your PC is connected.
    On the other hand, installation heavily depends on other specifications like CPU and GPU usage and applicability. This could go on for 30 minutes to an hour.

    2. What is the problem with the Windows 11 download?

    There are some background services that must be running before you download and install the most recent OS version.

    You also need to have a functional Internet connection. The majority of the time, when the Windows 11 download is stuck at 99 percent or 100 percent, there is an issue with the Internet. This is due to the fact that the download moves along smoothly up until the connection is lost.

    Additionally, the upgrade process is known to conflict with some peripherals, drivers, and applications. We’ve divided each of these problems into their own sections below, along with the best solutions, so you can end having problems with your Windows 11 download getting stuck.

    3. What can I do if a Windows 11 update is stuck?

    3.1 Confirm the Internet connection

    Problems with the Internet connection are one of the main causes, which frequently go unnoticed. Consider that after starting the Windows 11 update download, the Internet connection is lost.

    While the actual issue with the Internet is with the Internet, it would appear that the Windows 11 download is stuck in this case. Therefore, confirm that the connection is active and functional.

    3.2 Disconnect all unnecessary devices.

    Disconnect the non-critical peripherals if you have multiple ones connected to the computer. Numerous of these are known to conflict with the update and prevent it from being applied.
    Simply take out the printer, speakers, microphones, and similar devices, leaving only the essentials like the keyboard, mouse, and monitor.

    When finished, restart the computer to see if the Windows 11 download stuck issue has been resolved.

    3.3 Launch the troubleshooter for Windows Update.

    a. Launch the Settings app by pressing Windows + I, then select Update & Security.
    b. From the navigation panel on the left, select the Troubleshoot tab.
    c. Select Additional troubleshooters by clicking on it.
    d. Click the Windows Update entry after that.
    e. In order to find and address problems with Windows Update, click the Run the troubleshooter button at the end.
    f. To finish the troubleshooting procedure, select the appropriate response and adhere to the on-screen instructions.
    Microsoft has a number of built-in troubleshooters that can automatically identify and resolve system problems. It is advised that you run a pertinent troubleshooter each time a problem arises. You also have one in this situation; it’s called Windows Update.

    Check to see if the Windows 11 download stuck problem has been resolved after running the troubleshooter.

    4. Retry after pausing the update

    4.1 Launch the Settings app by pressing Windows + I, and then select Update & Security from the menu that appears.

    4.2 Then, select Pause updates for 7 days from the list on the right.

    4.3 When the computer restarts, go back to the Update & Security settings and select Resume updates.

    4.4 After that, click Check for updates to see if the Windows 11 download is moving along and not getting stuck.

    So this is how you can able to fix the problem and get the latest Windows 11 operating system on your PC. If you find this useful then don’t forget to share with your near and dear ones.

  • Windows 11 Installation Assistant

    Windows 11 Installation Assistant

    The Windows 11 Installation Assistant is a useful tool for upgrading your compatible Windows 10 computer to the latest Windows 11 operating system and if you are an hour about the tool then we will showcase how to use this tool to upgrade to Windows 10 in this article. Additionally, you can try the method described in this post to fix Windows 11 Installation Assistant if it keeps closing or stops functioning on your computer.

    Last year Microsoft introduced Windows 11 along with Windows 11, three installation and upgrade tools, including Windows 11 Installation Assistant, Windows 11 Media Creation Tool, and Windows 11 Disk Image (ISO) Download, were made available.
    The Windows 11 Installation Assistant is a tool for installing Windows 11 on the Windows 10 computer you’re currently using. It does not, however, support ARM64-based devices.

    That is, if Windows 11 does not currently appear in Windows Update, using the Windows 11 Installation Assistant is your best option for installing Windows 11.

    How Do I Upgrade to Windows 11 Using the Windows 11 Installation Assistant?

    1. See whether your computer can run Windows 11 Installation Assistant.

    Your device needs to meet the following specifications in order to run Windows 11 Installation Assistant and upgrade your computer to Windows 11:

    1.1 Windows 10 is licenced to you.

    1.2 Your computer is running a version of Windows 10 from 2004 or later.

    1.3 The minimal hardware and operating system requirements for Windows 11 are met by your device.

    1.4 To download Windows 11, you should have 9 GB of free disc space on your device.

    2. Download the Windows 11 Installation Assistant.

    2.1 Visit the Windows 11 software download page.

    2.2 Under the Windows 11 Installation Assistant, select the Download Now button. The download path for this tool will be used.

    3. Start the Windows 11 Installation Assistant to upgrade to Windows 11

    3.1 Launch the Windows 11 Installation Assistant that you downloaded.

    3.2 If the User Account Control interface appears, select Yes.

    3.3 To proceed, click Accept and Install when you see the following interface.

    3.4 The tool starts downloading and installing Windows 11 on your computer. The entire process will take some time. You can use your device normally during the process.

    3.5 You should save your work when you see the interface below. Then press the Restart now button. You must still connect your computer and keep it turned on.

    3.6 Your computer starts updating. It will restart several times. You must be patient until the entire process is completed.

    3.7 Following these steps, Windows 11 will be successfully installed on your computer.

    4. Troubleshoot Windows 11 Installation Assistant Issues

    When upgrading from Windows 10 to Windows 11, the Windows 11 Installation Assistant is used. Windows 11 Installation Assistant will not work or open if you are currently running a Windows 11 Insider preview build in the Dev Channel.
    The specific performance is as follows: when you launch Windows 11 Installation Assistant, it will appear on the screen for one second before disappearing/closing. The results are consistent no matter how many times you try. If you are in the Dev Channel of the Windows Insider Program, closing or crashing Windows 11 Installation Assistant is normal.
    Since you already have Windows 11, it doesn’t apply to you. But if you still want to use it, try the following procedures to activate the Windows 7 compatibility mode.

    4.1 Right-click the downloaded Windows 11 Installation Assistant and choose Properties.

    4.2 Go to the Compatibility section now.

    4.3 Check Run this programme in compatibility mode and choose Windows 7 from the drop-down menu under Compatibility mode.

    4.4 Apply by clicking.

    4.5 Click OK.

    The aforementioned technique will typically work to resolve Windows 11 Installation Assistant closing issues. To install Windows 11 on your computer, you can also use the Windows 11 Media Creation Tool or a Windows 11 ISO download if the problem continues.

    Now that you understand how to use Windows 11 Installation Assistant to upgrade your Windows 10 computer to Windows 11, you can move on. You can simply turn on the Windows 7 compatibility mode to make this tool function normally if it keeps closing and disappearing. You can let us know in the comments if you still have any relevant problems that need to be resolved.