Windows has undergone significant change over time, losing some of its more traditional features in the process. Windows used to give you the option to get the old ungroup icon style, despite the fact that window grouping on the taskbar is a relatively new feature.
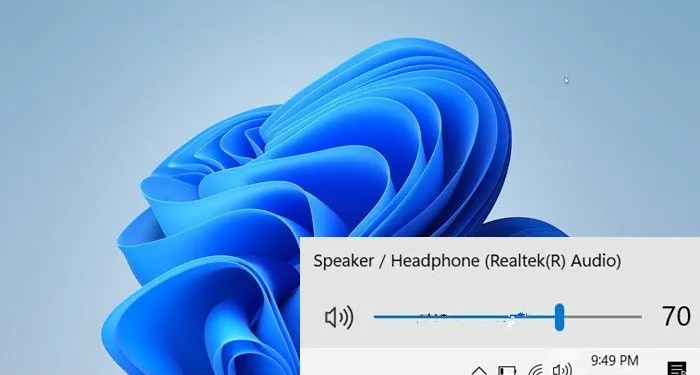
The Windows 11 PCs group not only the interfaces and settings but also the icons. Giving all the controls a single location is undoubtedly a better feature, but some users find it irksome. This change was made for the better. This article is especially for you if you fall into that category because it discusses ExplorerPatcher, a programme that enables you to ungroup Taskbar Icons in Windows 11. In essence, this tool allows you to separate the WiFi, Sound, and Battery icons and access each one’s individual settings.
This article will guide you how to remove groups of taskbar icons in Windows 11.
1. How to separate the taskbar icons for WiFi, Sound, and Battery in Windows 11
A simplistic tool called ExplorerPatcher is accessible for free download on Github. This programme can substantially alter the appearance of your Windows 11 computer. Once the programme is downloaded and installed on your computer, the taskbar will immediately move to the left corner of your screen, just like it did in Windows 10.
Additionally, you can now access each icon’s settings separately after the icons in your System Tray are automatically ungrouped.
ExplorerPatcher can help you group or ungroup the other icons on your taskbar in addition to the system tray icons. The option to combine taskbar icons was available in earlier versions of Windows, but Microsoft has since removed it from the taskbar settings.
2. How to Make Use of ExplorerPatcher
The ExplorerPatcher is the first application you can use to ungroup the Wi-Fi, Sound, and Battery Charging taskbar icons in Windows 11. This is a freeware application that allows you to restore the previous Windows taskbar that you were used to.
This is a free app that is very easy to use; with a few clicks, you can access the old taskbar and File Explorer. This is a patch created by the community for those who want to continue using Windows 11, but in the old style and design. One of the reasons is that this old style promotes productivity, making it more appealing to those seeking a productive working environment on their computer.
The ExplorerPatcher allows you to tailor the classic functionality to your specific preferences and needs. It only downloads and install the files required on your computer. Aside from the taskbar, it has a plethora of other customised options through which you can choose how you want your Windows 11 OS to appear.
Here’s a tutorial for downloading and installing the ExplorerPatcher, as well as some tips for using it:
2.1 The first thing you should do is download ExplorerPatcher. Make sure to get the most recent version.
2.2 Once the ExplorerPatcher installer has been downloaded to your computer, run it to begin the installation process.
2.3 The User Account Control (UAC) will ask you to confirm that you want to allow this app to make changes to your computer. If you want to proceed, select Yes.
2.4 The taskbar will automatically switch to the previous appearance, which includes the ungrouped icons, after a brief period of time.
2.5 The Wi-Fi, Sound, and Battery Charging icons are ungrouped by default, so if that’s all you want to change, the process is finished.
2.6 If you want to make additional changes to your Windows 11 operating system, right-click on the taskbar and select Properties to access the customization options.
2.7 All the customization options that the patch enables you to change will be visible to you once you are inside the Taskbar Properties menu. Look through each one and make the desired changes.
2.8 After finishing that, you must click the Restart File Explorer button in the bottom left corner to make your changes effective.
2.9 The new changes will be evident when the File Explorer reappears a short while later.
2.10 The Programs and Features menu is one place to start if you choose to uninstall the ExplorerPatcher because you no longer want to use it. Open the Run dialogue box by pressing Windows key + R, then type “appwiz.cpl” into the search bar, followed by the Enter key, to access it.
2.11 ExplorerPatcher can be found by browsing the list of apps in the Programs and Features. Click on it with the right mouse button and then select Uninstall.
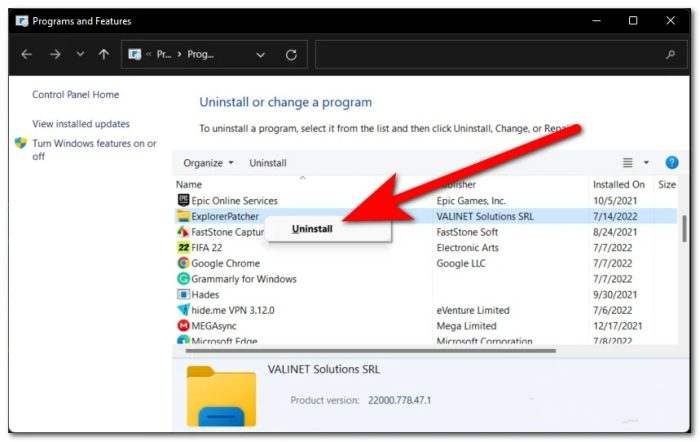
2.12 The default Windows 11 design will return once the uninstallation process is finished.
3. combine the taskbar icon feature
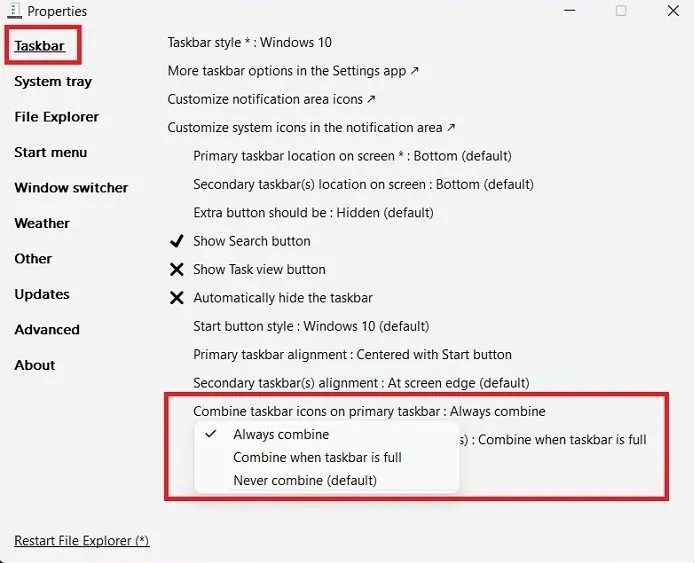
One feature that was eliminated from Microsoft’s most recent operating system, Windows 11, was the ability to combine the taskbar icons. We could combine the taskbar icons from the Taskbar settings in earlier versions of Windows, but not any longer. Users who previously used Windows 10 and have upgraded to Windows 11 are already adjusting to the new, center-aligned taskbar, making the absence of the “Never Combine” feature all the more annoying.
Don’t worry, though. That is also a feature of ExplorerPatcher. With this tool, you can easily combine the taskbar icons or never combine them.
Get the ExplorerPatcher for your computer and install it. When the programme is installed, launch it on your computer and select Combine taskbar icons on the main taskbar from the Taskbar section. Now decide if you want to combine them always, only when the taskbar is full, or never.
4. Why can’t I see Windows 11’s Never combine taskbar icons setting?
Microsoft recently updated Windows 11 to remove the option to “never combine taskbar icons.” Your taskbar icons can no longer be mixed and matched. To do that, though, you can use a third-party application. One such tool that can restore this functionality to your Windows 11 computer is ExplorerPatcher.
5. How do I view seconds in the computer clock?
You can accomplish that using a programme like ExplorerPatcher. With ExplorerPatcher, you can also see the seconds. By default, Windows displays the time as hours:minutes. Install the programme on your computer, then launch it. Go to the System Tray section and select the “Show seconds in the clock” checkbox.
So this is how you can able to ungroup taskbar icons in the Windows 11 computer and if you find any doubts then do let us know in the comments section below.
Leave a Reply