Microsoft has introduced the latest Windows 11 operating system with the notes of new features and a massive makeover but the same is also featuring some challenging issues and identifying the root cause of all the sound on your Windows 11 computer has suddenly stopped working. Fortunately, there are a few typical causes that you can look into, including incorrect audio output device configuration, missing sound device drivers, and incorrect audio enhancement. So let’s go over how to fix a Windows 11 computer that has no audio.
Why is my computer suddenly devoid of sound in Windows 11?
It’s possible that outdated or broken sound drivers are to bear responsibility for the error message “No output devices found in Windows 11.”This error is not an exception; many device problems are caused by their drivers. Reinstalling or updating sound drivers are therefore likely fixes.
Other potential causes of this error include Windows 11 disabling your PC’s audio device or not adding/installing it as the message instructs. If so, you may need to enable it using the Device Manager or Settings options.
How can I resolve Windows 11’s issue with No output devices found?
1. Verify the sound settings in Windows 11
1.1 Click Start to open that app, then select Settings.
1.2 Under the System tab, select Sound.
1.3 Click the Add device button if there isn’t a sound device listed in the Output section. Then, pick a relevant category to which you can add your sound output device.
1.4 Double-click any of the sound devices listed in the Output section to bring up the options shown below:
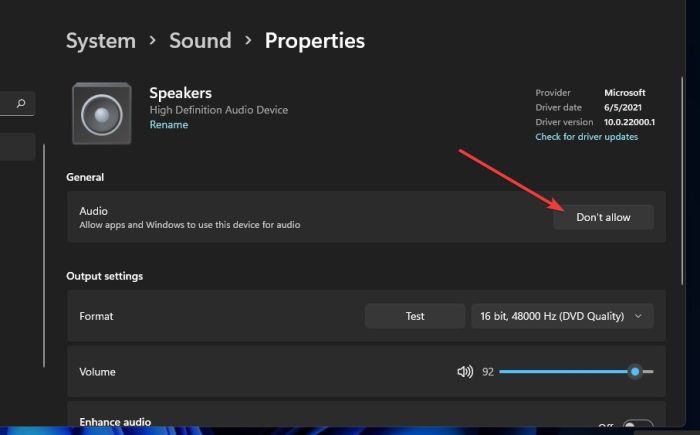
1.5 If your PC’s output audio is set to Don’t Allow, select Allow. Check that all of your computer’s output sound devices are permitted. This is how you fix it. Windows 11 found no output devices.
Check the Device Manager to see if sound devices are enabled
2.1 To open the Device Manager functionality, right-click the Start menu button and select the Device Manager option.
2.2 Then, in Device Manager, double-click the Sound, video, and game controllers category.
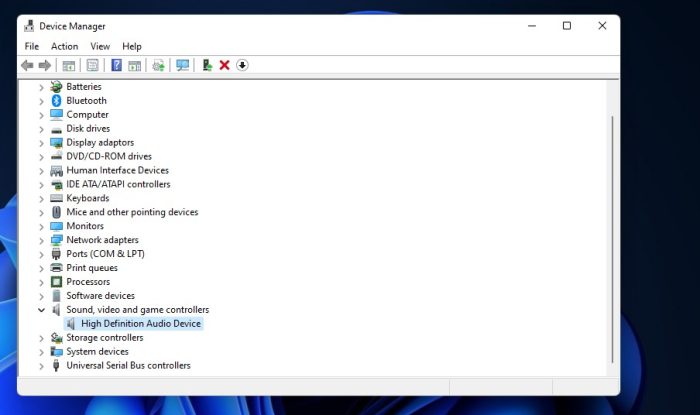
2.3 If any of the audio devices listed there are disabled, right-click them and select the Enable options.
2.4 To broaden the Audio inputs and outputs category, double-click it.
2.5 Then, if any of the listed sound output devices are disabled, right-click them and select their Enable options. The error “No output devices found in Windows 11” should be fixed.
Run the Audio Playing Troubleshooter
3.1 Press the Windows + I keyboard shortcut to open Settings.
3.2 On the System tab of Settings, select Troubleshoot.
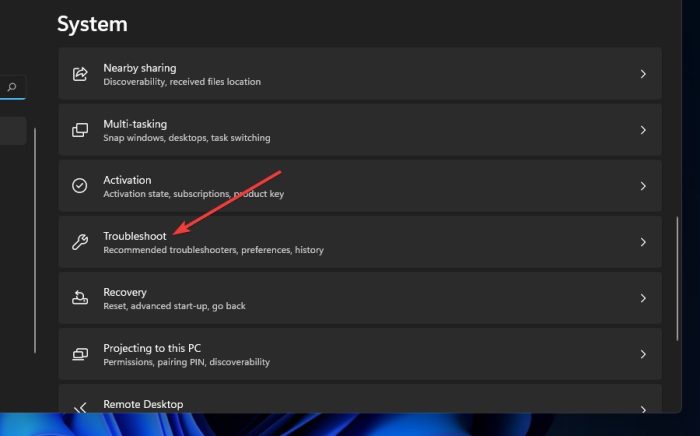
3.3 Then click on the Other troubleshooters button.
3.4 For the Playing Audio troubleshooter, click the Run button.
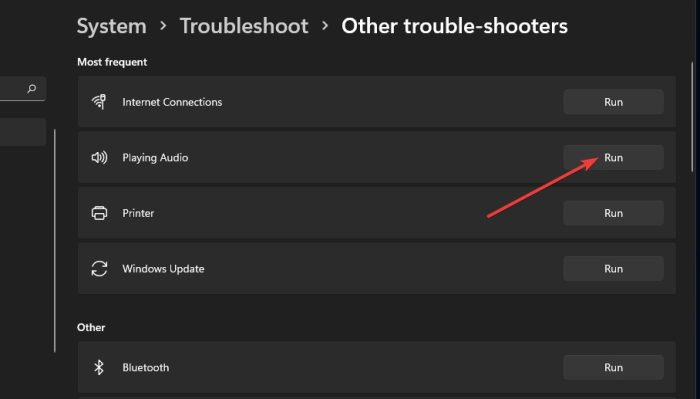
3.5 Apply any potential fixes that the troubleshooter recommends after that. The No output devices found in Windows 11 error can be fixed using this method as well.
Perform a system file check
4.1 Select the taskbar icon for the magnifying glass.
4.2 Type cmd into the search box to bring up the Command Prompt.
4.3 To run as administrator, right-click the Command Prompt search result and choose Run as.
4.4 Next, enter the following System File Checker command:
sfc /scannow
4.5 Start the scan by pressing the Return key.
4.6 Fix the No output devices found problem after the scan has completed completely.
5. Sound driver update
5.1 open Device Manager.
5.2 Double-click the “Sound, video, and game controllers” category.
5.3 Then choose Update driver by right-clicking the sound device on your PC, such as High Definition Audio Device.
5.4 Select the option to automatically search for drivers.
5.5 If that option does not install a new driver, choose Search for updated drivers on Windows Update.
5.6 Next, on the Windows Update tab that appears, click the Check for updates button.
5.7 Select the option to download and install any available updates.
5.8 Furthermore, select Advanced options, then Optional updates.
5.9 Check the boxes for optional driver updates.
5.10 Click the Download and Install button after that.
Some users prefer to use third-party driver updater software, such as DriverFix, to update their drivers. A third-party driver updater will scan your PC and show you which devices require new drivers. If your sound device is among them, you can use the software to download and install the most recent driver for it.
6. Install the audio driver once more
6.1 open the Device Manager window.
6.2 To view the devices for that category, double-click Sound, video, and game controllers.
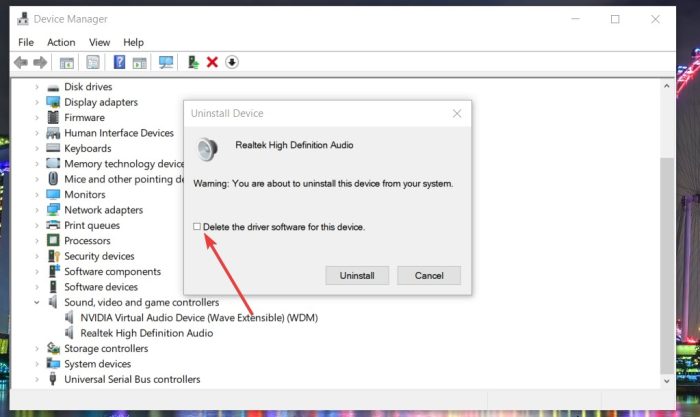
6.3 Afterward, right-click the sound device on your PC and choose Uninstall device.
6.4 On the confirmation window that appears, check the box that says “Delete the driver software for this device.”
6.5 Next, select Uninstall.
6.6 Select Start from the menu.
6.7 Choose the Power and Restart options from the Start menu.
What should I do if none of the aforementioned solutions resolve the problem?
If none of the aforementioned fixes resolved your PC’s No audio output device installed error, there might be a hardware problem. This might be a problem with your computer’s sound card or audio output device.
Try connecting your PC’s external sound device—such as its speakers—to a different computer if it has one. Test the output sound device on the other PC to see if it functions as it should.
Additionally, verify the integrity of the cables connecting any external sound output devices to your computer. Ensure that the appropriate ports are fully plugged in.
In any case, to resolve hardware-related sound issues, the majority of users will likely need to contact repair services. If your PC or its external audio output device needs repairs, think about sending it back to the manufacturer. If the computer or sound device is still covered by its warranty, you might be able to do it without paying anything.
So this is how you can able to fix the problem on your Windows 11 powered computer and if you find any issues then do let us know in the comments section below and stay tuned with us for more interesting tutorials at your fingertips.
Leave a Reply