It has long been customary to dual-boot several Windows versions. On the same hard drive of a PC or laptop, it enables you to experience both recent and outdated versions of Windows.
By using dual booting, you can test out Windows 11 without wiping Windows 10. Dual-booting legally and without breaking Microsoft’s terms of service does require a separate licence and account for each of the two Windows operating systems.
Now Lets look how to simultaneously boot Windows 10 and Windows 11 and the steps are shown below.
Dual-booting Windows 10 and Windows 11: How to Do It
A few things are required in order to dual booth Windows 10 and Windows 11. You must possess both a current Windows 11 licence and a current Windows 10 licence. A single usage of each licence is permitted. Windows 10 is likely to remove an original equipment manufacturer (OEM) licence from your computer, and Windows 11 will request a product key during setup. You’ll also need to have a different Microsoft account for each operating system since Windows 11 now requires you to have one as part of the setup for the Home Edition. Although you can attempt using the same one, having different accounts is recommended. This makes it easier to distinguish between any conceivable app downloads and other app licences connected to your accounts. You can always make a second Microsoft Account for nothing in order to test out Windows 11 and then delete it after everything is set up.
You must be familiar with disc management tools, have a USB drive with a minimum capacity of 16 GB, and have access to the internet in order to download Windows 11 in order to dual boot. The prerequisites for Windows 11 must also be met. Without registry tweaks, dual booting is not possible if your computer is incompatible.
1. Get Windows 11
You must download Windows 11 in order to begin. Visit the Microsoft website to do this. Select Create Windows 11 Installation Media, then download the application. Upon starting it, select Use the recommended options for this PC. Click Next after selecting USB flash drive. A USB drive must be plugged in. Click Next after selecting your drive from the list. Your computer will make a bootable copy of Windows 11.
2. Get ready to divide your main Windows 10 hard drive.
You must navigate to Windows 10’s Disk Management for this second step. Use the Start Menu to find it and launch it. It will be Create and format hard disc partitions that you wish to choose. When you do, locate the OS drive, which is labelled C, and open it. Given that it is partitioned as NTFS, you should be aware that this is your OS drive. Shrink Volume can be selected by right-clicking the drive.
3. Reduce the Windows volume.
After clicking Shrink Volume, let Windows check your drive before proceeding. The drive can then be reduced in size in MB at that point.
Remember that 1,000 MB is equal to 1 GB. So, at least 64,000 MB are required for Windows 11. We advise reducing your drive’s size to roughly that level. For our demonstration, we reduce to 100,000 MB. Use the Shrink button to accept the shrink.
4. Make a fresh volume.
It will take some time to reduce your volume, and it can appear that your computer has stalled, so don’t panic. When it’s finished, a new Unallocated space with a grey background will appear. When you do, right-click the blank area and select New Simple Volume.
Give it a new drive letter (D is what we’ve chosen), then click Next. The volume can also be labelled. Ours is designated Windows 11. Keep everything in its current state and check that it resembles the scene in our photo above. Finally click the finish button.
5. Turn off Bitlocker encryption and quick startup
You must disable Bitlocker encryption and Fast Startup in Windows 10 after creating a new volume. By doing so, you can access your computer’s BIOS and switch between the two operating systems when it boots up.
Search for Power in the Windows 11 Start Menu and select Power and Sleep Settings to do this. Next, select Additional Power Settings by scrolling down. Then choose What Does the Power Button Do? option.menu item. Toggle the checkbox for Fast startup to off, then click Change options that are temporarily unavailable. To finish, click Save changes.
Find Bitlocker in the Start Menu and select Manage Bitlocker from the results. Device encryption must be turned off in Windows 10 Home.
6. Boot your computer from the Windows 11 Bootable drive.
After that, boot your computer from the bootable drive you just created. Typically, you may do this by pressing the F12 key on your laptop or keyboard after turning it on and selecting the name of your USB drive from the list of alternatives. Specific instructions varies based on the computer’s manufacturer. HP, Dell, and Lenovo have provided some instructions.
7. Set up Windows 11
When the Windows 11 installer has finished loading, select Next, then Install Now. Setup will begin, and you should select Custom. If no drives appear, enter your PC’s BIOS and set the SATA controller to compatibility/IDE/Standard Mode. After that, select the partition that you previously sized and named as Windows 11 and click Next. After that, Windows will be installed.
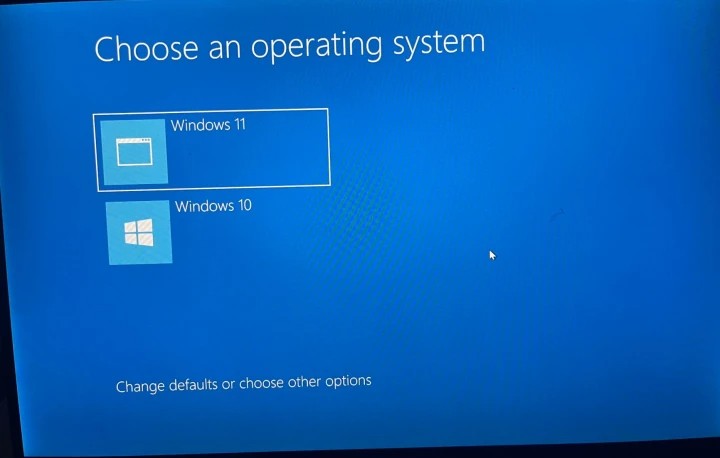
8. Dual booting
After you’ve installed everything, Windows will urge you to choose an operating system. Choose between Windows 10 and Windows 11 every time you boot your PC. You can also change the date and time right here.
You must, however, first activate Windows 11 with a new product key. To do this, go to Activation Settings and then Change Product Key. To pair Windows with a key rather than your Microsoft Account, enter a new product key.
Also, ensure that Fast Startup is disabled. Simply search for Edit Power Plan and then pick Power Options, as you did in Windows 10 Step 5.
This prevents the deactivation of your Windows 10 installation. Otherwise, your skills may be restricted. At any time, you can choose your operating system from the dual boot option.
Leave a Reply