Category: Windows 11

  • How to Disable Widgets on Windows 11

    How to Disable Widgets on Windows 11

    Windows 11 has been introduced with massive changes and the same is reflected in each and every section of the operating system. Microsoft has worked really hard and the company has improved the user experience and the company has also introduced a new user interface as well.

    Microsoft also implemented the widgets in the Windows 11 operating system in a more effective manner and the same is now more useful and we can able to get various information using the widgets such as weather information, live score updates, and more. You can able to access widgets easily as well in the new version of the Windows operating system.

    You can able to call the widgets in Windows 11 and get the latest updates easily. However, if you want to disable the widgets due to your own recent then this article is meant for you. Well, today I will guide you on the way to disable widgets on Windows 11 and the same can be done via three methods. So without making any further delay let’s get into the article to check out the step by step guide to disable widgets on Windows 11.

    Disable Widgets using the Taskbar Settings

    This is one of the most easiest methods of disabling widgets on your Windows 11 computer and the same can be done with a couple of clicks. You can follow the steps which are listed below to disable widgets on Windows 11 using this method.

    • First of all, you need to right click on any empty area on the Taskbar and select Taskbar settings. Having said that, you can also get to the settings by right clicking Start and navigate to Settings > Personalization > Taskbar.
    • Now you need to find the Widgets option and simply turn the toggle to Off.

    This is how you can able to disable widgets on Windows 11 using the Taskbar settings.

    Disable Widgets on Windows 11 using the Registry Editor

    If you are good to use the Windows Registry Editor then you can follow the steps which are listed below to disable widgets on Windows 11.

    • You need to hit the search icon on the Taskbar and search “registry editor” and open Registry Editor on your computer.
    • Now you need to click on Yes on the prompt that shows up and under HKEY_CURRENT_USER, you need to find Software > Microsoft > Windows > CurrentVersion > Explorer > Advanced then you need to double click on TaskbarDa.
    • Now you need to set the Value data field to 0 to disable the widgets and simply click OK and close the Registry Editor.

    Disable Widgets using the Group Policy Editor

    • You need to press Win + R to call Run and just type gpedit.msc then press enter to bring the Group Policy Editor.
    • Under Computer Configuration, you need to find and select Administrative Templates > Windows Components > Widgets.
    • Then right click on Allow widgets and select Edit and now click on the Disable radial button to disable all widgets and just click OK to close the Group Policy Editor.

    This is how you can able to disable widgets on Windows 11 and if you find any doubts then do let us know in the comments section below. You guys are recommended to follow our website for more tips and tricks to use Windows operating system comfortably.

  • How to Update Drivers on Windows 11

    How to Update Drivers on Windows 11

    Drivers are the essential factor of the Windows operating system as the same helps the operating system to enhance the performance and to offer the best user experience. We always update the applications and software which are installed on our machine and these days we update the application via the official store of Microsoft.

    In the same manner, the habit of updating the drivers are also important and the same can be done in two methods. You can able to update the drivers of your camera, microphone, graphic card, USB among others, and updating drivers will enhance the performance of your PC and you will get the best out from your companion.

    You can able to update the drivers using the Device Manager or the Windows Updater which will help you to find and install the latest version of drivers automatically. In this article, we will check out both ways to get the latest version of the drivers on your Windows 11 powered computer. So without making any further delay let’s dive into the article to check out the complete details.

    Updating drivers on Windows 11 using Device Manager

    This method will help you to update drivers individually and you can find the latest version of the drivers and install them manually as well. Follow the steps which are listed below to do the same.

    • First of all, hit the start menu and search for Device Manager and open it.
    • Now Navigate to the desired device to get the latest driver of it. For example; if you want to update the driver of your microphone then locate the same.
    • After that, it right click on the same and click on the update option.
    • Now you will get two options – search automatically for drivers or browse my computer for drivers. If you already downloaded the driver for the specific device then you need to select the second option otherwise you need to select the first option.
    • The first option will search for the latest version of the driver of your device and if the new version is available then it will showcase you and you need to install it.
    • After installing the new version of the driver, you need to restart your PC.

    That’s it! This is how you can able to update a driver using Device Manager.

    How to update a driver using Windows Updater

    This is another method to get the latest version of the drivers and it is pretty simple as well. Just follow the step-by-step points below to get the latest version of the drivers using this method.

    • You need to open Settings on your device and you can open the same by clicking on the start menu and the type Settings then click on the search result.
    • Now click on the Windows Update option.
    • After that, you need to click on the Advanced option and click on the view of optional updates where you will find the updates for the drivers.

    So this is how you can able to find the latest version of the drivers for your computer and you will get the best experience as well. Don’t forget to share this guide with your near and dear ones as they will also get benefits.

  • How to Password Protect Files and Folders in Windows 11

    How to Password Protect Files and Folders in Windows 11

    Personal information and data are the most valuable stuff in the digital world and everyone wants to protect the important files from unwanted hands. We set the lock screen a password and try to keep our laptop or computer away from unauthorized people to protect the data which are saved on the hard disc of the PC. But having a password protected files and folders will offer an extra layer of protection on your important files and data.

    If you are someone who wants to have an extra layer of protection on the files and folders which are saved on a Windows 11 powered computer then this article is meant for you. Today I will guide you on the way to protect a folder or file using a password in Windows 11. So without making any further delay let’s dive into the article to check out the step by step guide.

    Step to password protect a file/folder on Windows 11

    This is the most easiest way to secure your file or folder using a password and for the same, you need to download an application dubbed the Easy File Locker. The application is free and safe to use. Follow the steps which are listed below to secure your file or folder using this application.

    • First of all, you need to download the application by heading over the link.
    • After that, open the application and go to System then select Set Password.
    • Now you need to enter a strong password and click on Ok.
    • Then you need to head over to Files and Folders then Add Folder.
    • Now you will see Path: Alongside a three-dot menu and click on this then choose your file or folder.
    • Under you will find an Accessible checkbox. Uncheck this and click on Ok.

    Steps to secure file or folder using WinRAR

    • If you don’t have WinRAR app on your computer then you need to download the same by heading over the link.
    • Now you need to right click the Folder or any file which you want to secure using a password and select “Add to Archive”.
    • After that, you need to click the Advanced Tab which will be available next to General at the top.
    • Then select Set Password option and you will get a pop up screen where you need to enter a password and click “OK”

    This is how you can able to secure your file and folder using password and if you find this helpful then don’t forget to share this tutorial with your near and dear ones.

  • How to Check Available RAM Slots in Windows 11

    How to Check Available RAM Slots in Windows 11

    When you purchase a new laptop or desktop for yourself, you must check the capability to upgrade which means you need to check RAM slots, PCIe SSD slots, or an HDD slot. This will enable you to add extra memory in the future and makes your device a future proof. Adding memory to the device will also help you to get the best performance according to your workload. I believe now you got the point of the importance of having the additional slots on your device and the in this article, we will check out the way to check the available RAM slots in Windows 11.

    There are multiple ways to check the available RAM slots in Windows 11 powered computer. You guys can check out the same using the built-in tools such as the Task Manager, Command Prompt, and third-party software. Apart from that, you can also check out the same by physically as well. So without making any further delay let’s dive into the article to check out the ways to know the available slots.

    Using Task Manager to check the available RAM Slots in Windows 11

    It is one of the easiest way to check the available RAM on your computer and the same can be done by following the steps which are listed below.

    • You need to open the task manager on your device and the same can be done using the keyboard shortcut “Ctrl+Shift+Esc” or by clicking the start menu and searching for the task manager.
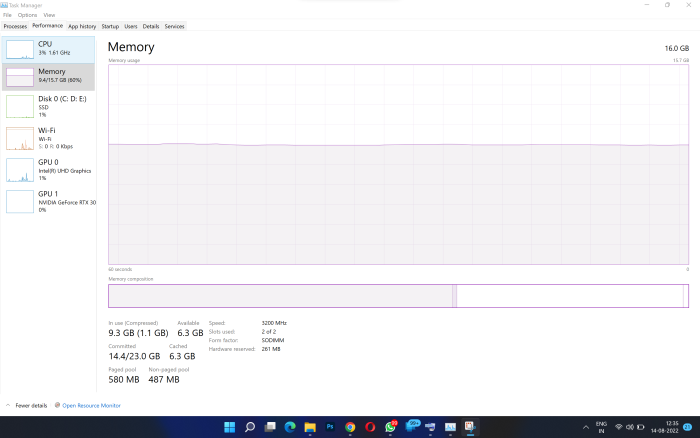
    • Now you need to open the task manager and then you need to switch to the “Performance” tab on the screen.
    • After that, you can able to see the used RAM slots in the “Slots used” section. So this will provide you with the answer to having the available slots in your device.

    Check RAM Slots in Windows 11 using Command Prompt

    It is another method to check the available slots on your computer and the same is pretty straight forward as well. You can check out the step by step guide below.

    First of all, press the Windows key and type “Command Prompt” and choose “Run as administrator” to open a Command Prompt to get the power of the administrator.

    You can able to check the total number of RAM slots by using the command: wmic Memphysical get MemoryDevices

    After that, you can able to see the memory slots and you can able to view the current RAM slot which you are using by entering the command: wmic MemoryChip get BankLabel, DeviceLocator, Capacity

    Check the memory slots using third party software

    You can use the CPU-Z software which is known for monitoring the CPU temperature but the same is also capable to know you the information about the available RAM slots as well as the RAM type. You can able to download the application without spending any amount which makes it is available for free of cost and the same will provide all kinds of software information.

    After downloading and installing CPU-Z, you need to select the “Memory” tab to find information about your installed RAM and that includes the memory type and size.

    Now you need to move to the “SPD” tab at the top and under the “Memory slot selection” option, you need to select the drop-down menu to get the information about the available RAM slots,

    You can also check the available RAM using system information

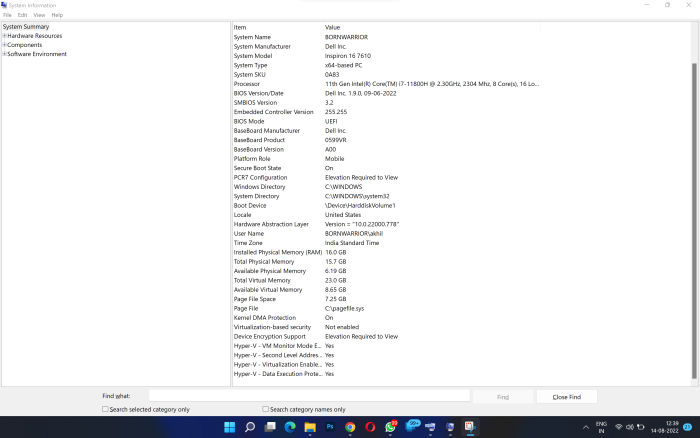
    You need to open system information by searching the same in the search bar after clicking the Windows button. After you finding the same you need to open “System Information“.

    After that, you need to click on ”System Summary” in the left sidebar and scroll down in the right pane. You will be able to find the total installed physical memory (RAM) along with the information about the available virtual memory as well.

    So this is how you can able to check ram slots in Windows 11 and if you find any problems then do let us know in the comments section below. We recommend you to browse our website for more tips and tricks to use Windows operating system comfortably.
  • How to Record Audio in Windows 11

    How to Record Audio in Windows 11

    Windows 11 is the latest version of the operating system by Microsoft for the millions of computers around the world. The operating system is coming with impressive features and a redesigned user interface which is now more look like mac OS as the company has made the Taskbar available at the centre position of the screen. The company has also created Windows 11 with support for the Android applications as well. We already covered a lot about the Windows 11 operating system and you guys can check it out by heading over the link.

    The Windows 11 operating system also enables users to record audio as well and there is no need to have a third party application as well. The operating system comes with a built in voice recording application and the same is also packed with lots of handy features as well. The user interface of the application is pretty straight forward and simple. So without making any further delay let’s get into the article to check out the way to know how you can able to record audio on Windows 11 powered computer.

    Before getting into the tutorial, let me say that if you accidentally uninstalled the application from your computer then you can get it via the Microsoft Store and you can simply download it without spending any additional cost.

    How to record audio in Windows 11

    Before you start recording audio in Windows 11, you need to select the microphone and the same can be done by selecting the internal microphone of your PC or any external microphone and the same can be selected by opening the settings application of your device. After selecting the microphone, follow the steps which are listed below to record audio in Windows 11.

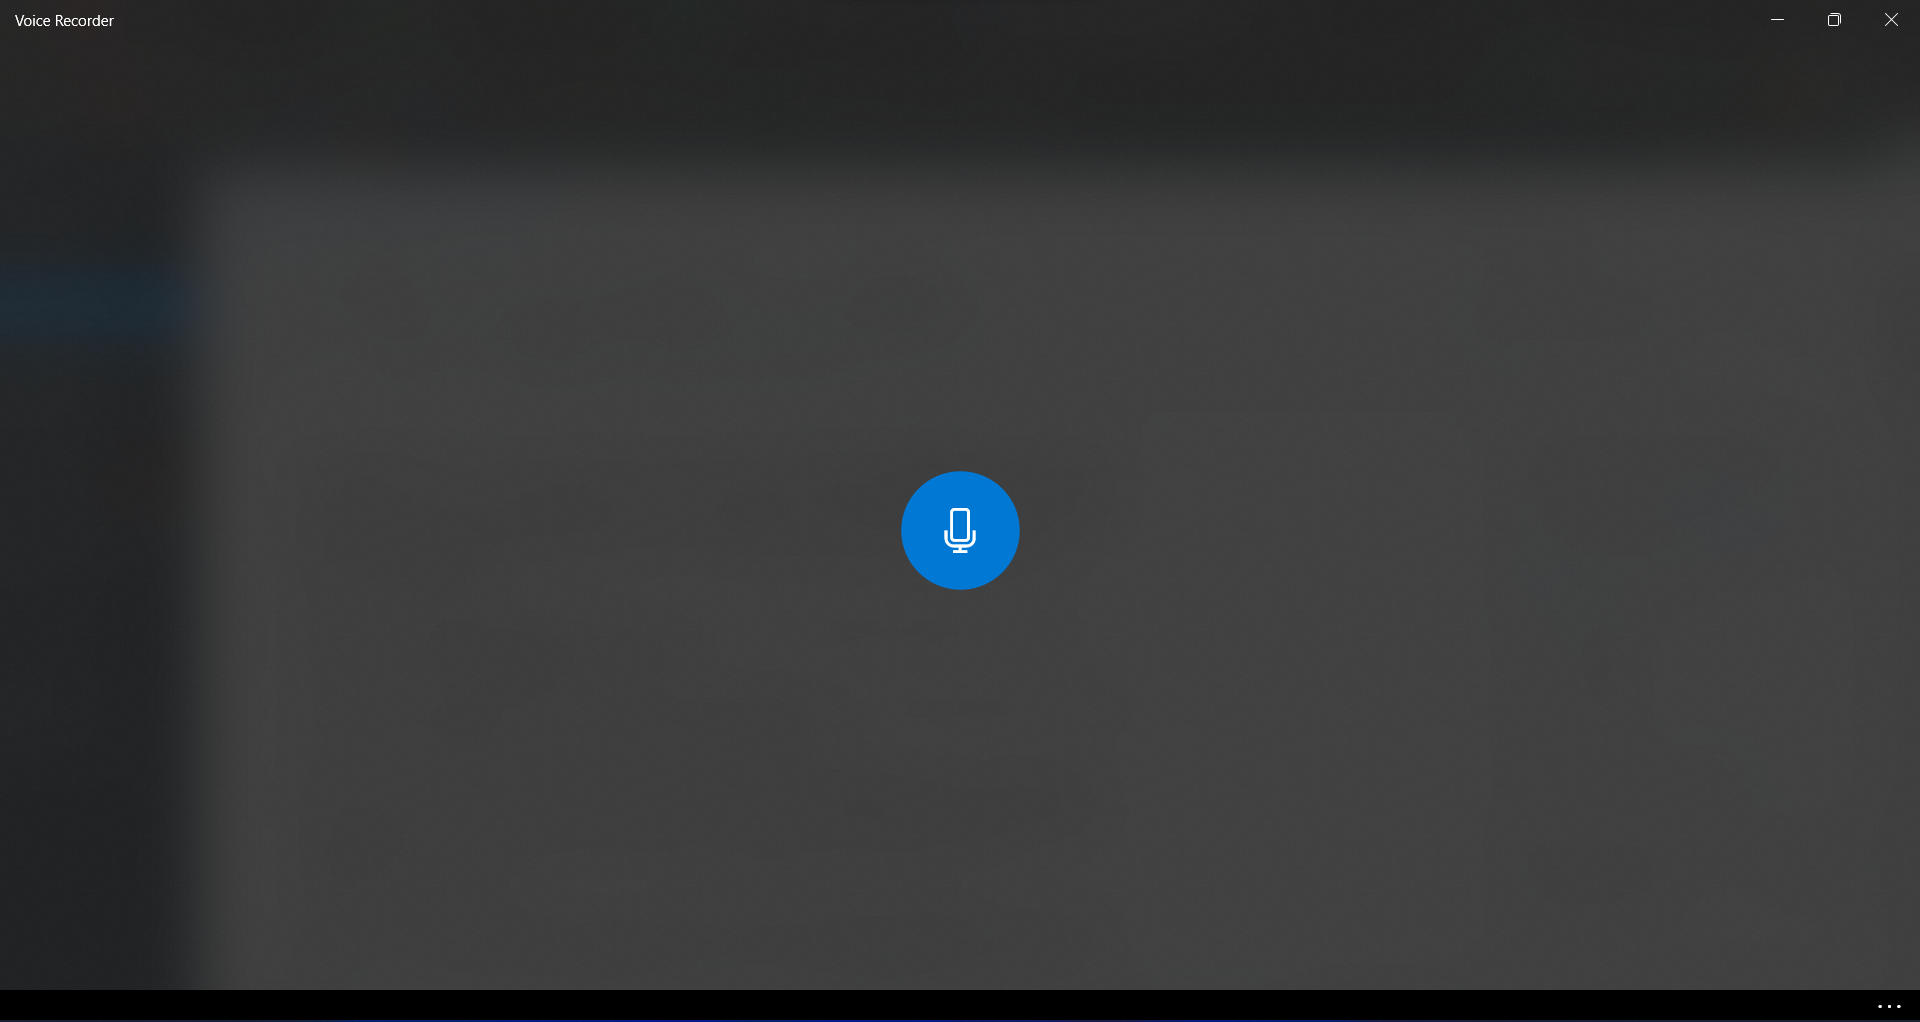
    • You need to open the voice recorder application on your computer.
    • After opening the voice recorder application, you need to click on the record button to record the audio. It is worth mentioning that you can also start recording by pressing the Ctrl+R keyboard combination.
    • This action will start the recording and you can press the pause button to pause the recording. Resume the recording based on your demand, and the audio will be recorded in the same file. The application will also serve with the option to stop the recording or click on the flag button to flag it as well.
    • Once you stopped recording the audio, the application will enable you to play the recorded audio clip without leaving the application. You guys can also access the audio clip from the Sound recordings folder inside the documents folder of your system.

    Editing capabilities of the application

    The voice recorder application is also coming with some essential tools which will help you to edit the audio file as well. The application will enable you to trim the audios that you have recorded on your computer and the application will also make things easier for everyone to trim audio that you have recorded using the app as well. You can do the editing in the application by following the steps which are listed below-

    Upon opening the voice recorder app, you need to select the recording that you want to trim from the left pane of the application interface.

    After that, you can able to see the option to trim audio. Click on it.

    Now you need to drag the pins to select the part of the audio that you want to trim.

    After selecting the desired portion of your audio, simply click on save and the same will save the trimmed version of the audio.

    The application also enables you to share the recorded audio without leaving the application and the same can be shared through any social media or via email. This can be done by selecting the audio and clicking the share button which will be available on the user interface of the application. After clicking the share button, you can able to select the platform where you want to share the audio file.

    I believe that now you can able to easily record audio in Windows 11 as well as trim it and share the same with your near and dear ones. If you find any problems then do let us know in the comments section below and our team will be happy to help you. If this guide helps you then don’t forget to share the same with your close ones.

  • Forgot Your Windows 11 Password? Here is How to Reset Windows 11 Password

    Forgot Your Windows 11 Password? Here is How to Reset Windows 11 Password

    The password helps us to protect our device from unauthorized hands but forgetting a password is a challenging situation as you need to spend lots of time to recover your password and if you are unaware about the way to recover your forgotten password then this article is meant for you. In this article, I will guide you on the way to reset the password of your Windows 11 computer. So without making any further delay let’s dig into the article to check out the way to reset Windows 11 password.

    I will guide you a simple step-by-step guide that will help you to recover a password in minutes. After going through this guide you can able to recover password for both local and online accounts.

    How to reset your Local Account’s Password in Windows 11

    You can do the job by using the Advanced Recovery options, you can recover the password for a local account that you created on Windows 11 computer and you can do the same by following the steps which are listed below.

    • First of all, you need to press and hold down the “Shift” key on your keyboard and click the “Restart” button in the bottom-right corner. This will open the “Advanced Options” window.
    • Now you need to select “Troubleshoot.”
    • After that, under Advanced Options you need to select “See more recovery options” and select “System Image Recovery option.”
    • Now you will see a new window and you need to click on “Cancel.” Then press the “Next” button and click “Advanced” on the next screen.
    • You will get pop-up windows that appear on your screen, select “Install a driver.” Then hit the “OK” button and you will get a file browser window, now you need to select “This PC” from the drop-down menu.
    • Now you need to select the drive where you installed the Windows 11 operating system, you need to navigate to the Windows -> System32 folder. Then search for a file called “Utilman.” Enter Utilman1 as the new name. Utilman.
    • Now, find “cmd” and rename the same Utilman and continue to click “Cancel” to return to the “Advanced Options” screen. Then click “Continue” and the same will bring the Windows 11 lock screen.

    Password Reset Windows 11 Using Command Prompt

    On your Windows 11 lock screen, click the “Accessibility” icon and the same is available at the lower-right corner, it will now open Command Prompt instead of the Accessibility menu. To display a list of all the user accounts on your PC, type the following command into the CMD window. Take down the account name from the second column.

    • Now run the command. Replace accountname with the actual account name and your preferred password in place of the password. It will immediately reset the password on your Windows 11 PC.
    • Then shut the CMD window and log in using the new password. You will be able to sign in to the Windows 11 computer without any problems this time. So even if you forgot your Windows 11 password.

    Password Reset for Windows 11 via Online Microsoft Account

    You can reset the password of Windows 11 via online Microsoft account easily and quickly. If you connect your computer with your Microsoft online account and the password is not on your head. Then you can able to change the password comfortably by following the steps which are listed below.

    • You need to provide your email address or username associated with the Windows 11 PC on the Microsoft password recovery page opened on a different computer or mobile device. After that, select “Next.”
    • Now you need to pass the verification process and enter the one time password which you will receive on your recovery email or registered mobile number.
    • After entering the one time password, you can able to enter your new password and use the same to login to your computer without any problems.

    So this is how you can able to reset password on your Windows 11 computer and if you find any issues then do let us know in the comments section below. You guys are recommended to follow more tips and tricks on our website.

  • 3 Quick Ways to Enable Microphone Access in Windows 11

    3 Quick Ways to Enable Microphone Access in Windows 11

    On a device, privacy and security are the main concerns for preventing hackers from accessing your data and information. Hackers can take your personal information by listening in on your device’s microphone.

    So, disabling your device’s microphone is a wise and effective decision if you want to prevent the loss of your data and information. On the other hand, users might need to activate or deactivate the microphone in order to fix different microphone problems.

    But Microsoft altered a number of features and the look of the Settings app in the new version of Windows 11. However, users might find it difficult to enable microphone access on their PCs due to the changes in settings and features. To make things easier, we’ll guide you some quick and easy ways to turn on the microphone in Windows 11.

    If you want to use a PC to make audio or video calls, you need a microphone. When using one, there are some privacy issues, which is why Windows occasionally limits access to audio recording devices.

    You won’t be able to make any audio calls during this time, and the other person won’t be able to hear you clearly either. This isn’t a serious issue, and it can be quickly and easily resolved by switching a few settings.

    Why has my microphone been turned off?

    Although there are many causes, settings are the most likely one. Your audio recording device might be disabled if someone accidentally changed them.

    The reason it’s disabled could be that you just bought a new microphone and haven’t set it as the default device.

    How do I configure my default microphone?

    a) Open Settings by pressing the Windows Key + I.
    b) Visit the Sound section now.
    c) Choose the microphone you want to use as the default in the Input section.
    Your default input device will change once you’ve done that.

    How do I enable my microphone?

    1. Modify Your Privacy Settings

    1.1 Select Settings from the menu after clicking the Start button.
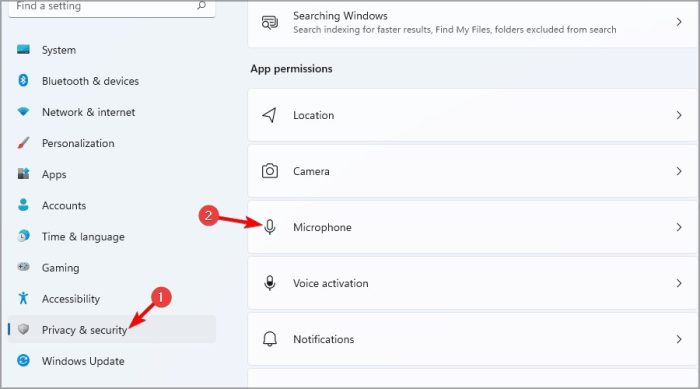
    1.2 From the left pane, select Privacy & security. Select Microphone from the right pane.


    1.3 Check that Microphone access is turned on.

    2. Modify the sound settings

    2.1 Simply press the Start button.
    2.2 From the list of apps, choose Settings.
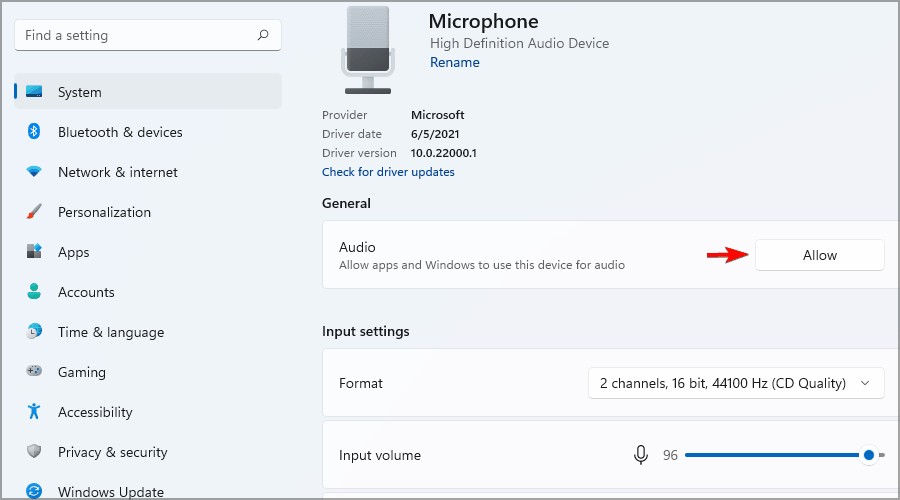
    2.3 Make sure the System is chosen in the left-hand pane and Click Sound in the right pane.
    2.4 Input section, pick your microphone.
    2.5 Now activate your microphone by clicking the Allow button in the Audio section.

    Remember that if you disable your microphone from this section, there is no other way to properly enable it again.

    3. Using Device Manager.

    3.1 In the list that appears, press Windows Key + X and select Device Manager.
    3.2 Open up the section for audio inputs and outputs. Find your disabled microphone, perform a right-click, and select Enable device from the menu.

    When it comes to missing or corrupted Windows files, some PC issues can be challenging to resolve. Your system may only be partially functional if you are having trouble fixing an error. Installing the software Restore, which scans your computer and determines the source of the issue, is something we strongly advise.

    One of the simplest ways to enable your microphone in Windows 11 is by using the Device Manager, but it may not always work depending on your settings.

    Simply repeat the process, but select Disable device rather than Enable to turn off the microphone in Windows 11.
    We advise you to update your drivers while you’re in Device Manager. You can make sure your hardware is functioning properly by doing this. We advise using specialized software like DriverFix if you want to quickly do this for all of your drivers.

    How can I make the microphone available to only certain apps?

    A. To open Settings, press Windows Key + I.
    B. Select Microphone under Privacy & security after that.
    C. Ensure that the option to allow apps access to your microphone is turned on.
    D. Choose which applications you want to be able to use your microphone.

    Can I prevent desktop applications from using my microphone?

    While Windows 11 allows you to select which Universal app has access to the microphone, Win32 programmes cannot use this feature.

    There is no way to prevent a particular programme from using the microphone, but it is possible to block microphone access for all desktop programmes and see which software is able to do so.

    Simply disable the Let desktop apps access your microphone feature from the Privacy Settings to prevent any regular applications from using the microphone.

    The first step in resolving microphone problems is to see if your microphone is recognised by the PC using some sophisticated microphone test tools.

    We believe that this guide will help you and don’t forget to share the same with your near and dear ones. We recommend you to keep browsing our website for more tips and tricks for your Windows computer.


  • How to ALWAYS show all the Icons in Notification area of Windows 11

    How to ALWAYS show all the Icons in Notification area of Windows 11

    Icons were primarily displayed on the Taskbar in earlier iterations of Windows. With just one click, users can switch between different apps. The default setting in Windows 11 allows users to hide the icons from the main taskbar in order to prevent overloading. On the right side of the taskbar, an arrow icon labelling the Sub-menu has been added. what location users can access the app from. However, there are times when users ask Windows 11 to display all of the tray icons.

    The following are some reasons for why Windows 11’s taskbar’s icons don’t display:

    • Submenu Function: Windows 11 introduces a new feature called Sub-menu, which is symbolised by an Arrow Icon. This icon contains the app icons. The user must click the arrow icon in order to access the necessary app. These app icons can be displayed on the taskbar in a variety of ways.
    • Settings for “Allow all icons” are disabled: Many of the features of Windows are unavailable to users when the registry is corrupt. In a similar vein, it also disables the taskbar icon settings. The user can edit the registry and enable the settings to resolve this problem.

    1. Drag and Drop Trick

    You can move the necessary application from the submenu to the taskbar using the drag-and-drop method. The simplest procedure to follow on Windows 11 is to display all of the tray icons. Drag and dropping the icons onto the Taskbar will therefore be made easier by the next step;

    1.1 Click on the arrow option on the Taskbar’s right side.
    1.2 Now pick out each App individually and drag it to the taskbar.
    1.3 Release the mouse button once your pointer has reached the taskbar, then drop the icon there.
    1.4 Repeat this process until the taskbar is filled with the applications displayed in the arrow icon.
    1.5 When it’s finished, the arrowhead icon will automatically vanish.

    2. Windows Registry editing

    The Windows registry can crash on occasion. Many features are blocked from users’ access, such as the ability to “Always show all the icons and notifications on the Taskbar.” Therefore, a user must modify the Windows registry in order to enable this feature (Data Value). The following steps will assist you in editing it:

    2.1 To launch the Run dialogue box, press the Window key and R on your keyboard.
    2.2 Type Regedit and select “OK” from the menu. The Registry Editor launches.
    2.3 Navigate to the following address or simply type it into the address bar.
    HKEY_CURRENT_USER\SOFTWARE\Microsoft\Windows\CurrentVersion\Explorer
    2.4 Double-click the EnableAutoTray folder now. You will see the Edit DWORD (32-Bit) Value box.
    2.5 Change the Value to 1, then press the “Ok” button. It will turn on the Notification Area Icon utility’s “Always show all the icons and notifications on the Taskbar” option.


    2.6 Click the “OK” button after checking the box. Eventually, the Taskbar will display the icons.

    3. By using Windows Settings

    Users of Windows 11 can customise the Taskbar. They can easily customise it. Users can move the Taskbar, change its size, and customise the icons that appear on it. As a result, you can display all tray icons in Windows settings as well.

    3.1 Right-click the Start Button and select Settings from the menu that appears.
    3.2 Choose Personalization from the menu on the left side of the screen. Scroll down to the Taskbar option.Now scroll down to the bottom of the page and select Taskbar corner overflow. It will display all of the app icons that can be displayed on the Taskbar.
    3.3 Turning on all of the apps will cause the icons to appear in the system tray (Taskbar)

    4. Run Program

    Direct access to many programmes is made possible with the Run programme. Additionally, it offers access to the taskbar’s settings, where you can turn on the option to display all tray icons on the taskbar. Thus, the actions listed below will assist you in doing so;

    4.1 The Run programme will appear on the screen after you press the window key + R.
    4.2 Now enter the following command directly and click “OK.”
    shell:::{05d7b0f4-2121-4eff-bf6b-ed3f69b894d9}

    4.3 The Notification Area Icon Utility will reopen, and this time you can choose “Always show all the icons and notifications on the Taskbar.” The icons will appear in the system tray after you click the “OK” button.

    5. Pin the Apps to the Taskbar

    Icons can also be displayed on the taskbar by being pinned, in addition to the methods mentioned above. The Taskbar application can be permanently pinned by users of Windows 11. The user can choose which icons he wants to keep on the taskbar, which is an advantage of this feature. So, adhere to these guidelines;

    5.1 Search for the apps you want to add to the taskbar in the Start Menu.
    5.2 Launch the app. As soon as the app launches, the taskbar will display it by default.
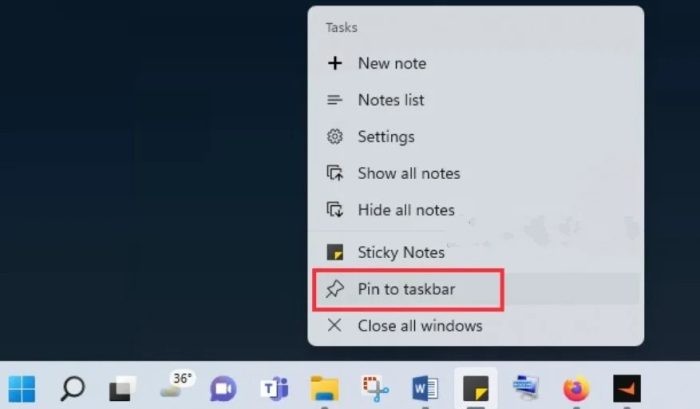
    5.3 Now, just perform a right-click on the application’s icon in the taskbar and select the option to Pin to Taskbar.


    5.4 Even if the app is closed, it will still be visible on the taskbar. So, this is how you arrange the necessary apps or pile icons into the tray.

    We believe that this guide will help you and don’t forget to share the same with your near and dear ones. We recommend you to keep browsing our website for more tips and tricks for your Windows computer.

  • Windows 11 22H2 startup sound quality is getting lowered by Microsoft

    Windows 11 22H2 startup sound quality is getting lowered by Microsoft

    Microsoft is nearing the completion of the first major update to Windows 11: version 22H2. The update is expected to be released between July and October 2022, and it appears that the operating system’s new features and changes have been finalised. If you don’t want to be a Microsoft beta tester but are interested in what’s new in Windows 11. Windows 11 (version 22H2) is scheduled to be released in late September 2022. It will be the first major update of the new Windows generation, introducing a new set of features and enhancements to improve security, productivity, and the overall user experience.

    Although the release is still many weeks away, the development team has already baked everything that will be included in version 22H2.

    It is believed that the upcoming version of the Windows 11 is coming with lots of improvements and in this article, we will check out the improvements in the next version of the operating system. So without making any further delay let’s get into the article to check out the complete details.

    1. Improvements in the Start Menu

    The “Recommended” section of the Start menu can now be customised with new settings in Windows 11 22H2. You can now choose between “More pins,” “Default,” and “More recommendations” in the Start settings page to display fewer recommended items and more pins, even though it is still not possible to disable or remove the feature.

    1.1 The “More pins” option only displays a single row of items and allows you to display additional pins. The “Default” option displays three rows of recommended items and three rows of pin items, while the “More Recommendations” option displays two rows of pins and more recommended items.
    1.2 Furthermore, this new version adds another entry in the right-click context menu for the “Recommended” and “More” buttons in the Start menu to refresh the items.
    Windows also adds a quick access button to the power menu settings that opens the “Sign-in options” page.
    1.3 Folders are another important feature of the Start menu Now, you can make folders by piling apps on top of one another. More apps can be added to a folder, apps within a folder can be rearranged, and apps can be removed from a folder.

    2. Voice Recognition

    Voice Access is a new feature in Windows 11 22H2 that allows anyone to control their laptop or desktop computer with their voice.

    When using Voice Access, you can speak to open and close apps, navigate the web, narrate emails, and more. Microsoft says that voice access “utilises contemporary, on-device speech recognition to precisely recognise speech and is backed without an internet connection.”

    Windows should be configured with the English-U.S. display languageOtherwise, voice access might not function as intended.

    Voice Access can be found under Settings > Accessibility > Speech. You must download a speech model for the on-device speech recognition before you can enable it for the first time. You can select a microphone and use your voice to control Windows 11 after the package has been downloaded.
    You can enable Voice Access to launch automatically when you sign in again in the Settings app. Voice commands or keyboard shortcuts (Alt + Shift + C and Alt + Shift + B) can also be used to control whether or not voice access is listening.
    “Voice access wake up” and “Unmute” will enable voice access once the feature has been turned on To silence voice access, type “Mute” after “Voice access sleep.” To prevent voice access from listening to you, you can also “Turn off microphone.”In order to learn how to use Voice Access and locate all the commands, the system even offers an interactive guide.

    The Windows 11 interface is very easy to use. You could say “Open,” for example, “Open Edge” or “Open Word,” to start an app. For instance, “Switch to Edge” will direct you to a running application.or the window management commands “Minimize window,” “maximise window,” and “close window.” Or you can “Click” something, like To name a few, “click Start,” “click Cancel,” or a button or link.

    Voice access is also now compatible with the touch keyboard. You can type numbers, punctuation, emojis, and even spell words.

    3. Encounter with startups

    As part of the boot experience, a progressive ring animation will now be displayed instead of an animated circle of dots. (This new animation will be used throughout the OS by Microsoft.)

    Additionally, the progress ring animation for Windows 11 has been updated and now aligns with the new progressive ring animation rather than the previous animated circle of dots animation.

    After the computer restarts automatically to install updates, the Windows startup sound no longer plays. Additionally, Windows 11 ships with the.NET Framework 4.8.2, which adds runtime support for the ARM64 architecture.

    So let’s wait for the upcoming changes on the new Windows 11 operating system and we would like to know your thoughts on the upcoming changes in the comments section below.

  • 6 Ways to Fix No Sound Output Devices Found in Windows 11

    6 Ways to Fix No Sound Output Devices Found in Windows 11

    Microsoft has introduced the latest Windows 11 operating system with the notes of new features and a massive makeover but the same is also featuring some challenging issues and identifying the root cause of all the sound on your Windows 11 computer has suddenly stopped working. Fortunately, there are a few typical causes that you can look into, including incorrect audio output device configuration, missing sound device drivers, and incorrect audio enhancement. So let’s go over how to fix a Windows 11 computer that has no audio.

    Why is my computer suddenly devoid of sound in Windows 11?

    It’s possible that outdated or broken sound drivers are to bear responsibility for the error message “No output devices found in Windows 11.”This error is not an exception; many device problems are caused by their drivers. Reinstalling or updating sound drivers are therefore likely fixes.

    Other potential causes of this error include Windows 11 disabling your PC’s audio device or not adding/installing it as the message instructs. If so, you may need to enable it using the Device Manager or Settings options.

    How can I resolve Windows 11’s issue with No output devices found?

    1. Verify the sound settings in Windows 11

    1.1 Click Start to open that app, then select Settings.
    1.2 Under the System tab, select Sound.
    1.3 Click the Add device button if there isn’t a sound device listed in the Output section. Then, pick a relevant category to which you can add your sound output device.
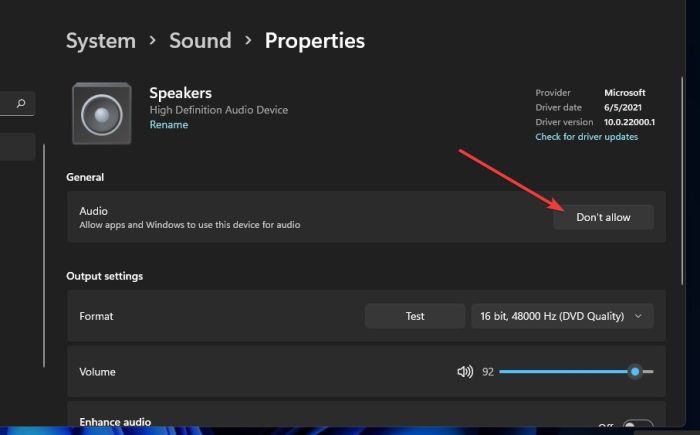
    1.4 Double-click any of the sound devices listed in the Output section to bring up the options shown below:


    1.5 If your PC’s output audio is set to Don’t Allow, select Allow. Check that all of your computer’s output sound devices are permitted. This is how you fix it. Windows 11 found no output devices.

    Check the Device Manager to see if sound devices are enabled

    2.1 To open the Device Manager functionality, right-click the Start menu button and select the Device Manager option.
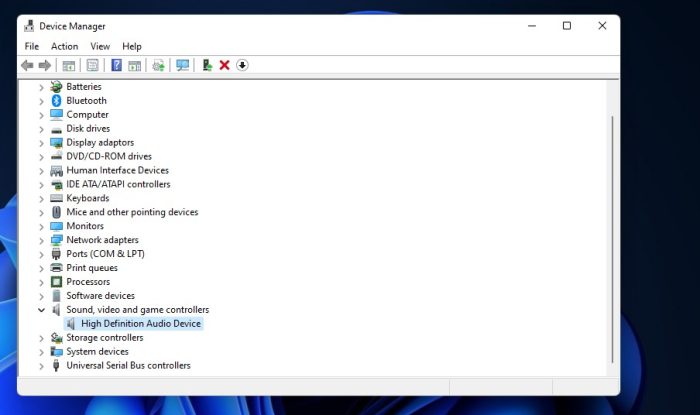
    2.2 Then, in Device Manager, double-click the Sound, video, and game controllers category.


    2.3 If any of the audio devices listed there are disabled, right-click them and select the Enable options.
    2.4 To broaden the Audio inputs and outputs category, double-click it.
    2.5 Then, if any of the listed sound output devices are disabled, right-click them and select their Enable options. The error “No output devices found in Windows 11” should be fixed.

    Run the Audio Playing Troubleshooter

    3.1 Press the Windows + I keyboard shortcut to open Settings.
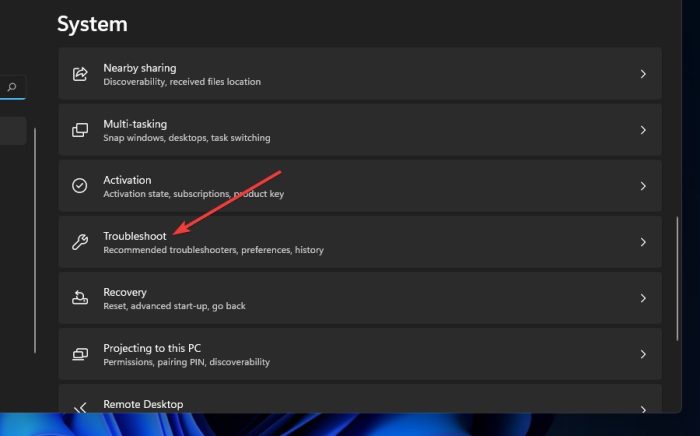
    3.2 On the System tab of Settings, select Troubleshoot.


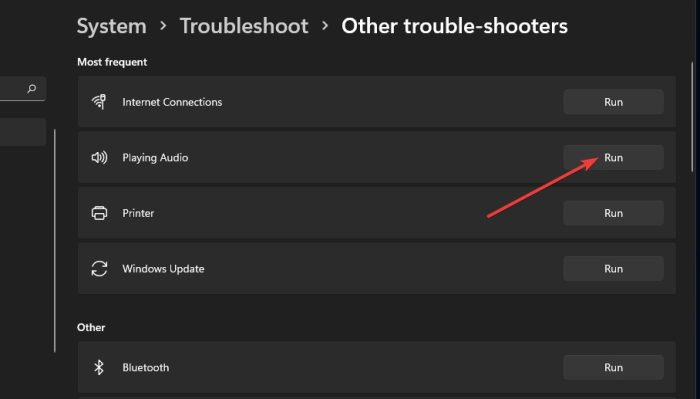
    3.3 Then click on the Other troubleshooters button.
    3.4 For the Playing Audio troubleshooter, click the Run button.


    3.5 Apply any potential fixes that the troubleshooter recommends after that. The No output devices found in Windows 11 error can be fixed using this method as well.

    Perform a system file check

    4.1 Select the taskbar icon for the magnifying glass.
    4.2 Type cmd into the search box to bring up the Command Prompt.
    4.3 To run as administrator, right-click the Command Prompt search result and choose Run as.
    4.4 Next, enter the following System File Checker command:
    sfc /scannow

    4.5 Start the scan by pressing the Return key.
    4.6 Fix the No output devices found problem after the scan has completed completely.

    5. Sound driver update

    5.1 open Device Manager.
    5.2 Double-click the “Sound, video, and game controllers” category.
    5.3 Then choose Update driver by right-clicking the sound device on your PC, such as High Definition Audio Device.
    5.4 Select the option to automatically search for drivers.
    5.5 If that option does not install a new driver, choose Search for updated drivers on Windows Update.
    5.6 Next, on the Windows Update tab that appears, click the Check for updates button.
    5.7 Select the option to download and install any available updates.
    5.8 Furthermore, select Advanced options, then Optional updates.
    5.9 Check the boxes for optional driver updates.
    5.10 Click the Download and Install button after that.
    Some users prefer to use third-party driver updater software, such as DriverFix, to update their drivers. A third-party driver updater will scan your PC and show you which devices require new drivers. If your sound device is among them, you can use the software to download and install the most recent driver for it.

    6. Install the audio driver once more

    6.1 open the Device Manager window.
    6.2 To view the devices for that category, double-click Sound, video, and game controllers.


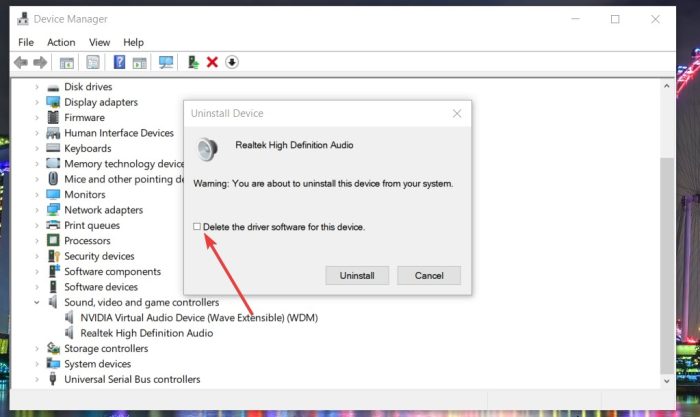
    6.3 Afterward, right-click the sound device on your PC and choose Uninstall device.
    6.4 On the confirmation window that appears, check the box that says “Delete the driver software for this device.”
    6.5 Next, select Uninstall.
    6.6 Select Start from the menu.
    6.7 Choose the Power and Restart options from the Start menu.

    What should I do if none of the aforementioned solutions resolve the problem?

    If none of the aforementioned fixes resolved your PC’s No audio output device installed error, there might be a hardware problem. This might be a problem with your computer’s sound card or audio output device.

    Try connecting your PC’s external sound device—such as its speakers—to a different computer if it has one. Test the output sound device on the other PC to see if it functions as it should.

    Additionally, verify the integrity of the cables connecting any external sound output devices to your computer. Ensure that the appropriate ports are fully plugged in.

    In any case, to resolve hardware-related sound issues, the majority of users will likely need to contact repair services. If your PC or its external audio output device needs repairs, think about sending it back to the manufacturer. If the computer or sound device is still covered by its warranty, you might be able to do it without paying anything.

    So this is how you can able to fix the problem on your Windows 11 powered computer and if you find any issues then do let us know in the comments section below and stay tuned with us for more interesting tutorials at your fingertips.