On a device, privacy and security are the main concerns for preventing hackers from accessing your data and information. Hackers can take your personal information by listening in on your device’s microphone.
So, disabling your device’s microphone is a wise and effective decision if you want to prevent the loss of your data and information. On the other hand, users might need to activate or deactivate the microphone in order to fix different microphone problems.
But Microsoft altered a number of features and the look of the Settings app in the new version of Windows 11. However, users might find it difficult to enable microphone access on their PCs due to the changes in settings and features. To make things easier, we’ll guide you some quick and easy ways to turn on the microphone in Windows 11.
If you want to use a PC to make audio or video calls, you need a microphone. When using one, there are some privacy issues, which is why Windows occasionally limits access to audio recording devices.
You won’t be able to make any audio calls during this time, and the other person won’t be able to hear you clearly either. This isn’t a serious issue, and it can be quickly and easily resolved by switching a few settings.
Why has my microphone been turned off?
Although there are many causes, settings are the most likely one. Your audio recording device might be disabled if someone accidentally changed them.
The reason it’s disabled could be that you just bought a new microphone and haven’t set it as the default device.
How do I configure my default microphone?
a) Open Settings by pressing the Windows Key + I.
b) Visit the Sound section now.
c) Choose the microphone you want to use as the default in the Input section.
Your default input device will change once you’ve done that.
How do I enable my microphone?
1. Modify Your Privacy Settings
1.1 Select Settings from the menu after clicking the Start button.
1.2 From the left pane, select Privacy & security. Select Microphone from the right pane.

1.3 Check that Microphone access is turned on.
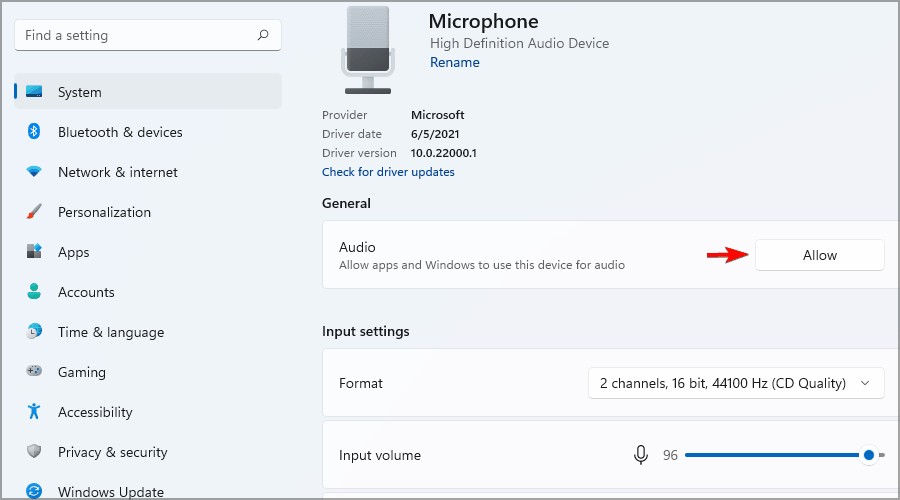
2. Modify the sound settings
2.1 Simply press the Start button.
2.2 From the list of apps, choose Settings.
2.3 Make sure the System is chosen in the left-hand pane and Click Sound in the right pane.
2.4 Input section, pick your microphone.
2.5 Now activate your microphone by clicking the Allow button in the Audio section.
Remember that if you disable your microphone from this section, there is no other way to properly enable it again.
3. Using Device Manager.
3.1 In the list that appears, press Windows Key + X and select Device Manager.
3.2 Open up the section for audio inputs and outputs. Find your disabled microphone, perform a right-click, and select Enable device from the menu.
When it comes to missing or corrupted Windows files, some PC issues can be challenging to resolve. Your system may only be partially functional if you are having trouble fixing an error. Installing the software Restore, which scans your computer and determines the source of the issue, is something we strongly advise.
One of the simplest ways to enable your microphone in Windows 11 is by using the Device Manager, but it may not always work depending on your settings.
Simply repeat the process, but select Disable device rather than Enable to turn off the microphone in Windows 11.
We advise you to update your drivers while you’re in Device Manager. You can make sure your hardware is functioning properly by doing this. We advise using specialized software like DriverFix if you want to quickly do this for all of your drivers.
How can I make the microphone available to only certain apps?
A. To open Settings, press Windows Key + I.
B. Select Microphone under Privacy & security after that.
C. Ensure that the option to allow apps access to your microphone is turned on.
D. Choose which applications you want to be able to use your microphone.
Can I prevent desktop applications from using my microphone?
While Windows 11 allows you to select which Universal app has access to the microphone, Win32 programmes cannot use this feature.
There is no way to prevent a particular programme from using the microphone, but it is possible to block microphone access for all desktop programmes and see which software is able to do so.
Simply disable the Let desktop apps access your microphone feature from the Privacy Settings to prevent any regular applications from using the microphone.
The first step in resolving microphone problems is to see if your microphone is recognised by the PC using some sophisticated microphone test tools.
We believe that this guide will help you and don’t forget to share the same with your near and dear ones. We recommend you to keep browsing our website for more tips and tricks for your Windows computer.
Leave a Reply