ByshantanuMay 8, 2015Fix : Error 0x80080008 in Windows 8 update After reading this post you will be able to fix an error code 0x80080008 while installing Windows update…Windows 8Windows 8.1
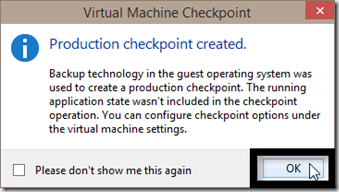
ByshantanuMay 5, 2015How to create a checkpoint in Windows 10 This post will help you with a unique feature of Windows 10 hyper-V, where you can very conveniently…Windows 10
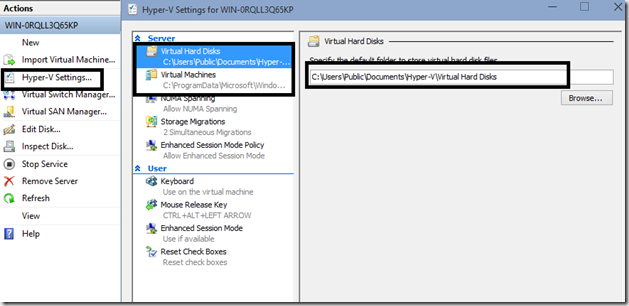
ByshantanuMay 5, 2015How to Setup Hyper-V in Windows 10 insider Preview This post will help you setup Hyper-V in Windows 10 Technical Preview | Insider Preview. In the last…Windows 10
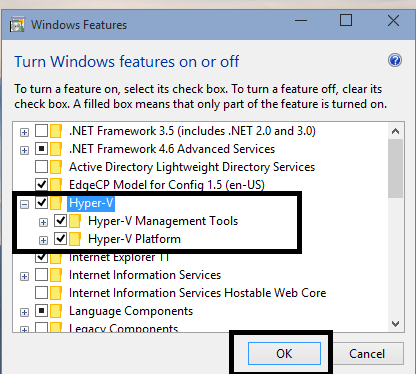
ByshantanuMay 5, 2015How to enable Hyper-V in Windows 10 TP This post will help you enable Hyper-V in Windows 10 Technical Preview / Insider Preview. Hyper-V is a well…Windows 10
ByshantanuMay 3, 2015Continuum : The next paradigm shift Continuum, as the name somewhat suggests, provides you with an always handy & continued Windows Experience. Continuum started…Windows 10
ByshantanuMay 2, 2015Fix : Error 0x800F0906 in Windows 8 This post deals with the Windows Component error in Windows 8, where on running the DISM tool to…Windows 8Windows 8.1
ByshantanuMay 1, 2015Using DISM to repair Windows Image : Windows 8 After reading this post you will be able to reset the & check the Windows system image for…Windows 8Windows 8.1
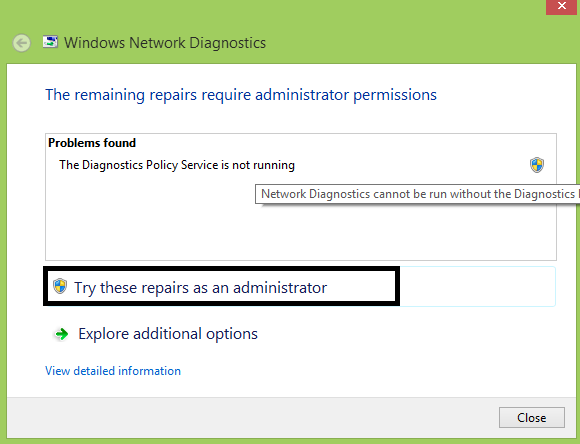
ByshantanuMay 1, 2015Fix: Diagnostics Policy Service not running in Windows 8 | 8.1 This post helps you solve an issue with your windows 8 | 8.1 PC, where, The diagnostics policy…Windows 8Windows 8.1
ByshantanuApril 30, 2015Fix : Windows 8.1 error 0X800F081F This post will help you fix an issue with your Windows 8.1 based PC, where you get an…Windows 8Windows 8.1
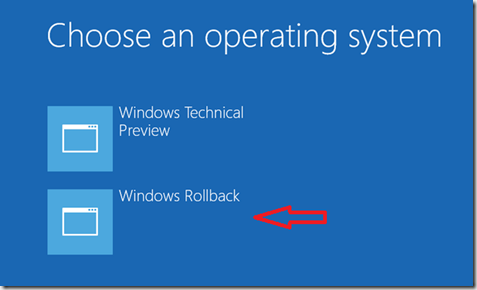
ByshantanuApril 28, 2015How to remove | rollback Windows 10 preview After reading this post you will be able to remove or roll back the Windows 10 Technical preview…Windows 10
ByshantanuApril 27, 2015Windows 10 TP Build 10061 | Info Recently, the Windows 10 build 10061 was released to the “Fast ring” testers. This build is was pushed…Windows 10
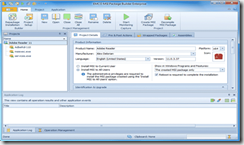
ByshantanuApril 26, 2014EMCO MSI Package Builder – Hassle Free Way to Silently Deploy Applications EMCO MSI Package Builder – Hassle Free Way to Silently Deploy Applications What you would do if you’ve…Editorials