Blog

  • How to Setup Hyper-V in Windows 10 insider Preview

    How to Setup Hyper-V in Windows 10 insider Preview

    This post will help you setup Hyper-V in Windows 10 Technical Preview | Insider Preview. In the last post I wrote, I outlined the steps to enable Hyper-V in Windows 10 TP. Now after you have enabled Hyper-V, its time to use the Hyper-V manager to setup Hyper-V and personalize it to match your settings. Remember, First thing to check is that your Computer BIOS settings for Hardware Virtualization are set to enabled.

    Now, to launch Hyper-V manager:

    • Type Hyper-V in the start screen | Start Menu
    • hyper-v4
    • Select, Hyper-V manager from the listed options.
    • Now, Click on the Machine ( server ) name in the left hand pane, as indicated in the screenshot below
    • hyper-v5
    • This will list all the associated options of this particular server within your server list.
    • Now, if in case, there are no servers listed in the left hand
    • hyper-vC
    • Click on, Connect to a server
    • hyper-vC1
    • Click on Local Computer,
    • Click Ok
    • Now,
    • Look at the options displayed on the right hand side pane.
    • To change a setting, click on any one of them
    • To start with, Click on Hyper-V settings
    • hyper-v6
    • Here, You can easily set the Paths for your VHD ( Virtual Hard disk files ) & VM ( Virtual machines )
    • Change them to your necessity or liking.
    • After this, Add your Old VMs or setup a new one.
    • Follow this Post ( How to add a new VM in Windows 10 )
  • How to enable Hyper-V in Windows 10 TP

    How to enable Hyper-V in Windows 10 TP

    This post will help you enable Hyper-V in Windows 10 Technical Preview / Insider Preview. Hyper-V is a well known virtualization service offered by Microsoft in its Operating system software. Hyper-V continues to provide its feature enriched and stable virtualization platform in Windows 10 as well. Follow the steps below to enable Hyper-V in Windows 10.

    Check the Basics

    Note: Make sure that Virtualization is Enabled In your computer’s BIOS.

    • Go to the Start menu or start screen
    • Type Programs & features
    • hyper-v 
    • Click on Turn Windows Features on or off
    • Now, Check the box saying Hyper-V as indicated in the screenshot below
    • hyper-v1
    • Press OK
    • hyper-v2
    • Windows will install Hyper-V & at the end will ask you to Restart your PC
    • hyper-v3
    • Once you restart your PC, Windows will setup Hyper-V for you.


    Hope this helps. Please use the comment section below to share your thoughts & feedback.

  • Continuum : The next paradigm shift

    Continuum : The next paradigm shift

    Continuum, as the name somewhat suggests, provides you with an always handy & continued Windows Experience. Continuum started or was introduced as an answer to touchscreen & desktop experiences in Windows. Earlier with Windows 8, it was very much a universal computing experience, be it a tablet or a desktop | laptop.

    With Continuum, Windows now has the capability to switch between tablet & desktop mode based on either the hardware you are using ( touchscreen setup ) or if your device supports a flip to tablet experience. You connect a keyboard | Mouse to your touchscreen setup, Windows detects it and goes into the normal PC | Desktop mode, where you get your usual Windows desktop & your apps go in to the mode where they can be easily resized or dragged, changed with Mouse & Keyboard.

    Similarly, if you go into tablet mode, all your apps go full screen & are optimized for touchscreen & gesture support. This makes the new Continuum feature an amazing addition to Windows 10.

    Now, that’s not all. With every new build, continuum is getting more polished & feature enriched. A recent blog post for Build conference showcases a video that shows how continuum can prove to be the next paradigm shift in always handy & always on computing.

    Check out the video below:

  • Fix : Error 0x800F0906 in Windows 8

    This post deals with the Windows Component error in Windows 8, where on running the DISM tool to scan health of the Windows image, you get an error 0x800f0906 in Windows 8. Below are the steps you can use to fix this error using Command prompt.

    • Open Windows power menu ( Windows logo key + X)
    • policy3
    • Open / Click on Command Prompt (Admin)
    • Now type,
    • net stop wuauserv (press Enter)
    • cd %systemroot%\SoftwareDistribution (press Enter)
    • ren Download temp (press Enter)
    • net start wuauserv (press Enter)
    • net stop bits (press Enter)
    • net start bits (press Enter)
    • net stop cryptsvc (press Enter)
    • cd %systemroot% \system32 (press Enter)
    • ren catroot2 temp2 (press Enter)
    • net start cryptsvc (press Enter)

    This should solve your problem, if not, please use the comment section to tell me & I will try to help further.

  • Using DISM to repair Windows Image : Windows 8

    Using DISM to repair Windows Image : Windows 8

    After reading this post you will be able to reset the & check the Windows system image for corruption or damaged files. This in turn helps you fix various small issues associated with your Windows Computer, specifically the components that use the Windows image access. Below are the steps to use a built-in Windows tool to scan & repair the Component store in Windows 8.

    • Press Windows logo key + X ( to open the power menu )
    • policy3
    • After the Command prompt opens,
    • Type SFC /SCANNOW
    • Let the process complete.
    • Restart your computer
    • Again, open the elevated command prompt as indicated above
    • Now,
    • Type dism /online /cleanup-image /scanhealth
    • Now,
    • type dism /online /cleanup-image /checkhealth
    • Now,
    • type dism /online /cleanup-image /restorehealth


    This Should solve the issue related to the Windows Component Store corruption. Please feel free to use the comments section to provide feedback or suggestions.

  • Fix: Diagnostics Policy Service not running in Windows 8 | 8.1

    Fix: Diagnostics Policy Service not running in Windows 8 | 8.1

    This post helps you solve an issue with your windows 8 | 8.1 PC, where, The diagnostics policy service is not running. There could be a few causes of this problem. Some of them include a device driver issue that’s stopping the service due to a conflict. A malware or other issues relating to a system service corruption.

    Here are a few steps that can help you fix this issue:

    Method 1

    • Press Windows logo key + X (to open the power command menu )
    • policy3
    • Now, Click on Device Manager
    • Here, locate Network Adapters, Right Click your network adapter
    • Click on Update Driver software
    • policy5
    • Alternatively, you can download and install the updated version of your network adapter’s driver software from your motherboard / computer manufacturer’s support website
    • Restart your computer & check if the problem is solved.


    Method 2 : Starting the Diagnostics policy service

    • Press Windows logo key + R
    • Type services.msc
    • Locate the service Diagnostic Policy Service
    • policy1
    • Right Click the service
    • Click on Properties
    • policy2
    • Now, here, make sure that the service is started,
    • if not, start it
    • & set the startup type to Automatic
    • Apply , OK
    • Check if the problem is solved.


    Method 3: Using the Windows Network Diagnostic

    • Right Click the network icon on taskbar
    • Click on Troubleshoot Problems
    • policy4
    • Policy
    • After the process completes,
    • Click on Try these repairs as an administrator
    • Check  if this solves your problem.

    Method 4 : Command line

    • Press Windows logo key + X ( power menu )
    • Click on Command Prompt (Admin )
    • Now, type
    • net localgroup Administrators /add networkservice
    • Press Enter
    • Now, Again type,
    • net localgroup Administrators /add localservice
    • Press Enter
    • You will get a message saying “ Command completed successfully”
    • Exit the command prompt & check if this solves your problem


    Hope this helps, You can drop in a line in the comments section below, if you have any suggestions or feedback.

  • Fix : Windows 8.1 error 0X800F081F

    Fix : Windows 8.1 error 0X800F081F

    This post will help you fix an issue with your Windows 8.1 based PC, where you get an error 0x800F081F. This error can occur due to corrupted Windows update files or certain hardware failures or device driver issues. Follow the methods below to solve this issue:

    Method 1 : Update Device Drivers

    • Go to Windows Update,
    • Go to the start screen
    • Type Windows Update
    • Select from Optional Updates section
    • Check all the Hardware device driver updates available
    • Alternatively,
    • you can visit your Motherboard / Computer Manufacturer’s website to download and install the latest drivers.


    Method 2 : System Update & Readiness tool

    • CheckSUR tool, can be used to check & replace the damaged & missing files in Windows Update
    • Press Windows logo key + X to open the power menu
    • policy3
    • Click on Command Prompt (Admin)
    • Now,
    • Type dism.exe /online /cleanup-image /scanhealth
    • When the process completes,
    • type
    • dism.exe /online /cleanup-image /restorehealth
    • After the operation completes, Restart your computer
    • Run Windows update to check if the problem has been solved.
  • How to remove | rollback Windows 10 preview

    How to remove | rollback Windows 10 preview

    After reading this post you will be able to remove or roll back the Windows 10 Technical preview installed on your PC. I have been testing the Windows 10 TP from early stages & I always install any beta ( preview ) OS as multi boot & another copy as a Virtual Machine. Now, removing a VM is a fairly easy task, but uninstalling a dedicated OS is not to easy. To solve this issue, Microsoft came up with an easier solution that enables the testers / users, to uninstall or rollback the Technical Preview / Insider preview. They now have a dedicated entry on the boot selection menu that lets you remove or rollback the preview without much hassle. So, follow the steps below to rollback or uninstall the Insider preview.

    • Startup your Computer
    • On the boot selection menu
    • Select Windows Rollback.
    • Windows10_removal
    • Keep the system running & your Technical preview will be removed.


    Hope this helps.

  • Windows 10 TP Build 10061 | Info

    Windows 10 TP Build 10061 | Info

    Recently, the Windows 10 build 10061 was released to the “Fast ring” testers. This build is  was pushed via the windows update process. Here is what’s new in this build.

    Improvements to Action Center, Taskbar & Start

    With this build, the start menu can be resized and has a transparency effect. The power button has now been moved to the bottom left of the start menu making it better accessible. The start menu now features an automatic color enhancement technique, which is pulled off from the existing desktop background.

    With start menu, the taskbar & action also gets the transparency effect & we can now change the color scheme across these by using the settings app & navigating to the personalization settings. This build now features the all new “ Black system” theme across Taskbar, Start menu & Action center. With that, the task view has received several updates, the icons are more refined, the thumbnails and buttons seem to be more polished. The Switch app ( ALT+Tab) and snap assist are also updated with this interface optimization.


    New Mail & calendar Apps

    The new email app features this new & amazing email authoring experience, which makes you use almost all the features and experience of Microsoft Word, that includes, inserting tables, adding pictures and bullets & giving different colors to your text. The UI functionality on the new email & calendar apps features the three pain UI, which is  very familiar to Windows users & lets you toggles very efficiently within Mail & calendar apps. The mail app supports customizable swipe gestures which are very handy. Office 365 is supported out of the box & these apps also support exchange, outlook & other IMAP & POP accounts.


    Thank you for reading this post, more feature reviews coming soon.

  • EMCO MSI Package Builder – Hassle Free Way to Silently Deploy Applications

    EMCO MSI Package Builder – Hassle Free Way to Silently Deploy Applications

    EMCO MSI Package Builder – Hassle Free Way to Silently Deploy Applications

    What you would do if you’ve to visit each system residing on the network just to install one or two applications?? Obviously, you can do this if the number of systems were fewer or there are merely any need for installing applications. However, this seems quite challenging and full of trouble if you’ve repeat this task over and over again. Need of a tool has been arisen that could saves you from such repetitive activities and automates the whole task of deploying applications on networked computers.

    I’ve recently came across a tool entitled EMCO MSI Package builder that offers flawless operation of remotely deploying applications as much as you want. It’ll take your traditional setup files (EXE format) into account and make it ready to install on computers connected over network without needing any interaction from end user part.

    What is MSI Packages?

    MSI is a windows installer file format that is used to package almost any type of setup files to perform installation on the client computer. MSI files can be used for remote application deployment, performing storage related tasks and removing bogus or any other desired programs from the targeted computer. This will save your ample amount of time by collecting multiple setup files into one single package and perform installation one by one.

    Need of MSI Package Builder Tool

    MSI Builder tool is designed to help support professionals and network administrators in managing applications on networked computers like install, repair, update or remove programs. It offers an easy to build operation of creating MSI packages and easily distributing it over network.

    You can find more details on converting exe to MSI over here:

    http://emcosoftware.com/msi-package-builder/convert-exe-to-msi

    Anyone can choose to create and distribute MSI packages using changes tracking technology or manually by using visual editor, the said two methods are inbuilt into the application and can be used as per requirement.

    clip_image002

    The most important and worth noticing features is its capability to perform silent installations on network computers. Silent signifies that the created MSI packages will be distributed on computers using Microsoft Group policy and doesn’t requires any participation on the end user side.
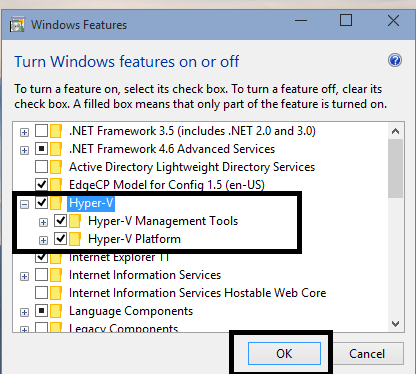
    What all it takes?


    clip_image004

    From the above figure, you can have a clear idea about everything you’ll need to perform silent remote installation of any applications. Just define the project name, choose source location of targeted setup file you are going to deploy, system platform and few more. After which, tool will begin creating MSI package for that particular application and let you deploy it freely on any system. Below mentioned link contains the detailed step on how you can easily create MSI packages along with its distribution:

    http://emcosoftware.com/msi-package-builder/create-msi-package

    Final Thoughts

    EMCO MSI Package Builder is a powerful installation authoring tool that provides unique capability and functionality to support engineers and helps in greatly reducing overall effort and time in distributing applications over networked computer. Basically, this application is available in two versions: Professional and Enterprise. The company also offers 30 days free evaluation period for this application to test it yourself and decide.

    Have you ever tried any such tools or experienced difficulties in remote application deployment, feel free to share it with us!!