Blog

  • Fix : Cannot change Internet Explorer Start page | Home Page

    Fix : Cannot change Internet Explorer Start page | Home Page

    This post is intended to help those users, who are unable to :

    • Change their IE home page | Start Page
    • Change the Search page
    • Change the Default Search Provider

    In many situations today, add-on programs get installed in our computers. This could be due to installing software through some Internet agency’s download manager or a free software that had some add-on program clipped on to it & that installed without your permission. Recently, I faced a similar issue & I tried everything to reset my Internet Explorer’s start page or homepage. Nothing seemed to work, I even uninstalled & reinstalled the Internet Explorer, cleared the Temp folder & all offline files etc. etc.

    Below is the procedure that worked for me to Fix : Cannot change Internet Explorer Homepage | Start Page :

    Method 1 :

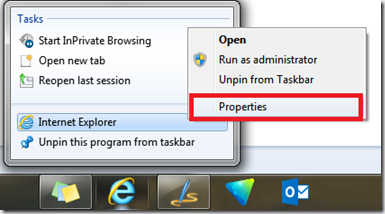
    • On your taskbar or Desktop
    • Right Click the Internet Explorer Icon
    • Go to it’s properties

    IE_homepage_startpage0

    • Now,
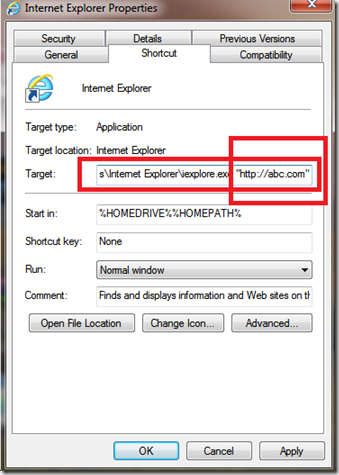
    • In the Target Window, check the whole target link
    • Check if there is a link at the end of the line ( refer the screenshot below )
    • Remove the link from the end
    • & make sure that you put double quotes at the end i.e. right after iexplore.exe
    • Click Apply
    • Click Ok

    IE_homepage_startpage4

    • Now,
    • Open Internet Explorer
    • Press ALT + X
    • Click on Internet Options
    • Click on Advanced
    • Click on Reset
    • After the resetting process completes
    • Restart your computer
    • Check to see if this solved your problem

    If you still cannot reset Homepage , try the method below

    Method 2

    • Open Regedit ( Windows Logo key + R & type regedit in the box & press Enter )
    • Press yes
    • Now, the first thing you should do is to backup your Registry
    • Right Click on Computer
    • Click on Export
    • Give a file name & Click on Save
    • Now,
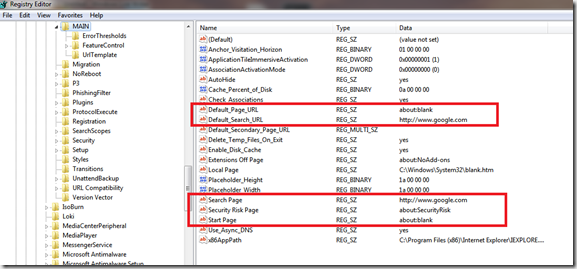
    • Locate HKEY_LOCAL_MACHINE\Software\Microsoft\Internet Explorer\Main

    IE_homepage_startpage

    • Refer the screenshot above & Change the Default_Page_URL , Default_Search_URL, Search Page & Start Page to about:blank or anything you like
    • Now, repeat the above said steps with HKEY_LOCAL_MACHINE\SOFTWARE\Wow6432Node\Microsoft\Internet Explorer\MAIN
    • Now,
    • Locate HKEY_LOCAL_MACHINE\Software\Microsoft\Internet Explorer\SearchScope
    • Here, Delete the entry any secondary entry, other than Bing or Google ( refer Screenshot )
    • IE_homepage_startpage3
    • Repeat the steps with  HKEY_LOCAL_MACHINE\SOFTWARE\Wow6432Node\Microsoft\Internet Explorer\SearchScopes
    • Now,
    • Locate : HKEY_LOCAL_MACHINE\Software\Clients\StartMenuInternet\IExplore.exe\shell\open\command
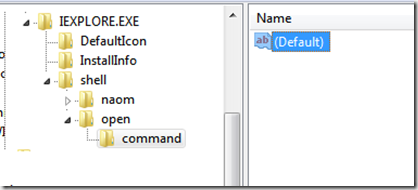
    • IE_homepage_startpage1
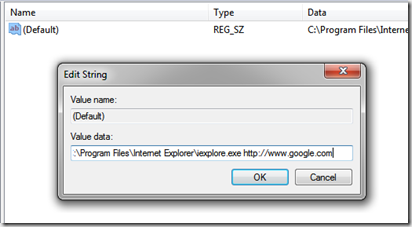
    • here, double click  Default
    • IE_homepage_startpage2
    • Either Remove any link that appears after iexplore.exe or add the name of your favourite website ( Refer Screenshot above )
    • Click ok
    • Exit Regedit
    • Restart your computer
    • Check if your problem is solved

    Hope this helps you. If not , or if you have any query, use the comment section to notify me & i will try to help.

  • Fix : Sleep mode not working after upgrading to Windows 8.1

    Fix : Sleep mode not working after upgrading to Windows 8.1

    After reading this post you will be able to fix an issue with your Windows PC, where, on upgrading to Windows 8.1 from Windows 8, you are unable to put your computer to a sleep power state. Windows 8.1 has been a major update for Windows 8 and has brought a lot of features to the initial Windows 8 release. But, some times, due to Reset Power settings

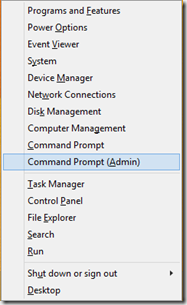
    • Press the Windows logo key + X

    cmd_admin_win8

    • Click on Command Prompt ( Admin )
    • Now,
    • Type restore all your power schemes to the default Windows State.
    • Restart your PC
    • Now,
    • Go to Power Options (Type Power options on the start screen & Click on the search result )
    • Make sure the Balanced Power plan is activated

    If this does not Turn on Hybrid Sleep & Selective suspend

    • Go to Power Options ( Control Panel )
    • Click on Change Plan Settings ( Of your Current Power Plan )
    • Now,
    • Click on Change advanced power settings
    • Click on Change settings that are currently unavailable
    • power1
    • Now,
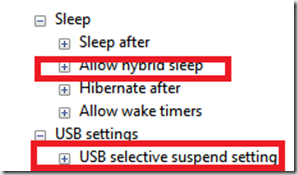
    • Make sure Allow Hybrid Sleep is set to ON
    • Also, make sure USB Selective Suspend is also set to ON
    • power2

    Check if your Problem is solved. If you still Upgrading to Windows 8.1, make sure that you update your:

    • USB Drivers
    • Display Drivers
    • Chipset Drivers
    • SATA / AHCI drivers
    • To do so, Either run Windows update
    • or
    • Go to your Computer / Motherboard / Display ( Graphics ) Manufacturer’s support website & download / Install the proper drivers
    • Now, for the settings :
    • Go to the Device Manager ( Windows Logo key + X – > Device Manager )
    • Expand Network Adapters
    • Right Click the network adapter listed there ( If there are more than one, repeat this step for all of them )
    • Go to Properties
    • Go to Power Management
    • Uncheck the Checkbox that says “ Allow this device to wake the computer “
    • and
    • Make sure that the checkbox “ Allow the computer to turn off this device to save power” is checked.


    If this does not solve the problem, follow Method 4

    Method 4 : Leave HomeGroup

    • If you are using a Home Group for sharing, try leaving it
    • Go to HomeGroup in Control Panel
    • Click on Leave Homegroup
    • Restart your PC

    Method 5 : Testing what it could be

    The Basic steps of troubleshooting anything, is to cross of any possible culprits, one by one.

    • Disable Network before putting your computer to sleep
    • Go to Network & Sharing Center ( Control Panel )
    • Click on Change Adapter Settings
    • One by one, Right Click  all the listed adapters and click on Disable
    • Now,
    • Check if your computer goes to sleep.
    • If it does, you have narrowed your trouble down to a network adapter.
    • Enable the adapters one by one to pin point the exact adapter that is causing trouble
    • To Enable the adapters:
    • Right click – > Enable
    • If you pin point the network adapter that is causing trouble, try updating it’s device drivers


    • Remove non-essential ( add-on ) devices for the time being
    • You might have some USB Devices like printer / scanner / USB storage etc. plugged in to your system.
    • It is possible that one of the devices is causing your computer to not go into sleep mode.
    • To check :
    • Unplug the devices one by one & after each device is removed, try putting your computer to sleep

    Hope this helps you. For any queries, please use the comments box

  • Review : Systools Hard Drive Data Recovery for Windows

    Review : Systools Hard Drive Data Recovery for Windows

    Data & Information are synonymous terms. In today’s world data is the most important factor for any individual or business. We carry out all essential data in Pen drivers, external hard drives etc. All this information flow requires a lot of read & write operations. The devices carrying the data do have a life expectancy period. Even, otherwise any data storage device could fail without any prior notice. But, the main question is that when your Data fails, do you have sufficient resources to recover it ? Does the software you are using supports the kind of device & file system your storage device has ? Recently, Systools contacted me to test one of their products SysTools Hard Drive Data Recovery Software for Windows .

    Review : SysTools Hard Drive Data Recovery for Windows

    My test environment consisted of :

    • One 16gb USB Pen drive ( FAT 32 File system )
    • One 500 GB External Hard Disk Drive ( NTFS File system )
    • The data on my Pen Drive had 12 GB of JPEG images
    • My 500 GB external Hard Disk drive had Four Partitions.
    • The First Partition was completely formatted
    • The data on the Second Partition was deleted

    Key Features of SysTools Hard Drive Data Recovery  are :

    • Complete Hard Drive Data Recovery
    • System Partition Recovery
    • Formatted Partition Recovery
    • RAW Partition Recovery
    • Corrupt MBR, MFT or FAT recovery
    • Recover from Internal / External Storage
    • Recover from CD / DVD / Pen Drive ( flash drives ), Data Cards etc.
    • Maintains the Folder Structure
    • Recover photos, video, music, documents & other multimedia files
    • Supports all Windows Version ( Windows 8 32 bit & 64 bit, Windows 7 32 bit & 64 bit, Vista, XP, 2000 & below )

    Recovering Data has never been so easy, The takes almost 30 seconds from downloading the software to Installing it & starting the recovery process.

    • Download & Install the software
    • Activate it
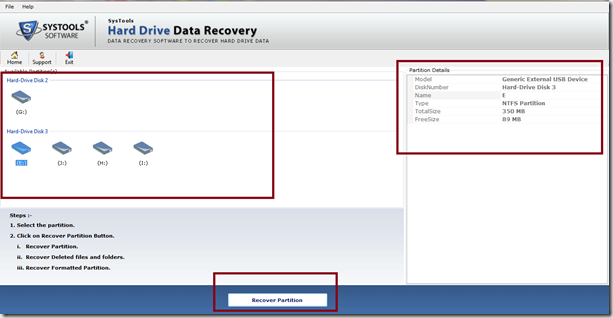
    • Click on Scan Disks

    1

    • Just Select the disk drive you wish to recover data from
    • Click on Recover Partition button

    2

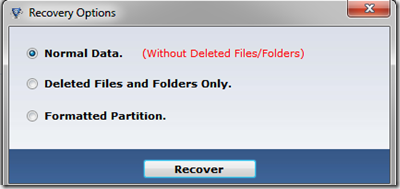
    • Now, Select from Normal Data
    • Deleted Files & Folders Only
    • Formatted Partition
    • Click on Recover

    3

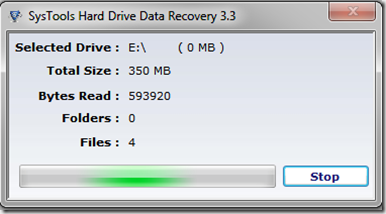
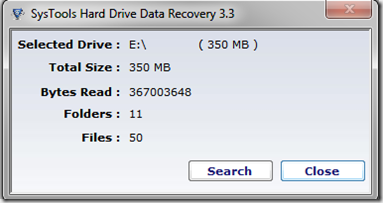
    • Instantly, the process starts.
    • I selected the Formatted Partition option
    • As this was a dummy partition of 350 MB, it took almost 10 minutes for this software to recover the partition

    4

    • After the recovery process is completed,
    • Click on Close

    4

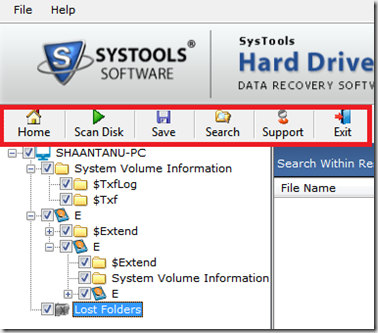
    • Select all the files & folders you wish you recover
    • Click on save in the Navigation Bar
    • Select the location of your recovered Files & folders
    • Click on Save

    5

    SysTools Hard Drive Data Recovery is a great tool, When it comes to recovering your valuable data from almost any source in your Windows Computer. It works with all versions of Windows i.e. 32 & 64 bit and can search through NTFS & FAT files systems. The recovery process within this software is very easy & all necessary information is right in front of you. Its simple, yet a powerful tool for recovery.

    5/ 5stars

    TW

  • Review : Ultimate Windows Tweaker 3.0 for Windows 8 , 8.1

    Review : Ultimate Windows Tweaker 3.0 for Windows 8 , 8.1

    Tweaking or Customizing Windows is something that  a lot of us want to do. Changing some setting or doing something different with your Computer has it’s own kicks. But, Customizing Windows safely & getting the most out of it is no easy task. Any day to day user of Windows will have to endure a lot of time to achieve any customization they wish to do with Windows. But, what if there is an application, built specifically for your Windows 8 PC, that could let you do almost every possible tweak or customization safely & easily ? The Windows Club, one of the Authority Web portals on Windows has rolled out a new version of their famous Ultimate Windows Tweaker & this time it adds support for Windows 8 | 8.1 .Ultimate Windows Tweaker 3.0 by The Windows Club is a freeware program that allow the Windows 8 / 8.1 users to easily & efficiently tweak Windows features to personalize the look and feel of your Windows.

    To download UWT follow this link.

    Review : Ultimate Windows Tweaker 3.0 for Windows 8, 8.1

    5/ 5stars

    UWT 3.0 offers a lot of features, some of them are :

    • System information
    • User Account Control
    • Security Tweaks
    • UI Customization
    • Performance Tweaks
    • Internet Explorer Customization
    • Some Additional Customizations

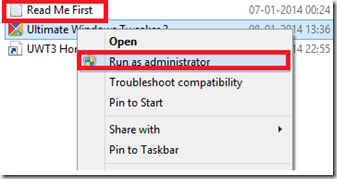
    To open the program, Right Click in and click on Run as Administrator ( Remember to read the Read me file in your downloaded package )

    UTW1

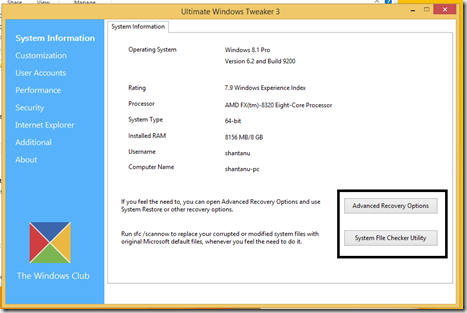
    On the main screen itself, System Information is displayed. What I liked the most about this start screen is that it offers the most used recovery options in Windows. In a single click, you can open the Advanced recovery menu ( Windows 8 / 8.1 ) & you can also use SFC /SCANNOW ( system file checker utility ) to check for any File related corruption.

    UTW2


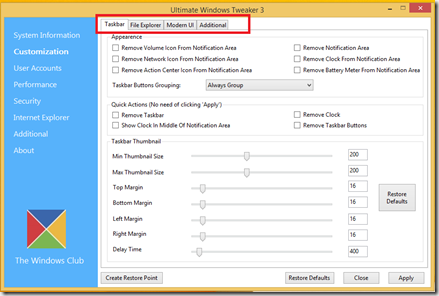
    The Second option on the left hand options bar gets you to the Customization menu.

    Within this option, you can :

    UTW3

    • Customize the Taskbar
    • Customize File Explorer
    • Customize the Modern UI in Windows 8 | 8.1
    • Use Some additional Customization Options

    UTW4


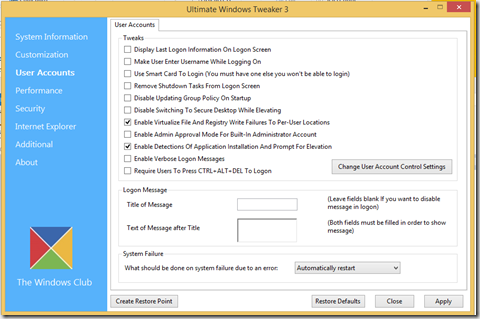
    The Third Option is User Accounts. Here you can :

    • Change User Account Control Settings
    • Change all User Specific settings

    UTW5

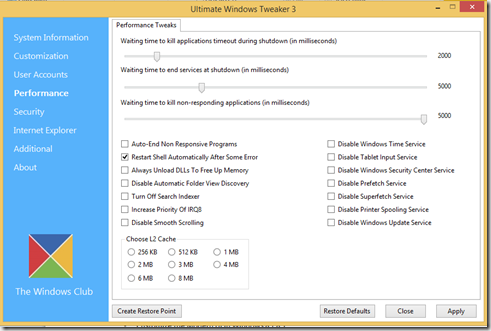
    The fourth option lets you do Performance tweaks, Some of them are :

    • Reduce the time taken by Windows to force shutdown your system
    • Reduce the waiting time to kill the unresponsive applications & services
    • You can even check the option to Auto Kill non responsive programs
    • If you are using an SSD, the first option to choose here would be to Turn off Search indexer

    UTW6


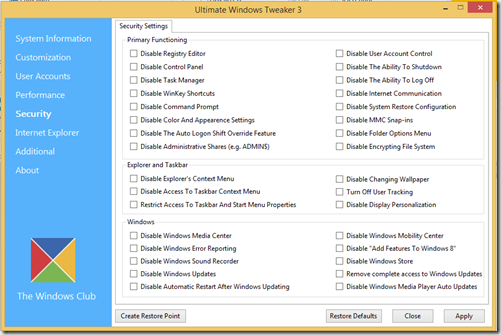
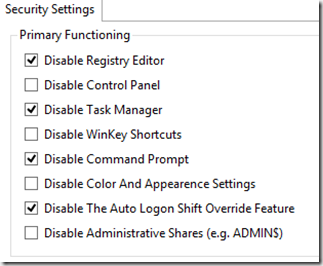
    The Security Tweak bar is the next option. This is basically a Control Panel of all the security related tweaks that can be done on Windows. This is something all the IT professionals look for. Getting all of them in a single click is much appreciated:

    UTW7

    Some of the tweaks that i played here are :

    UTW_security


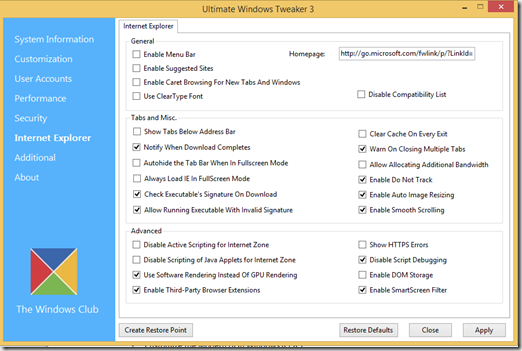
    With Ultimate Window Tweaker 3.0 you can also Tweak your Internet Explorer, you can :

    UTWIE

    • Control the Overall IE options
    • You can change the look & feel of your IE
    • You can Disable Active Scripting
    • Use between GPU and Software Rendering
    • & a lot more

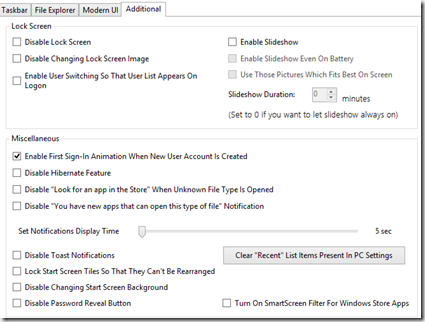
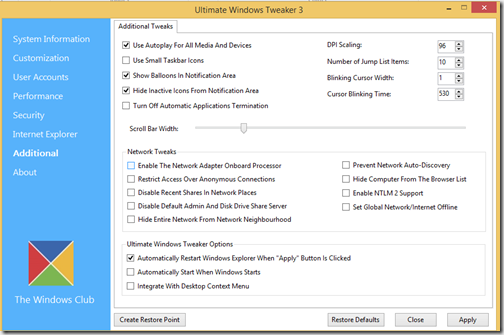
    But, that’s not all. You can use the Additional Tweaks Section :

    UTW8


    Another Amazing feature of this tool is the ability to Restore Defaults. This option is available under every Tweak menu, if you think you did something wrong, just click on Restore Defaults & you will go back to the stock Windows Settings.

    UTW75

    Before Using the Ultimate Windows Tweaker 3.0 for Windows 8 | 8.1, make sure to create a Restore Point

    TW

  • Fix : Broken libraries in Windows 8.1 | Restore Default Libraries

    Fix : Broken libraries in Windows 8.1 | Restore Default Libraries

    This post will help you fix broken libraries in Windows 8 , 8.1 & Windows 7 | Restore Default Libraries. This post also shows you the steps to show & restore your libraries in Windows operating system. Sometimes the library folders get corrupted & the whole functionality of the libraries is affected. This post will also fix the issue when you cannot find your files stored in the libraries or open the library folders at all.

    Below are the steps to fix Windows Libraries :

    Step 1 : Show the Libraries

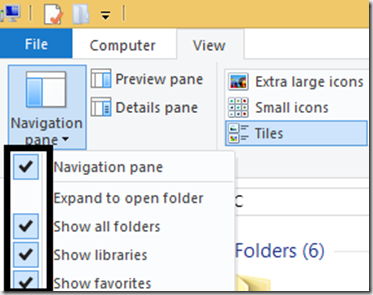
    • Go to This PC ( Computer )
    • Click on View
    • Click on Navigation Pane
    • Check “show all folders”
    • Check “Show Libraries”
    • Do not uncheck anything that is already checked

    restore_libraries_8

    Step 2 : Restore Default Libraries

    • Now,
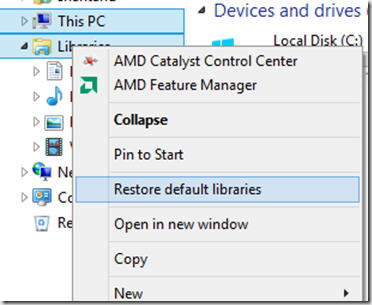
    • Locate your libraries in the left hand pane
    • Right Click
    • Click on Restore Default Libraries

    restore_libraries_8_1

    • That’s it.

    If you still face an issue with your libraries, please use the comment section & i will try to help.
  • How to : Enable Local Administrator Account in Windows 8.1

    How to : Enable Local Administrator Account in Windows 8.1

    This post is a collection of steps on How to enable local administrator account in Windows 8.1 . The same steps can be followed in Windows 8 as well. Windows 8 / 8.1 by default has the local Administrator account disabled. Follow the steps below to enable the local ( built-in) administrator account in Windows 8.

    • Follow this article to List Local users MMC
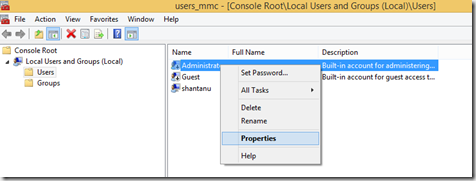
    • Now, Right Click the User Account that says Administrator
    • Click on Properties

    local_administrator_account

    • Now, here, Uncheck the box that says Account is disabled
    • Click on Apply
    • Click on Ok
    • Your Built-in ( Local ) administrator account is now active
    • You can choose to set a password for the same by:
    • Right Clicking the Administrator account
    • Click on Set password

    If you face a problem with the steps mentioned above or need assistance with a certain step, please use comments section to post your query

  • Review : Wondershare Video Converter Ultimate | Giveaway

    Review : Wondershare Video Converter Ultimate | Giveaway

    5/ 5stars

    Video conversion started back in the days when portable video players were introduced. People belonging to the 80’s era know that when different form factors of video players came to the market, came with it the need for format & resolution conversion. VCD, DVD, WMV, 3gp, AVI, MPG etc. are amongst many popular video formats out there. As the technology progressed, different devices such as smartphones & tablets & multimedia players came into existence. For a user like me, who likes to have a number of gadgets, a video converter is an application of great utility. I always have a need to convert from & to QuickTime, Windows Media & RMVB. Most of my home videos were WMV & mpg format & I always have a need to play all my videos on my iPad & my Windows Phone. Same goes with playing them on my PC and my sister’s iPhone. Platform dependency was make my life a bit hard.

    I tried a number of video convertors & the results were all but unsatisfactory. Suddenly a friend recommended me the Wondershare Video Converter Ultimate (http://www.wondershare.com/pro/video-converter-ultimate.html ). I tried the application before buying & I have to admit that it works better than any Video / Audio converter I have used till date. It has a better conversion rate & as suggested by the website, it does convert almost 30 times faster than a few other converters I tested.

    Below is the Review : Wondershare Video Converter Ultimate | Giveaway inside

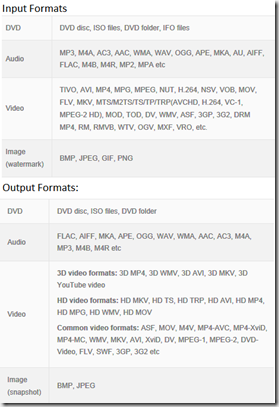
    Wondershare Video Convertor Ultimate supports a number of input & output formats that it supports for conversion. You can convert Audio, Video & Images by using this application. Wondershare Video Converter Ultimate can be installed on Windows 8/7/Vista/XP & also on Mac OS X 10.6, 10.7 or 10.8 Mountain Lion.

    Let’s cover each aspect from installation to conclusion one by one:

    Installation:

    Wondershare Video Converter Ultimate came in a small web downloader package & Installation on my medium bandwidth connection took around 2 minutes. It was fairly easy & did not give me any headaches. Now, I am very sardonic about my Video Players. All my life I have used the Windows Media Player & Media Player Classic, but this Video Convertor came with a Wondershare VIdeo Player & I was more than impressed by the overall user interface & usability of this player. It has all the combined / good features of my favourite players & performed even better than in all the key aspect of multimedia playback.

    First Impression:

    Wondershare Video Converter Ultimate has a very eye soothing User Interface. Every Button & menu is well located & within minutes you get a hang of what you are doing. Its a familiar application & feels like you are using it for ages. The conversion quality & speed is excellent. Its like a All in one A/V studio at your fingertips.

    Conversion Formats & Devices

    • Supports 158 Video conversion formats

    formats_wondershare

    • Supports editing of video on the fly
    • You can Burn CD/DVD & even save ISO files (burn to ISO ) directly from the converter itself.
    • Supports direct Video download, that means that you can simply click on download

    video_download_wondershare1

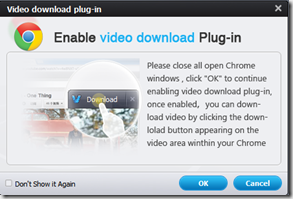
    • To enable the video download feature simply let the Wondershare Video Converter ultimate Enable the Video Download plugin

    video_download_wondershare

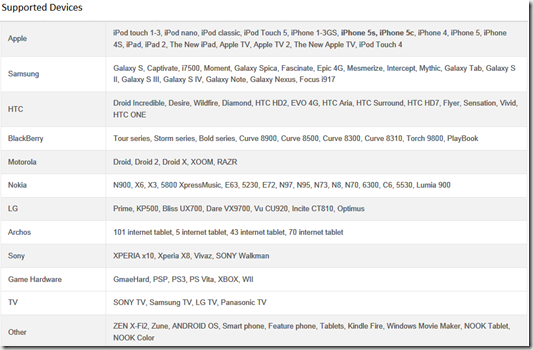
    • Wondershare Video Converter Ultimate supports a number of device specific output formats, that lets you convert any(supported input format) video

    supported_devices_wondershare


    Features & Interface

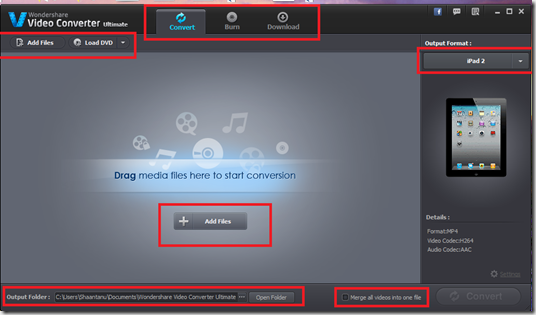
    wondershare

    • The initial screen on the Wondershare Video Converter ultimate is your dashboard that you can use to do every task associated with this application
    • If you wish you convert, either drag & drop files or click on the add files Button.
    • If you have a DVD that you need to convert, simply click on Load DVD & browse for the DVD path
    • At the bottom you can choose the storage folder where all the converted videos are saved for future usage.
    • If you have a lot of small videos and wish to make a combined video, simply click on the Merge all videos into one file file checkbox at the bottom right corner & Click on convert
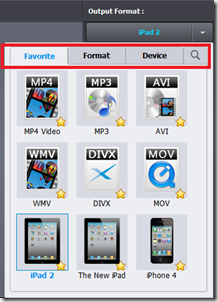
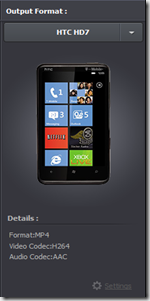
    • You can select a output format based on your Device or file format
    • Just Click the dropdown menu on the Output Format menu on the right hand side of the dashboard

    wondershare1 wondershare2

    • If you wish to edit the video that you are converting, simply click the edit button in front of the video

    wondershare3

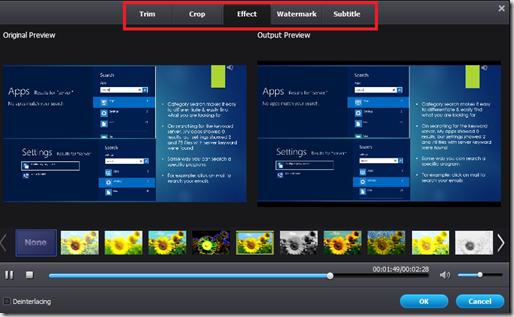
    • Now, after you click on edit, you are presented with some great options. You can add subtitles to the video if you wish, or crop the video, add a watermark or add an effect of your liking. After you are finished, just click on Ok & choose the destination that you wish to save the video to.

    wondershare4

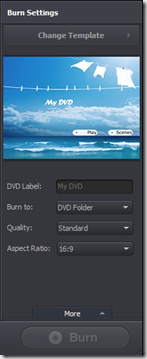
    • The Burn Suite within this Converter application is equally amazing, you can choose the converted files ( Audio, Video, Images )
    • Select a Template
    • Select a DVD label
    • Choose the Quality of the Videos
    • & choose the aspect ratio
    • Click on burn & you are done

    wondershare5


    Conclusion & Rating

    Wondershare Video Converter Ultimate is an application that packs almost every feature that a user looks for. It can download, convert to your favourite format or device & even burn a DVD or save an ISO file with your content. It is fast, faster than any video converter application that I have used till date & it offers a great Wondershare Video Player that is among the best players that I have used. Wondershare Video Converter Ultimate can be installed on both Windows & Mac. I would give this application 5 Star rating.

    TW


    Giveaway

    If you wish to get your hands on this amazing Video converter, share this post on Facebook and twitter & post a comment with the link to your Facebook / twitter post in the comment section of this post to stand a chance to Win a License of Wondershare Video Converter Ultimate.

    * 10 days until the Giveaway closes. Send in your entry now.

  • How to : List Local users MMC in Windows 8, 8.1

    How to : List Local users MMC in Windows 8, 8.1

    This post is a step by step on How to list local users MMC in Windows 8 | 8.1 .Microsoft Management Console (MMC), is a built-in extensible common presentation service for management applications. MMC snap-ins are commonly used by Microsoft or other third party programs to interact with host integration services within the operating system.  MMC can be used to add /remove snap-ins according to the need of the administrator. Some of the most common management consoles in Windows Operating system are gpedit.msc & rsop.msc ( Resultant Set of Policy )

    Below are the steps to List Local users & Groups in Microsoft Management Console (MMC):

    • Press Windows Logo Key + X
    • Press A ( This will open command prompt with elevated privileges | Administrator mode )

    cmd_admin_win8

    • Now, within the command prompt type MMC  & press enter

    mmc


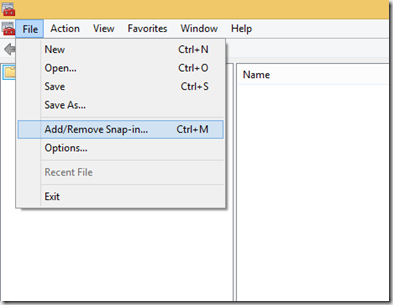
    • Now, within the File Menu on the top left corner
    • Click on Add/Remove Snap-in…

    mmc1

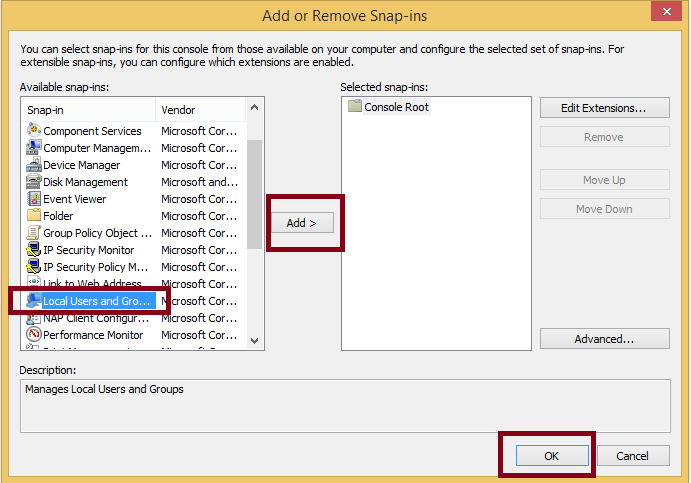
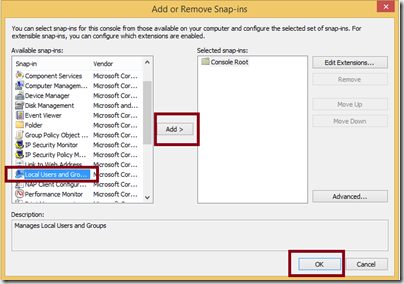
    • Locate & select Local Users and Groups
    • Click on Add
    • Click OK
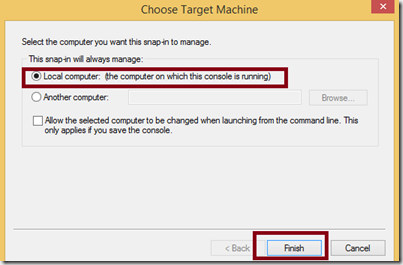
    • A New Windows will pop open

    mmc2

    • Here, Select Local Computer
    • Click on Finish
    • Press OK

    mmc3

    • Now, a new entry named Local Users and Groups (Local) Can be seen
    • Here, if you notice are listed all the users in your system.

    mmc4

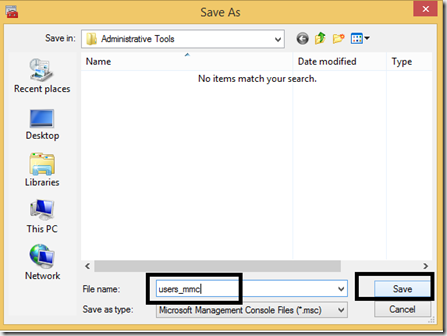
    • Now, Click on File
    • Click on Save
    • Give a name to this management console, so that you can use it later

    mmc5


    If you need further help or face an issue implementing any of the above mentioned steps, feel free to drop a line to me & I will try to help out.

  • Fix : Windows 7 Installation Stop error 0x80FE0000 | 0x80FF0000

    Fix : Windows 7 Installation Stop error 0x80FE0000 | 0x80FF0000

    This post will help you Fix Windows 7 Installation Stop error / BSOD 0x80FE0000 | 0x80FF0000. Below are the steps to fix blue screen error 0x80FF0000 | 0x80FE0000 while installing Windows 7 | Vista with a message Could not set the offline locale information

    You might get this blue screen error for some of the possible reasons listed below :

    • Corrupted Hard Disk Drive with possible bad sectors
    • Windows Installation Disk problem
    • BIOS setting problem
    • You tried Installing Windows in a Logical Drive instead of Primary partition

    Before you continue reading this post, I suggest you read this article to know more about blue screen errors and possible steps to resolve them.

    Below are a few different methods to fix this stop error:

    Method 1 : Windows Installation Disk problem

    • If you are installing Windows Vista | 7 from a DVD, make sure that your DVD is not scratched or has any visible signs of damage
    • If you have an ISO file ( Disc Image ), you can use it to make a Installation USB drive to Install Windows
    • For How to make a USB installation drive Follow this link
    • After creating the USB Installation, try to install Windows again
    • If you still face an issue, go down to Method 2

    Method 2 : Check your Hard Disk Drive ( hdd ) for errors

    • Boot from Windows 7 | Vista Installation DVD / USB
    • Press Shift + F10
    • or,
    • Click on Repair your computer
    • Click Next
    • Click on Command Prompt
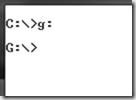
    • Now, if this your hard disk has multiple partitions, go to the partition you are trying to install Windows in.

    cmd

    • now, type chkdsk x:/f    –    ( X being your drive letter, example : C: , D: )

    Method 3 : Making Sure that you are not Installing Windows to a Logical Drive

    • Follow method 2 to open command prompt
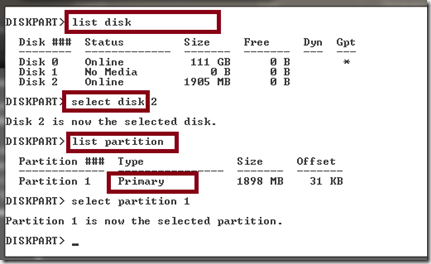
    • In Command Prompt, type diskpart and press enter
    • Type List Disk (note down your disk number in case you have multiple hard disk drives installed in your PC )
    • Type Select Disk 0 (Replace 0 with the number of your drive. Example : Disk 0, Disk 1, Disk 2 )
    • Type List Partition
    • This should list all the partitions on your hard disk drive
    • Just make sure that the partition you are trying to install Windows on is not a Logical Drive (It must be a primary partition )

    cmd1


    Method 4 : Cleaning Your partition | DATA Backup Must before continuing

    Note : This method will clean all partitions on your hard disk. Before continuing, make sure you backup your data.

    • Follow Method 2 to open command prompt
    • Type Diskpart and press enter
    • Type List Disk (note down your disk number in case you have multiple hard disk drives installed in your PC )
    • Type Select Disk 0 (Replace 0 with the number of your drive. Example : Disk 0, Disk 1, Disk 2 )
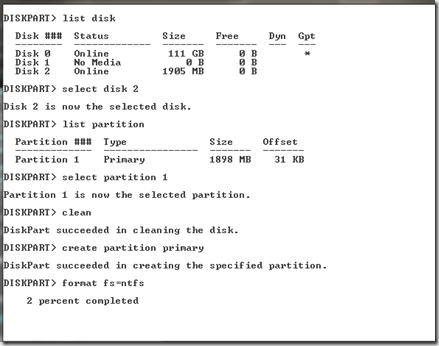
    • Type Clean ( This will delete all partitions on your drive )
    • Now, type create partition primary & press Enter
    • Type format fs=ntfs
    • Note: This is a full format and will take some time to complete depending on the size of your disk

    cmd2

    • After the format is complete, try installing Windows again

    Method 5 : Check BIOS settings

    • Boot into the BIOS ( press DEL, F2, F10 ) ( refer your system documentation for details )
    • Locate options saying SATA Mode & set it to AHCI
    • Remember, The option to change the SATA type might vary depending on your BIOS make and system model. You just have to set the drive to AHCI, if available.


    If you still face an issue, please use the comment section to post your problem & I will try to help you

  • How to Install Windows Live mail / essentials in Windows 8 | POP Support

    How to Install Windows Live mail / essentials in Windows 8 | POP Support

    This post is a How to Install Windows live mail desktop ( essentials ) in Windows 8 |POP support. Many of you have written to me saying that they are really sad that Windows 8 mail app does not support POP ( Post office Protocol ) & you wish to use POP as your email settings. And many email providers does not support / charge extra for IMAP.In Windows 7 days, I used to install Windows Live Essentials for Windows Live mail, messenger, photo gallery, live writer and some other sets of essentials programs. This post helps you do exactly that. Just follow the steps mentioned below :

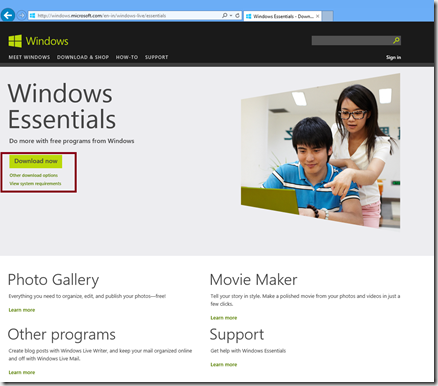
    • Go to http://get.live.com
    • Click on Download Now
    • After the Download Completes, Run the program

    Windows live mail

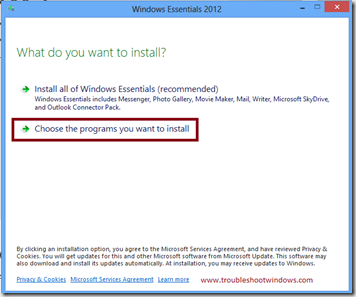
    • Click on Choose the programs you want to Install

    Windows live mail1

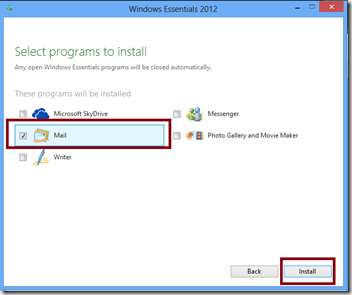
    • Select Windows Live Mail & uncheck every other box ( Unless you need those extra applications )

    Windows live mail2

    • Click on Install
    • Let the process Finish
    • It might take a while, depending on your Internet connection speed.
    • Now,
    • You can use the POP3 type email settings with Windows Live Mail in Windows 8, Without using the Default Windows 8 mail app.

    If you have any queries or comments, please feel free to use the comment section