This post is a step-by-step tutorial with pictures on How to create a Windows 10 Recovery disk. A recovery drive is a much needed & very helpful tool when it comes to troubleshooting your PC. Though Windows 10 recovery options can be used in a number of ways, making and keeping a recovery disk is a must have for those dire situations where nothing else works. The best part about this recovery disk is that it doesn’t just help troubleshoot your PC, it can also contain a proper backup of your PC. So, in case of data loss, you have an option of recovering your essentials.
Below are the steps with pictures to create a recovery disk:
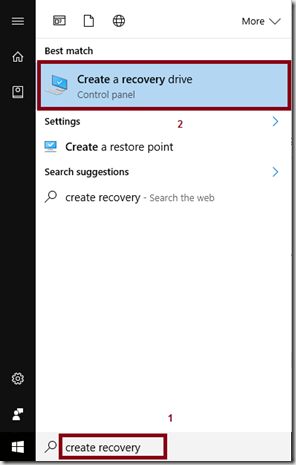
- Go to the start screen
- In the search box, type Create a recovery drive
- Click on the app under results.
- Click on Yes, when prompted
- Refer the screengrab below

- Now,
- a wizard to create the recovery drive will open up

- If you wish to include system files
- Check the check box as indicated in the screenshot above,
- else, uncheck the box
- Click on Next

- It might take a minutes for your system to get ready
- Make sure you insert a USB disk with at least 8 GB space
- Also make sure that your don’t have any data on the drive, as this app will format the drive
- Select the USB drive
- and click next


- After you click on create, the process will start & might take from a few minutes to more than that, depending on the option you chose.

- The wizard will copy files to your drive and you will receive a confirmation message at the end

- Click on Finish
- Your Recovery Drive is now ready