ByshantanuNovember 15, 2012How to Disable Autorun in Windows 7, Vista & XP This post contains steps to turn off the Autorun feature in Windows. Autorun feature allows any autorun enabled…Windows 7Windows VistaWindows XP
ByshantanuNovember 12, 2012Handy Keyboard shortcuts for Windows 8 Windows 8 is proving out to be a great & responsive operating system. It’s an operating system that…Windows 8
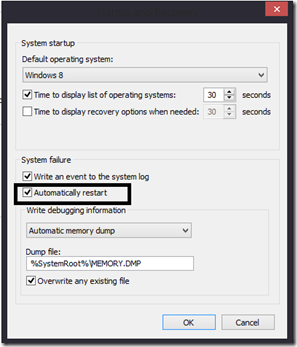
ByshantanuNovember 9, 2012How to disable automatic system restart on system failure in windows 8, 7, vista, XP This post will help you disable Automatic Restart on System Failure in Windows 8, 7, Vista & XP.…Windows 8
ByshantanuNovember 8, 2012Fix: Mouse / Touchpad pointer jumps while typing in Windows 8, 7 ,Vista, XP After reading this post you should be able to fix a problem where your mouse or touchpad pointer…Windows 7Windows 8Windows VistaWindows XP
ByshantanuOctober 31, 2012How to create a USB / CD / DVD Recovery Repair media in Windows 8 After reading this post, you will be able to create a recovery media in Windows 8. This media…Windows 8
ByshantanuOctober 30, 2012Refresh your PC : Windows 8 Feature make your Installation new again This post explains a new feature in Windows 8, that enables the users to refresh their PC to…Windows 8
ByshantanuOctober 29, 2012How to add another or non Microsoft email account in Windows 8 mail app This article focuses on the users who wish to add / configure another email account in windows 8…Windows 8
ByshantanuOctober 28, 2012Fix : Clock watchdog timeout stop / blue-screen error in Windows 10 | 8 |8.1 After reading this post you will be able to fix a STOP error or better known as BSOD…Windows 10Windows 8
ByshantanuOctober 28, 2012Fix : Windows 8 UI / Metro Apps shows splash screen but won’t launch After reading this post you will be able to fix an issue where none of your Windows 8…Windows 8
ByshantanuOctober 26, 2012Windows 8 : Reimagined era of computing now begins After much anticipation, Windows 8 has reached the general availability milestone in it’s release cycle today the 26th…Windows 8
ByshantanuOctober 24, 2012Calibrate your display with Display calibration tool in Windows 7, 8 After reading this post you will be able calibrate your display. Display calibration lets you adjust gamma, contrast,…Windows 7Windows 8Windows Vista
ByshantanuOctober 21, 2012Fix : Frequent Windows is not responding error message in Windows 7 & Vista After reading this post you will learn a few ways to troubleshoot the frequent “not responding” problem with…Windows 7Windows 8Windows VistaWindows XP