Category: Windows 10

Troubleshooting, tips, tricks & feature reviews of Windows 10

  • How to Open RTF Files in Windows 10 – Open/Convert RTF Files

    How to Open RTF Files in Windows 10 – Open/Convert RTF Files

    In today’s article, we will be taking you through a detailed guide on how to open RTF files in Windows 10.

    If you’re someone who handles a lot of documents on your computer, then you definitely might have come across files with the “.RTF” file extension.

    Have you ever wondered what RTF stands for?

    Also, Read –> How to fix the “Your PC did not start correctly” error on Windows 10?

    What is RTF File Format?

    Rich Text Format or RTF is a document format created by Microsoft back in 1987. The main purpose of the RTF file format is to act as a cross-platform document format, thus making it easier for the same document with the “.RTF” format to be read across multiple platforms and all popular document processing software.

    How to Open RTF Files in Windows 10?

    If you’re looking for ways on how to open RTF files in Windows 10, then below is the easiest way to open RTF files on Windows 10.

    1. Navigate to the document file with the “.RTF” file format on your Windows 10 computer.
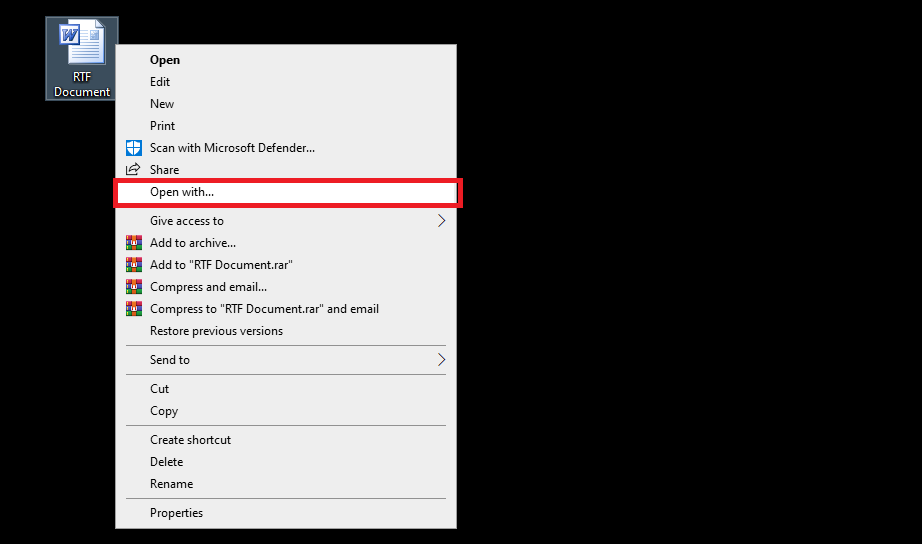
    2. Using the mouse, right-click on the file.
    3. From the drop-down menu that appears, click on the “Open With” option.open-RTF-files-on-windows10
    4. In the next window that appears, select “WordPad”. Alternatively, if you have the “Microsoft Word” software installed on your computer, you can select that as well.open-RTF-files-on-windows10-using-wordpad
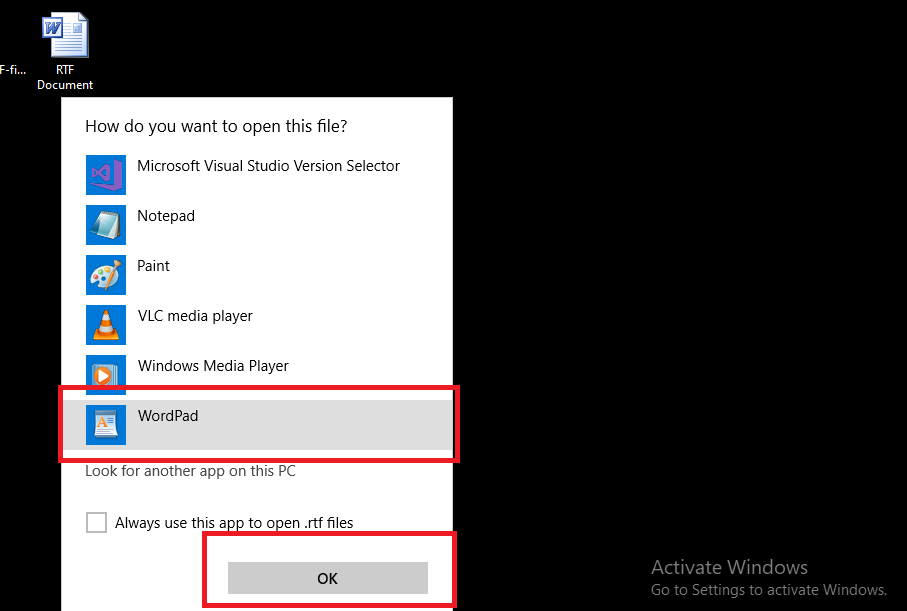
    5. Now, click on “Ok” to open the RTF file using either WordPad or Microsoft Word depending on your choice.

    If you wish to always open RTF files in Windows 10 using your selection of either WordPad or Microsoft Word, then check the box next to the “Always use this app to open .rtf files” option to set the application as the default for RTF files.

    How to Convert RTF Files to TXT File in Windows 10?

    Similar to the RTF file format, TXT is another commonly used file format. If you try to open the RTF files using a TXT document editor, then the contents of the document will be corrupted.

    You can convert the RTF file to TXT file format to easily open the same file on Windows 10 using a TXT file editor.

    Below are the steps to easily convert RTF files to TXT files.

    1. Click here to launch the Convertio RTF to TXT file converter tool.
    2. Now, upload the RTF file that you wish to convert to TXT file format. You can also upload multiple RTF files to convert all of them to TXT format at once.
    3. After uploading the file(s), click on the “Convert” button.
    4. Wait until the document conversion is completed.
    5. Once done, click on the “Download” button.

    And that is it. The converted TXT file will be downloaded to your computer now.

    How to Convert RTF Files to PDF Files in Windows 10?

    Many of us also use the PDF file format to share documents across platforms. If you wish to convert RTF files to PDF file format, follow the below steps.

    1. Launch the online RTF to PDF file converter by clicking here.
    2. Select the RTF file(s) that you wish to convert to PDF.
    3. After selecting the files, click on the “Convert” button.
    4. Wait for the file conversion to complete.

    Now, the PDF file will be automatically downloaded to your computer.

    Final Words

    We hope you found this article on how to open RTF files in Windows 10, convert RTF to TXT in Windows 10, and convert RTF files to PDF in Windows 10 as informative and easy to follow.

    Got any questions?

    Feel free to ask us in the comments below.

  • How to Install Windows 10 on a Laptop the Easiest Way

    How to Install Windows 10 on a Laptop the Easiest Way

    Are you wondering about how to install Windows 10 on a laptop?

    The Windows 10 operating system is the latest version from Microsoft.

    For anyone looking out for a stable, feature-rich, and highly functional Windows version, Windows 10 is the way to go.

    A simple Google search can help you find all the features and functionalities offered by the Windows 10 operating system.

    However, the feature that I am impressed the most about is the fact that anyone can now download & install Windows 10 on their system without needing a license key.

    Well, yeah, Windows is still a paid operating system and you are still asked for a license key when you install it.

    But, the restrictions are lighter than previous Windows versions and you can install Windows 10 on a laptop/PC and then later choose to upgrade to the premium Windows version by purchasing a license key.

    If you’re wondering about how to install Windows 10 on a laptop, then today we are here with a detailed step-by-step guide on the same.

    Also Read –> How to Create a Windows 10 Recovery USB

    How to Install Windows 10 on a Laptop?

    install-windows-10-on-laptop

    Before we take you through the steps to follow to install Windows 10 on a new laptop, take a look at the prerequisites.

    Windows 10 Prerequisites

    It is important that you make sure that the laptop you’re trying to install Windows 10 on meets at least the minimum required specifications to ensure that the operating system works smooth enough for hassle-free use.

    Below are the minimum specs required to install Windows 10 on a laptop:

    • If an OS already exists on the laptop, then it should be either Windows 7 SP1 or Windows 8.1.
    • At least 1GHz process.
    • A minimum of 1GB RAM for 32-bit Windows 10 or 2GB RAM for 64-bit Windows 10.
    • At least 16GB free disk space for 32-bit installation or 20GB free hard disk space for 64-bit installation.
    • DirectX 9 graphics driver or later with support for WDDM 1.0 driver.
    • 800×600 display resolution.

    Prerequisites to Install Microsoft Windows 10 on a Laptop

    Below are the prerequisite steps you need to complete before attempting to install Windows 10 on a laptop.

    • Download the official Windows 10 installation media creation tool from here.
    • Make sure to have a USB pen drive with at least 16GB of free storage space. If possible, format the pen drive to avoid any complications.
    • Download the official Microsoft Windows 10 ISO file from here.
    • You will need another computer in hand to copy the files to the pen drive (in case you’re trying to install Windows 10 on a PC without any OS currently).

    Steps to Install Latest Windows 10 on a Laptop

    Once you are sure that your laptop meets the minimum specs required to install Windows 10, below is the step-by-step guide to install the latest Windows 10 on a laptop.

    Procedure 1: Create Windows 10 Bootable USB Flash Drive

    1. Connect your pen drive to the computer and launch the Windows 10 media creation tool.
    2. On the Windows media creation tool window, click on the “Accept” button when prompted.
    3. Now, select the “Create installation media (USB flash drive, DVD, or ISO file) for another PC” option and then click on the “Next” button.
    4. Now, select the Windows 10 edition you wish to install as well as the preferred language and system architecture. If you aren’t aware of the details, tick the checkbox labeled as “Use the recommended options for this PC”.
    5. On the next screen, select the USB flash drive you connected to the PC and continue.
    6. Now the pen drive will be converted into a bootable Windows 10 installation disk.
    7. Wait for the procedures to complete.
    8. Remove the pen drive and proceed to the new laptop where you wish to install Windows 10.

    Procedure 2: Change Boot Order of Laptop to Boot from USB

    Before you can install Windows 10 from the pen drive, you need to change the boot order of the new laptop to boot from a USB pen drive. Below is how you can do that:

    1. Boot into the BIOS setup utility of your laptop. The method to boot into BIOS depends on the laptop manufacturer. Usually, tapping on the “Esc”, “F11”, or “F9” keys during the initial boot should boot the device into BIOS.
      You can search Google with your laptop manufacturer’s name and model name to know how to boot your laptop into BIOS.
    2. In the BIOS setup utility mode, set to boot from USB as the first priority (first in the order).

    Procedure 3: Install Official Microsoft Windows 10 from Bootable USB Drive

    Follow the below steps to boot from the USB and install the Microsoft Windows 10 OS.

    1. Connect the pen drive you had in step 1 above to the new laptop.
    2. Reboot your laptop.
    3. In case you are asked which disk to boot from, select the USB drive.
    4. Wait for a few minutes.
    5. The Windows 10 installation wizard will now launch.windows-10-installation-screen
    6. Follow the on-screen instructions and make appropriate selections to install Windows on your laptop.format-partition-windows-10
    7. During the installation, you will need to pick a drive partition where you wish to install Windows 10 (C: drive). Format the drive before proceeding. You can also delete existing partitions and create new ones on this screen.
    8. Wait for the installation to finish successfully.

    And that is all. After the installation completes successfully, your laptop will boot and load the Windows 10 operating system. Once the installation finishes and Windows 10 successfully loads up, you can remove the pen drive from the laptop.

    Final Words

    As we mentioned earlier, you can comfortably work on Windows 10 even without a license key.

    If you’re asked for a license key during the installation of Windows 10, simply skip this step. The limitations you experience without a license key are mostly cosmetic and do not affect security or functionality in any way.

    However, upgrading to a valid Windows 10 license is recommended to enjoy full benefits. You can also add a new license key after the installation as well.

  • Top 3 Methods to Open WMV File on Windows 10

    Top 3 Methods to Open WMV File on Windows 10

    Are you looking for ways to open WMV files on Windows 10?

    Then today we are here with a detailed guide that will take you through the steps to open files in the WMV file format on Windows 10.

    Just like the ways to open AVI files on Windows 10, there are also several ways to open WMV files.

    Before we begin, let us explain to you what the WMV file format actually is.

    What is WMV File Format?


    WMV stands for Windows Media Video and is a file format for video playback that is developed by Microsoft for the Windows operating system.

    The WMV file format is used for video files only and if you see any file with the “.WMV” extension, then it means that only media playback software tools that support the WMV extension can playback the file.

    How to Open WMV File on Windows 10?

    As we mentioned above, only media playback software tools that support the WMV file format can be used to playback video files that have the “.WMV” extension.

    Below are some of the best software tools to successfully playback the WMV files on computers running the Windows 10 operating system.

    Method 1: Open WMV File on Windows 10 Using Windows Media Player

    Windows Media Player is the standard audio/video playback software that comes bundled with the Microsoft Windows operating system.
    Windows Media Player 12 is the latest version that supports the Windows 10 operating system.
    The Windows Media Player 12 software comes pre-loaded with the standard installation of Windows 10. However, in certain Windows 10 versions, the software comes as an optional feature that can be enabled/disabled.

    If Windows Media Player 12 isn’t available by default on your Windows 10 computer, below are the steps to enable the same:
    1. Click on the “Windows” icon located in the left corner of your taskbar.
    2. Now, click on the “Settings” gear icon.

      Launch-Settings-from-Taskbar-Windows10

    3. Within the Settings window that loads up, click on “Apps” and then click on “Apps & Features”.

      Launch-Apps-Menu-from-Settings

    4. Now, click on “Optional features”, and then click on “Add a feature”.

      Optional-Features-in-Windows-10

    5. Search for “Windows Media Player”.

      Install-Windows-Media-Player-Windows-10

    6. Select “Windows Media Player” and then click on the “Install” button.

    And that is it. You have now installed the Windows Media Player software on your Windows 10 computer.

    Method 2: Use KMPlayer

    KMPlayer is a third-party video playback software that you can use to play video files in the most commonly used file formats, including the WMV file format.

    Moreover, you have several controls over the video file itself including the ability to change playback aspect ratio, zoom into the video, add subtitle files, etc.

    You can officially download KMPlayer by clicking here.

    Method 3: Use VLC Media Player

    VLC Media Player has to be one of the most popular video player software tools out there. Almost everyone who set up a new computer will definitely install the VLC Media Player and set it as their default video player.

    You can play almost every known video file format using VLC Media Player including WMV file format. Also, you get several functional controls over the video playback, which makes it one of the best video player software for Windows 10.

    You can officially download VLC Media Player for Windows 10 from here.

    Final Words

    We hope you found this article on how to open WMV file format videos on Windows 10 as helpful and easy to follow.

    The solutions mentioned above to play WMV files are absolutely easy and completely free.

    In case you know of better software tools to playback WMV files on Windows 10, feel free to mention them in the comments below.

  • How to replace PowerShell (Admin) with command prompt in Winlogo+X

    How to replace PowerShell (Admin) with command prompt in Winlogo+X

    This post will guide you to replace the PowerShell (Admin) entry in the power menu that opens by pressing Windows Logo key + X in Windows 10 with good old style Command Prompt (Admin).

    After an update Microsoft decided to replace the Command Prompt (Admin) entry in the Power menu of Windows 10. This menu opens when you press the Windows logo Key + X and gives you many options to quickly control your PC.

    winlogox

    • Press the Windows logo key and type Taskbar settings in the search boxtaskbar_setting
    • Click on Task settings
    • Now, click on the option that says Replace Command Prompt with Windows PowerShell in the menu when I right-click the start button or press Windows key + X

    CMD

    powrshell_off

    • Now, press the Windows key + X again and confirm the changes

    replaced_CMD

  • How to boot into Safe mode Windows 10

    How to boot into Safe mode Windows 10

    This post is a step by step guide with pictures to help you boot into safe mode in Windows 10. Safe Mode in Windows 10 is a part of the advanced startup or diagnostic startup feature of Windows. With this you get almost all the troubleshooting options of Windows 10 at one place. Booting into safe mode is a rather convenient choice if:

    • You wish to remove a faulty device driver
    • need to troubleshoot a specific problem related to apps and programs
    • To make sure your core Windows installation is working fine
    • & a lot of other troubleshooting stuff

    Safe Mode in Windows comprises of just the most basic system files & device drivers, the ones most essential for Windows to start. This mode helps you diagnose most of the problems associated with Windows, that might not let your PC start correctly.

    How to boot Windows 10 safe mode:

    Scenario 1: Through Lock Screen OR Start Menu

    • Press & Hold the Shift key on your keyboard
    • While Holding the shift key, Click on Restart

    diagnostic_startup_Windows10

    diagnostic_options_windows_10

    • Now, from the menu Click on Troubleshoot
    • From the menu that follows, Click on Advanced Options

    Troubleshoot_advanced_options_windows_10

    • Now, from the menu that comes,
    • Click on Startup Settings

    startup_options_repair_windows10

    • And, Click on Restart

    safe_mode_windows10

    • Now, you will get a screen with options just like in the screengrab below

    safe_mode

    • Press 4 on your keyboard
    • Your Windows 10 is now booting into safe mode
    • Enter your Account Password, when prompted
    • After the booting completes, your desktop will change to a black wallpaper
    • The screen should look something like this

    safe_mode_boot_windows_10


    Scenario 2: Through bootable media | Recovery Drive

    In this scenario, most of the options remain exactly the same as mentioned above, the only thing that changes is the way you get to the troubleshoot Screen

    • Insert your Recovery or Installation DVD/USB into the drive/slot
    • Boot from the said media
    • When prompted, Select your keyboard layout
    • From the screen that follows,
    • Click on Troubleshoot & follow the steps as mentioned above
  • How to Create a Windows 10 Recovery USB

    How to Create a Windows 10 Recovery USB

    This post is a step-by-step tutorial with pictures on How to create a Windows 10 Recovery disk. A recovery drive is a much needed & very helpful tool when it comes to troubleshooting your PC. Though Windows 10 recovery options can be used in a number of ways, making and keeping a recovery disk is a must have for those dire situations where nothing else works. The best part about this recovery disk is that it doesn’t just help troubleshoot your PC, it can also contain a proper backup of your PC. So, in case of data loss, you have an option of recovering your essentials.

    Below are the steps with pictures to create a recovery disk:

    • Go to the start screen
    • In the search box, type Create a recovery drive
    • Click on the app under results.
    • Click on Yes, when prompted
    • Refer the screengrab below

    search_start_windows10

    • Now,
    • a wizard to create the recovery drive will open up

    wizard_create_recovery_drive_Windows10

    • If you wish to include system files
    • Check the check box as indicated in the screenshot above,
    • else, uncheck the box
    • Click on Next

    windows10_recovery drive

    • It might take a minutes for your system to get ready
    • Make sure you insert a USB disk with at least 8 GB space
    • Also make sure that your don’t have any data on the drive, as this app will format the drive
    • Select the USB drive
    • and click next

    usb_recovery_drive_windows10

    windows10_recoverydisk

    • After you click on create, the process will start & might take from a few minutes to more than that, depending on the option you chose.

    creating_recoverydrive_windows10

    • The wizard will copy files to your drive and you will receive a confirmation message at the end

    recoverydrive_finished

    • Click on Finish
    • Your Recovery Drive is now ready
  • Fix: Unable to open Diagnostic options WinRE Windows 10

    Fix: Unable to open Diagnostic options WinRE Windows 10

    This post will help you fix an issue with your Windows PC, wherein when you try to open the diagnostic options | recovery console in Windows, you either get an error reading “Unexpected handler” or the recovery options just won’t open. Follow this step-by-step guide, If in case you are unable to open the Windows Recovery Environment (WINRE):

    Method 1:

    • Shutdown your PC
    • Disconnect any and all add-on devices like printer, scanner, external keyboard /mouse, projector or monitor, or any network device
    • Restart your PC
    • If you are able to boot into Windows, disconnect any network you are connected to
    • Press Windows logo key + X (To open power menu)
    • press A or click on Command Prompt(Admin)

    windowslogokey X

    • Click on Yes
    • In this elevated command prompt, type SFC /SCANNOW
    • Press Enter

    SFC

    • This will check your system files for integrity
    • If any discrepancies are found, they will be fixed after initial check.
    • After the process completes, restart your machine
    • Check if the problem is solved

    Method 2 : Recovery Drive | Bootable Drive (IF you are not able to boot into Windows)

    • If you have created a Recovery drive for Windows, Use that for booting
    • If you haven’t created a recovery drive, follow the steps here to make one
    • Or
    • You can use your Windows installation DVD/USB to boot
    • Once you boot from it, Select your language, keyboard option
    • Click on Next

    repair

    windows10_repair_boot

    • Now, Click on Repair your Computer, in the left bottom corner as shown above
    • Click on Troubleshoot
    • Now Click on Advanced Options
    • Click on Startup Repair

    Alternatively: Method 3: Refresh | Reset your PC

    This should fix your issue, if not let me know & i will try to troubleshoot your issue further

  • How to Rebuild BCD Windows 10 & 8.1

    How to Rebuild BCD Windows 10 & 8.1

    This is a step by step tutorial or a beginner’s guide to How to rebuild BCD (Boot Configuration DATA) and rebuild MBR (Master Boot Record) in Windows 10 & Windows 8 | 8.1.

    Rebuilding BCD | Boot configuration data | MBR

    To check & rebuild the Windows BCD:

    • If you are able to access lock screen on Windows, Press & keep holding the shift key & click on Restart to open Windows Recovery Environment (WinRE)
    • If not,
    • Insert the original Windows DVD/USB and boot from it
    • You can also use Windows Recovery Media
    • Select your Language & keyboard options
    • Click Next
    • Click on Repair your computer

    windows10_repair_boot

    • Click Troubleshoot
    • Click on Advanced Options
    • Click on Command Prompt

    command_prompt_diagnostics_menu_windows10

    • Now,
    • Type bootrec /fixmbr
    • Press Enter
    • Then,
    • Type bootrec /fixboot
    • Press Enter
    • Then,
    • Type bootrec /rebuildbcd
    • Press Enter
    • Now, Type Exit

    bootrec

    • Restart your computer
  • Fix: 0xc0000225 STOP error Windows 10 | 8.1

    Fix: 0xc0000225 STOP error Windows 10 | 8.1

    “After reading this post you will be able to fix an error code 0xc0000225 with a message “An unexpected error has occurred”, “a file is missing” , with a description “Your PC needs to be repaired”. This guide applies to Windows 10, 8.1 using diskpart, WInRE

    Cause: Corrupt or missing BCD. Your windows operating system has been installed in UEFI mode. UEFI (Unified Extensible Firmware Interface), is a newer technology when compared to the older BIOS setup that uses MBR (Master Boot Record), this problem is known to occur frequently with UEFI, but might also occur with non-uefi or MBR based computers.

    NOTE: Make sure to go into your system setup (BIOS/CMOS) and set the UEFI mode to UEFI only. If it’s set on both or compatible, make sure it is now set to UEFI only. (applies to new installation).

    Fix: 0xc0000225 STOP error Windows 10 | 8.1

    Method 1: Startup Repair

    You will need your Windows installation DVD / USB drive or Windows Recovery Media (If you have not created a recovery media, click here, to use this article to create one)

    • Insert your installation DVD/USB or recovery media & boot from it
    • After the booting sequence completes, select your language and keyboard layout
    • Click on Next

    repair

    • Now, Click on Repair your computer, (located in left bottom corner of your screen)

    windows10_repair_boot

    • Click on Troubleshoot
    • Now, Click on Advanced options
    • Click on Startup Repair
    • Your PC will restart and Windows will try Startup Repair.

    If this doesn’t fix the error, try to Rebuild your BCD – Refer this post –> How to Rebuild BCD Windows

    Method 2: Using Diskpart for MBR

    Troubleshoot_advanced_options_windows_10

    • Now, Click on Command prompt

    command_prompt_diagnostics_menu_windows10

    • Now,
    • Type Diskpart
    • Press Enter
    • Type List Disk
    • Press Enter
    • Type Select Disk 0
    • Press Enter
    • Type List Volume
    • Press Enter

    mbr_disk_select_diskpart

    • Type the drive letter of your cd/dvd/usb drive in my case, its d:
    • Now, type bootsect /nt60 SYS /mbr
    • Press Enter
    • you will receive a success message.
    • Type exit
    • Press Enter
    • Restart your Computer

    Method 3: For UEFI

    • Follow all the steps in method 2 (till you open command prompt)
    • Now, type diskpart
    • Press Enter
    • Type List volume
    • Press Enter
    • Check the list to see which volume has label as ESP

    uefi_esp_volume

    • In my case it is volume 4
    • Type Select volume 4
    • Press Enter
    • Now type,
    • assign letter=x
    • Press Enter

    uefi_esp_volume

    • Type exit
    • Press Enter
    • Now, Type bcdboot C:\windows /s x:/f UEFI
    • You will get a success message
    • Type Exit
    • Restart your computer

    This should solve your issue, if not, let me know and I will be happy to help you further

  • Fix: DRIVER_PORTION_MUST_BE_NONPAGED Windows 10

    Fix: DRIVER_PORTION_MUST_BE_NONPAGED Windows 10

    This post will help you fix an issue with your Windows 10 PC, where you get a STOP error, or better known as BSOD (Blue screen of Death) error in Windows. This step by step guide will help you pin point the issue that’s causing this stop error.

    The primary cause of this error is mostly faulty device drivers or corrupted driver files. Proper driver software in your PC is essential for proper functioning of your computer. Any hardware with faulty, missing or corrupted device drivers can be a primary cause of this BSOD error. That being said, a failing hardware of a loose connection within your PC can also cause this issue. Below are the steps to fix driver_portion_must_be_nonpaged stop error in Windows 10, 8.1,8 & 7.

    Method 1: Diagnose issue with Event Viewer

    • Restart your PC
    • Click here to use this article to boot into safe mode
    • If you are able to boot into safe mode,
    • Press Windows Logo key + X (to open power menu in Windows 10)
    • Press V or Click on Event Viewer

    windows x

    event_viewer_windows10

    • Expand Windows logs
    • Click on system

    windows_system_event_viewer

    • Now check the logs one by one to see of any errors are listed that indicate a device driver issue
    • Now,
    • Expand Application & Service Logs
    • & click on hardware events
    • Check if any such events are listed & make note of the device listed

    hardware_event_viewer

    • Go to your hardware manufacturer’s support website
    • Download & install the latest device drivers for your hardware
    • If you have a Desktop PC
    • Try to remove that hardware and reinsert it
    • If you have a Laptop
    • Try removing any add-on or peripheral device

    Method 2: Using Windows update

    • Go to start screen/menu
    • Type Windows update
    • Click on Windows update from search results
    • Click on Search for updates
    • Download and install all the available updates including any hardware device drivers that are listed

    Method 3: Manually updating all device drivers

    • Chipset drivers
    • Graphics or Display drivers
    • Audio drivers
    • Networking drivers
    • USB 3 drivers
    • Mass Storage | Storage drivers
    • The above listed device drivers are the ones that are utterly essential. Though all the drivers should be updated, start with updating these & then move on to the others. This will, first of all, help you pin-point the device driver or device that is causing this error & secondly, you will be able to easily fix the issue without having to fiddle with everything in your computer

    Now,

    • If the above mentioned methods solve your problem, its all good
    • If not, follow the two methods mentioned below

    Method 4: Update your BIOS

    • BIOS update should only be done if you are completely familiar with the process.
    • BIOS update should only be done on your own risk, if done incorrectly, it can make your computer unusable.
    • Incorrect BIOS update may void your warranty
    • Go to your System Manufacturer’s support website or your Motherboard manufacturer’s support website
    • Enter your Motherboard | system model & select your operating system
    • Check if any BIOS updates are available
    • Read the documentation properly & read any support documents available therein
    • Follow the procedure accurately and update your BIOS
    • Make sure you do not unplug power from your system or use a backup power supply, so that your system doesn’t lose power during this procedure.
    • If it’s a portable machine( a laptop), make sure you have at least 70% of battery available. Plugging in the charger | adapter is recommended*
    • Again, this guide is to be followed at your own risk, I or www.troubleshootwindows.com will take no responsibility for any damage caused.

    Method 5: Reset your PC

    • Go to start screen
    • Press & Hold the Shift key on your keyboard
    • Press the power button
    • Click on Restart

    Troubleshoot_advanced_options_windows_10

    • Click on Reset this PC
    • Resetting your PC will completely remove everything in your PC, your Windows will go to the state of a fresh install. No apps, files or personal data will be saved. So make sure you make a backup of your stuff first & then reset your PC
    • Click on Reset
    • Your Computer will restart & the process will take some time to complete

    Hope this helps, if not, let me know & I will try to troubleshoot your Issue further