Category: Windows XP

  • FIX : Documents stuck on print queue : Cannot delete Print Jobs Windows 7, Vista, XP

    FIX : Documents stuck on print queue : Cannot delete Print Jobs Windows 7, Vista, XP

    After reading this post you will be able to fix the problem where you give a print command & it gets stuck in the print queue & all the documents fail to print. When you try to cancel the print job or delete documents from the print queue, the documents/print job doesn’t get cancelled.

    Try the following to resolve the problem

    • Go to Control Panel ( Found in start menu )
    • Go to Devices and Printers
    • Double Click the Printer Name
    • Within the print queue press Cancel All or Right Click a particular document and click cancel/delete

    If this doesn’t solve it, try this:

    • Check if you printer has a Cancel or STOP button, Press it ( Refer your Printer documentation for using STOP/Cancel Button )
    • Turn your printer OFF, If it’s a USB device, try plugging your printer into another USB port. Then Turn it ON

    If this doesn’t solve it, try this:

    • Open Notepad & carefully select all the following text:
    • net stop spooler
      del %systemroot%\system32\spool\printers\*.shd
      del %systemroot%\system32\spool\printers\*.spl
      net start spooler
    • Right-click the text that you selected, and then click Copy.
    • In Notepad, right-click in the blank document, and then click Paste.
    • Carefully select (highlight) all the following text:C:\DeletePrintJobs.cmd
    • Right-click the text that you selected, and then click Copy.
    • In Notepad, click Save As on the File menu.
    • In the File Name box, right-click, and then click Paste.
    • Click Save.
    • Go to Start menu & in the start menu search box type CMD ( Right Click, Run as administrator )
    • type C:\DeletePrintJobs.cmd

    This will delete your printer spooler. Try this only if you are confident to do this opration. Use the comment section below to ask if anything is not clear enough.

    Last Method:

    • Go to, Control Panel
    • Program & Features
    • Uninstall a Program
    • Locate your Printer Driver/Software
    • Click on Uninstall.
    • Restart your computer
    • Either Insert the disc that came with your printer or download and install the latest drivers from your printer manufacturers website.
    • Check if you problem is resolved.
  • FIX : STOP Error : BSOD : kernel_data_inpage_error

    FIX : STOP Error : BSOD : kernel_data_inpage_error

    This guide can be used for resolving the STOP error with the keywords “kernel_data_inpage_error”. Here we have listed a few ways to resolve these type of Blue screen errors. After troubleshooting kernel data inpage error a few times, it seems like the cause of this error resides in memory. In these cases memory refers to both RAM and Hard disk drive in your system. It’s not at all necessary that your hardware has a problem, though it’s a possibility. This error might also occur due to a faulty driver software. To get to a conclusion whether you have a software or hardware error, that is causing this BSOD, try the following:

    Below is an example of the error you might be getting:

    Stop 0x0000007a ( XXXX XXXX XXXX )
    filename.sys – Address XXXXX

    • Use Windows Update to update your computer & drivers ( install all recommended and optional updates) ( optional updates most of the time have your device drivers )
    • If you don’t find new drivers on Windows update, go to your motherboard / Computer Manufacturer’s support site, Select your model / version –> download the Chipset , Display & communications / networking drivers and Install them.
    • Restart & check
    • If the problem still persists,
    • Go to Start menu and type CMD
    • Right click the Command (CMD) program that appeared in your start menu search results and click on run as administrator
    • now, type CHKDSK /p  & press enter.
    • After the scan is complete,
    • type, CHKDSK C: /f /r    (This will repair corrupted sectors )
    • Restart the system and check if the problem is solved.

    If not,

    • Follow this guide to check for Memory ( RAM errors ) CLICK HERE

    If, problems are found, replace your RAM modules, if you have multiple modules try taking all of them out and then test with one module at a time and check for errors. repeat the step with all modules.

    Last Step

    System Restore : Click here for the Guide to using System Restore

  • Fix : Printer not working, Printing problems in Windows

    Fix : Printer not working, Printing problems in Windows

    After reading this post you will be able to fix some the problems with your printer or many sorts of problems that are producing  errors when your try to print a document in Windows.

    Some of these problems involve :

    • You are unable to install a printer, connect to a printer, or print more than one job at a time
    • You receive an error indicating your Print Spooler service is experiencing problems
    • You receive an error indicating your <PRINTERNAME> is not the default printer
    • You receive an error indicating: <PRINTERNAME> cannot be contacted over the network
    • You receive an error stating that your Plug and Play printer %PRINTERNAME% has encountered a driver problem
    • You cannot Print in Internet Explorer (CLICK HERE)
    • Your printer shows as offline, even when it is turned on.

    A few things to check :

    • If your printer is connected locally ( directly to your computer & not on a network), try checking the connection between your Printer & computer and make sure it’s not loose.
    • Check the cable connecting your printer and computer. Change if necessary, always keep a spare, change just to make sure the cable isn’t bad.
    • Follow the Printer Manual to make sure any error signal lights indicating a problem with printer are not lit. If they are check for problem associated with that light in the documentation that came with your printer.
    • Check for paper Jam/low cartridge.
    • If your printer is connected over a network, make sure your network is up and running. ( check Router/Access Point )
    • If you are using a print server to connect to the printer over a network, make sure the print server is working fine.
    • If the printer is attached to another computer over the network and then shared for users on a network, make sure the printer is printing directly on the system it is attached locally to.
    • Refer your documentation & press the printer demo print button to make sure that the printer hardware is working fine.
    • Make sure there are no print command in print queue that might be hanging the print jobs. To check, go to start menu –> Devices and printers –> double click your printer and check the print queue.
    • If you cannot print from Internet Explorer follow this guide, Click Here

    Else,

    Microsoft Fix IT

    fix-it

  • FIX Windows Media Player unable to play certain type of media files

    FIX Windows Media Player unable to play certain type of media files

    After reading this post you will be able play to almost all commonly found media files. There are a lot of media file extensions that requires certain codecs to open/play. Default Windows installation does not support all the formats due to certain limitations. Some people download and install VLC player to play their Media files. VLC player can be found here. Though to play your media files within Windows Media player you can follow the steps below:

    • Head over to this website & download k-lite codec package
    • Or go to www.bing.com and search for k lite codec package.
    • Download the package
    • Install the package using Default/typical settings.
    • Open Windows Media Player and play your favourite file type.
    • Enjoy

    Note: Scan the Installation/Downloaded files with a good Antivirus Software before Installing.

  • How to Backup/Restore Windows Registry [Updated 2023 Guide]

    How to Backup/Restore Windows Registry [Updated 2023 Guide]

    This post will help you backup/restore Windows Registry in case a problem related to the registry arises.

    Before taking you through the steps to backup/restore Windows registry files in 2023 and beyond, let us first explain to you what are registry files in Windows and why they’re important.

    What Are Windows Registry Files?

    Ever wondered how your Windows-powered desktop or laptop powers ON and functions perfectly each time?

    Well, basically, they launch each time launching the required features, services, and applications with the help of Windows registry files.

    So, simply put, you can think of Windows registry files as a collection of configuration files for the Windows OS installed on your computer.

    When you power ON your machine, it collects all the information related to account access, applications/services to launch, device drivers, UI elements, your pre-configured device settings, and much more.

    How to Create Windows Restore Point Before You Backup/Restore Windows Registry?

    It is always recommended to create a “Windows Restore Point” before you attempt to back up/restore the Windows registry.

    In case something goes wrong, then the restore point can help you restore your computer to an earlier working condition as it is currently.

    Below are the steps to create Windows Restore Point:

    1. Click on the “Start” menu.
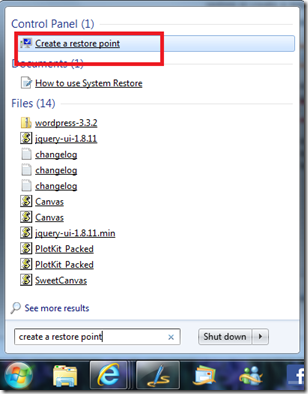
    2. Type “Create a restore point” in the search bar and select the option that appears with the same name.

      restore_sys

    3. Follow the onscreen instructions to proceed with the creation of a Windows Restore Point backup.

    How to Backup Windows Registry?

    You must be logged on as an administrator to perform these steps. If you are not logged in as an administrator, you can only change settings that apply to your user account.

    • Launch the “Run” window by pressing the “Windows” key + “R” key on your keyboard.
    • Now, type “Regedit” into the search box, and then press “ENTER” on your keyboard. If you are prompted for an administrator password or confirmation, type the password or provide confirmation. (For Windows XP –> start menu-> run-> Regedit)
    • Click on My Computer or Computer ( depending on your OS type) Click the File menu, and then click Export.
    • In the “Save In” box, select the location where you want to save the backup copy, and then type a name for the backup file in the File name box.
    • Click Save.

    And that’s it. You have now created a backup of Windows registry files on your computer.

    How to Restore Windows Registry Files?

    Follow the steps below to restore previously existing Windows registry backup files.

    1. Press the “Windows” key and the “R” key on your keyboard to launch the “Run” window.
    2. Within the Run window, type “regedit.exe” and click on the “Ok” button within the Run window or press the “Enter” key on your keyboard.
    3. The “Registry Editor” window will now launch.
    4. Click on the “File” option located on the top menu bar of the Registry Editor window and then click on the “Import” button.
    5. Within the window that appears, select the pre-existing Windows registry backup file on your computer and click on the “Open” button.

    The Windows registry backup that you selected in step 5 above will now be restored on your computer.

  • How to Fix: Windows Live Photo gallery or stuck pictures screensaver in Windows 7

    How to Fix: Windows Live Photo gallery or stuck pictures screensaver in Windows 7

    After reading this post you will be able to fix the problems associated with Windows Live photo gallery in Windows 7, Vista, XP. These problems include:

    • Windows live photo Gallery Freezes
    • Windows Photo gallery screensaver says “ no pictures found”
    • Other Photo Gallery related issues.

    There are two methods to fix this:

    Before starting let’s backup your Windows Registry, as this method includes registry editing. Click here

    Method 1:

    To fix this problem, you have to regenerate the database for Windows Live Photo Gallery. To do this, follow the appropriate steps for your operating system:

    Windows XP

    Close Windows Live Photo Gallery.

    • Click Start, click Run, type %userprofile%\Local Settings\Application Data\Microsoft\Windows Live Photo Gallery, and then click OK.
    • Delete any existing instance of “OLD_Pictures.pd4” and “OLD_Pictures.pd5.”
    • Locate and then right-click “Pictures.pd4” or “Pictures.pd5.”
    • Rename “Pictures.pd4” to “OLD_Pictures.pd4” or rename “Pictures.pd5” to “OLD_Pictures.pd5.”

    Windows Vista

    Close Windows Live Photo Gallery.

    • Click Start, click Run, type %userprofile%\AppData\Local\Microsoft\Windows Photo Gallery, and then click OK.
    • Delete any existing instance of “OLD_Pictures.pd4” and “OLD_Pictures.pd5.”
    • Locate and then right-click “Pictures.pd4” or “Pictures.pd5.”
    • Rename “Pictures.pd4” to “OLD_Pictures.pd4” or rename “Pictures.pd5” to “OLD_Pictures.pd5.”

    Windows 7

    Close Windows Live Photo Gallery.

    • Click Start, click Run, type%userprofile%\AppData\Local\Microsoft\Windows Live Photo Gallery, and then click OK.
    • Delete any existing instance of “OLD_Pictures.pd4” and “OLD_Pictures.pd5.”
    • Locate and then right-click “Pictures.pd4” or “Pictures.pd5.”
    • Rename “Pictures.pd4” to “OLD_Pictures.pd4” or rename “Pictures.pd5” to “OLD_Pictures.pd5.”

    Make Sure Windows Live Photo Gallery is closed when you perform this repair operation. When you restart Windows Live Photo Gallery, the database will be rebuilt.


    Method 2:


    Automatic Method:

    fix-it

  • Set a Video as Windows Desktop Background

    Set a Video as Windows Desktop Background

    After reading this you will be able to set your desired video clip as Windows Desktop background. Windows Vista had the Dream-Scene content that gave a lot people something new to play with. The people who might be missing that or the users who want to try something new will enjoy this little tip.

    For this trick to work you must have VLC player, you can Download VLC player here.

    Step 1

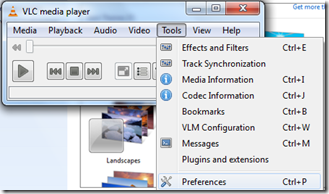
    Open VLC player and go to tools –> preferences

    VLC_pref

    Step 2

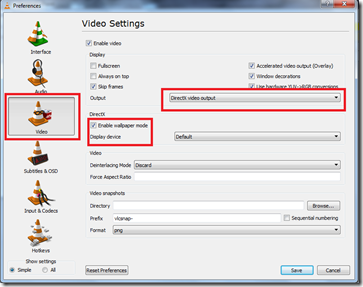
    Go to Video –> Output-> select DirectX video from dropdown list. Also check the Enable Wallpaper mode –> click save.

    vlc_pref2

    Step 3

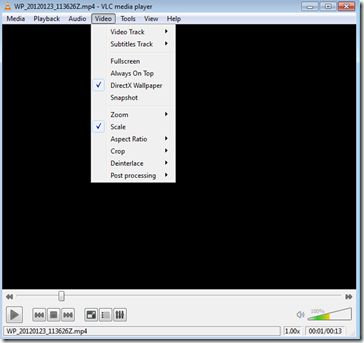
    Now open any video file in VLC & click on video & click DirectX wallpaper.

    vlc_pref3

    Your Theme will be changed to Windows basic in Windows 7 and your video will start to play on your desktop background.

  • Solution : Windows Media Player cannot play some media files : missing codecs

    Solution : Windows Media Player cannot play some media files : missing codecs

    After Reading this you will be able to play almost all type of media files on your computer. Different media files need different codecs to run properly. This problem can sometimes lead to misery for a user. You want to play a song or a movie and you get an error that some codec is missing and required to play that file.

    The Simplest of all the ways to get those files to play are :

    • Download and install VLC media player
    • or Download and Install K-lite codec package

    K-lite codec package comes with Media Player Classic that I personally like to watch movies on.

    Download VLC Media Player

    K-Lite Codec Package

    Note: It is always recommended to scan the files you download of the internet. If even a fragment of suspicion is detected on your part, please do not download the file.

  • What to Know & do about BSOD ( Blue Screen ) (Black Screen) errors

    What to Know & do about BSOD ( Blue Screen ) (Black Screen) errors

    After Reading this you will be able to know more about

    • Blue/Black Screen Errors
    • To find which error you are dealing with
    • To resolve the error

    A Blue Screen or Black Screen error which is also known as BSOD occurs when Windows faces a serious problem & shuts down or restarts your system to protect it from damage. Sometime when you boot back into Windows you get a message that “Windows has recovered from a serious error”.

    There can be many different problems associated with both hardware and software that might case a BSOD. But, we cannot troubleshoot these errors if we don’t know what particular problem we are dealing with.

    To know which particular error/problem we are dealing with, the first step would be:

    To disable automatic system restart on system failure

    To do this, Press the F8 key while booting ( just after you press power button on your computer ).

    Select the Advanced Startup options (Windows 7) & select Disable Automatic Restart on system failure.

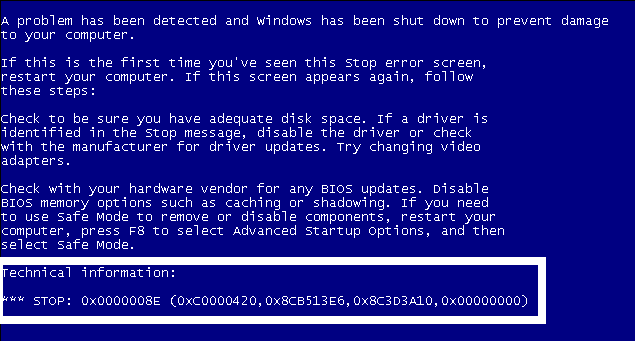
    This will restrict windows to not to shutdown/restart when the problem occurs.  At this moment you can note down the error code & more information displayed on your screen: Example screen below:

    BSOD

    and

    BSOD2

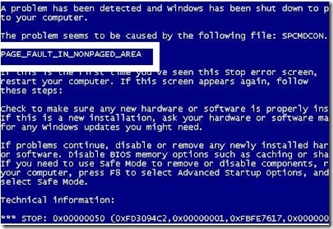
    Both the screen grabs above have highlighted white portions. These are the significant piece of information that you must note down from your BSOD. This will help you narrow down you problem and then solve it.

    Once you have the error code & description, search http://support.microsoft.com with the error code or search our website www.troubleshootwindows.com for more information on the error code.

    Basic Steps to resolve the Blue Screen errors

    • Remove any newly installed hardware & uninstall the driver software associated with it. To uninstall the drivers you can simply remove the hardware first and then boot into safe mode and uninstall them.
    • Remove any newly installed software or antivirus program by logging into safe mode.
    • Use System Restore, to restore your computer to an earlier time when it was working fine. To learn how to use system restore click here.
  • How to Fix No Sound Problem in Windows Vista/XP/7/8/8.1/10/11

    How to Fix No Sound Problem in Windows Vista/XP/7/8/8.1/10/11

    Are you looking for ways to Fix the No Sound Problem in Windows Vista/XP/7/8/8.1/10/11?

    Then today we are here with a detailed article on the same to help you out.

    What Could Be Causing No Sound Problem in Windows?

    There can be a number of reasons if your computer doesn’t play any sound at all. Sounds include Windows basic sounds, music, etc.

    What to Check:

    • Does the computer have sound hardware?
    • Does the computer have the device drivers?
    • Verify the speaker/headphone wires has proper connections.
    • Is the mute button active?
    • Does BIOS have Sound/Audio Hardware Enabled?

    How to Fix No Sound Problem in Windows XP/7/8/8.1/10/11?

    Solution 1: Check the Sound Hardware/Sound Card:

    Sound Hardware is also called the “Sound Card”. If you have a desktop system & have installed an add-on sound card for high-performing sound, the first step would be to open the cabinet and check if the sound card is installed into the slot properly.

    If you have a laptop ( notebook/netbook/ultrabook), there are very slight chances that you have an Add-on Sound card installed.

    Below are the steps to Check the sound card from within windows:

    1. Press the “Windows” key + “R” key on your keyboard to bring up the Run window.
    2. Within the Run window, type “devmgmt.msc” and click on the “Ok” button.
    3. This will bring up the “Device Manager” window.
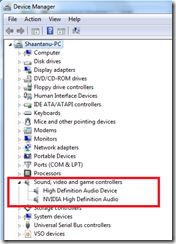
    4. See the below screenshot and check if the sound, video & game controllers show your Audio hardware installed.

    device manager


    Solution 2: Check if Device Drivers are Installed or not

    If you see an Exclamation mark on any listed hardware or a yellow question mark saying “Other Devices”, it is quite possible that either the device drivers installed for your device are faulty or there are no drivers installed.

    To resolve, right-click the hardware listed either in other devices or with an exclamation mark & click on update drivers & let Windows search the Windows Update service for any new drivers that might be available for your device type.

    You can also visit your computer manufacturer’s support website & try downloading the drivers from there. * refer to your computer documentation.

    If you see no hardware present within the sound, video & game controllers, you should try pressing the Scan for hardware changes button just below help ( refer to screenshot above). If the device manager fails to respond post-refresh, the chances of hardware issues are high or the audio hardware could be disabled in BIOS. ( To enable the same or to check BIOS settings, go to the end of this page).

    Solution 3: Verify the Speakers/Headphone Wires Does Not Have Any Damages

    Faulty headphones or speaker wires also cause the no audio issue. Check wires for any damages and ensure the connections do seem proper.

    Solution 4: Verify the Wires Connections Does Seem Correct

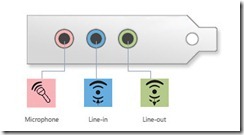
    If on a desktop PC, check out the image below and confirm all the wires connections do seem proper.

    sound back panel desktop

    Also, check for faulty speakers/headphones.

    Check if the audio is on mute.

    We may mistakenly turn the speakers into the mute mode, which might be causing the problem. Check the screenshots below to understand if your speakers are on mute or not.

    Muted

    muted

    Unmuted

    unmuted

    If you see the muted icon in your taskbar click on it to unmute. Also, check the volume level and increase it if necessary.

    Solution 5: Verify BIOS Has Sound/Audio Hardware Enabled

    To do this, refer to your motherboard/system maintenance manual & looks for the things given below:

    • Press Del or F2 or F10 or any other key depending on your system type & make
    • Advanced Options/ Integrated Peripherals
    • Enable Onboard Audio/ AC’97/HD Audio
    • Enable it
    • F10 ( Save & Exit )

    Final Words

    We hope you found this article on how to fix no sound problem in Windows XP/7/8/8.1/10/11 versions helpful and informative.

    Got any questions? Feel free to reach out and we’re more than happy to help you.