Blog

  • Solution : Windows Media Player cannot play some media files : missing codecs

    Solution : Windows Media Player cannot play some media files : missing codecs

    After Reading this you will be able to play almost all type of media files on your computer. Different media files need different codecs to run properly. This problem can sometimes lead to misery for a user. You want to play a song or a movie and you get an error that some codec is missing and required to play that file.

    The Simplest of all the ways to get those files to play are :

    • Download and install VLC media player
    • or Download and Install K-lite codec package

    K-lite codec package comes with Media Player Classic that I personally like to watch movies on.

    Download VLC Media Player

    K-Lite Codec Package

    Note: It is always recommended to scan the files you download of the internet. If even a fragment of suspicion is detected on your part, please do not download the file.

  • Solve Blue Screen error / BSOD : STOP: 0x0000000A IRQL_NOT_LESS_OR_EQUAL

    Solve Blue Screen error / BSOD : STOP: 0x0000000A IRQL_NOT_LESS_OR_EQUAL

    After reading this post you might be able to resolve the blue screen error you are facing. You are running a Windows based computer system and you face a Blue Screen Error or Stop screen error or BSOD.

    If it looks something like this:

    Stop: STOP: 0x0000000A (xxxxx, xxxxx, xxxxx, xxxxx)
    IRQL_NOT_LESS_OR_EQUAL

    xxxxx being some other codes/parameters

    This particular error is caused by a memory leak issue that happens because of the power manager.

    A hotfix is available with Microsoft support for this issue.

    To Download hotfix Click here


    Source: Microsoft Support

  • What to Know & do about BSOD ( Blue Screen ) (Black Screen) errors

    What to Know & do about BSOD ( Blue Screen ) (Black Screen) errors

    After Reading this you will be able to know more about

    • Blue/Black Screen Errors
    • To find which error you are dealing with
    • To resolve the error

    A Blue Screen or Black Screen error which is also known as BSOD occurs when Windows faces a serious problem & shuts down or restarts your system to protect it from damage. Sometime when you boot back into Windows you get a message that “Windows has recovered from a serious error”.

    There can be many different problems associated with both hardware and software that might case a BSOD. But, we cannot troubleshoot these errors if we don’t know what particular problem we are dealing with.

    To know which particular error/problem we are dealing with, the first step would be:

    To disable automatic system restart on system failure

    To do this, Press the F8 key while booting ( just after you press power button on your computer ).

    Select the Advanced Startup options (Windows 7) & select Disable Automatic Restart on system failure.

    This will restrict windows to not to shutdown/restart when the problem occurs.  At this moment you can note down the error code & more information displayed on your screen: Example screen below:

    BSOD

    and

    BSOD2

    Both the screen grabs above have highlighted white portions. These are the significant piece of information that you must note down from your BSOD. This will help you narrow down you problem and then solve it.

    Once you have the error code & description, search http://support.microsoft.com with the error code or search our website www.troubleshootwindows.com for more information on the error code.

    Basic Steps to resolve the Blue Screen errors

    • Remove any newly installed hardware & uninstall the driver software associated with it. To uninstall the drivers you can simply remove the hardware first and then boot into safe mode and uninstall them.
    • Remove any newly installed software or antivirus program by logging into safe mode.
    • Use System Restore, to restore your computer to an earlier time when it was working fine. To learn how to use system restore click here.
  • How to Fix No Sound Problem in Windows Vista/XP/7/8/8.1/10/11

    How to Fix No Sound Problem in Windows Vista/XP/7/8/8.1/10/11

    Are you looking for ways to Fix the No Sound Problem in Windows Vista/XP/7/8/8.1/10/11?

    Then today we are here with a detailed article on the same to help you out.

    What Could Be Causing No Sound Problem in Windows?

    There can be a number of reasons if your computer doesn’t play any sound at all. Sounds include Windows basic sounds, music, etc.

    What to Check:

    • Does the computer have sound hardware?
    • Does the computer have the device drivers?
    • Verify the speaker/headphone wires has proper connections.
    • Is the mute button active?
    • Does BIOS have Sound/Audio Hardware Enabled?

    How to Fix No Sound Problem in Windows XP/7/8/8.1/10/11?

    Solution 1: Check the Sound Hardware/Sound Card:

    Sound Hardware is also called the “Sound Card”. If you have a desktop system & have installed an add-on sound card for high-performing sound, the first step would be to open the cabinet and check if the sound card is installed into the slot properly.

    If you have a laptop ( notebook/netbook/ultrabook), there are very slight chances that you have an Add-on Sound card installed.

    Below are the steps to Check the sound card from within windows:

    1. Press the “Windows” key + “R” key on your keyboard to bring up the Run window.
    2. Within the Run window, type “devmgmt.msc” and click on the “Ok” button.
    3. This will bring up the “Device Manager” window.
    4. See the below screenshot and check if the sound, video & game controllers show your Audio hardware installed.

    device manager


    Solution 2: Check if Device Drivers are Installed or not

    If you see an Exclamation mark on any listed hardware or a yellow question mark saying “Other Devices”, it is quite possible that either the device drivers installed for your device are faulty or there are no drivers installed.

    To resolve, right-click the hardware listed either in other devices or with an exclamation mark & click on update drivers & let Windows search the Windows Update service for any new drivers that might be available for your device type.

    You can also visit your computer manufacturer’s support website & try downloading the drivers from there. * refer to your computer documentation.

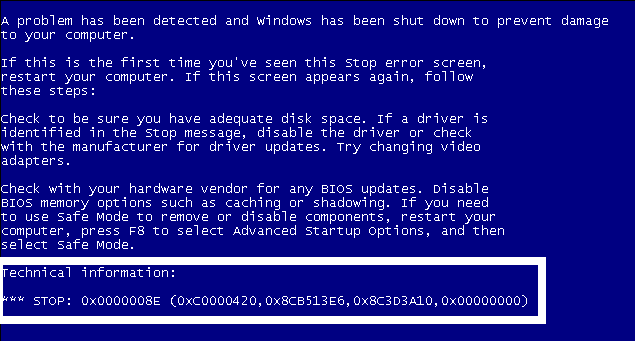
    If you see no hardware present within the sound, video & game controllers, you should try pressing the Scan for hardware changes button just below help ( refer to screenshot above). If the device manager fails to respond post-refresh, the chances of hardware issues are high or the audio hardware could be disabled in BIOS. ( To enable the same or to check BIOS settings, go to the end of this page).

    Solution 3: Verify the Speakers/Headphone Wires Does Not Have Any Damages

    Faulty headphones or speaker wires also cause the no audio issue. Check wires for any damages and ensure the connections do seem proper.

    Solution 4: Verify the Wires Connections Does Seem Correct

    If on a desktop PC, check out the image below and confirm all the wires connections do seem proper.

    sound back panel desktop

    Also, check for faulty speakers/headphones.

    Check if the audio is on mute.

    We may mistakenly turn the speakers into the mute mode, which might be causing the problem. Check the screenshots below to understand if your speakers are on mute or not.

    Muted

    muted

    Unmuted

    unmuted

    If you see the muted icon in your taskbar click on it to unmute. Also, check the volume level and increase it if necessary.

    Solution 5: Verify BIOS Has Sound/Audio Hardware Enabled

    To do this, refer to your motherboard/system maintenance manual & looks for the things given below:

    • Press Del or F2 or F10 or any other key depending on your system type & make
    • Advanced Options/ Integrated Peripherals
    • Enable Onboard Audio/ AC’97/HD Audio
    • Enable it
    • F10 ( Save & Exit )

    Final Words

    We hope you found this article on how to fix no sound problem in Windows XP/7/8/8.1/10/11 versions helpful and informative.

    Got any questions? Feel free to reach out and we’re more than happy to help you.

  • Block Internet Access over Network but allow Network Access / File & Print Sharing in Windows 8 , 7 , Vista , XP

    Block Internet Access over Network but allow Network Access / File & Print Sharing in Windows 8 , 7 , Vista , XP

    After reading this guide you will be able to block internet access over a home network or any network that your are an administrator to. This guide is a very simple collection of steps that do not require any additional software or firewall support to block internet access & just allow file & printer sharing.

    There are situations where one needs to allow or block internet usage to some users over a network. There are different methods that can be used to do the same, though the most easy method is given below:

    Let’s assume that you have a network running with single or multiple routers, either in home or office & you wish to block just the internet access to specific and / or all users. For this you have to login to your router by either IP address or router address & provide your username & password therein. Now in DHCP or DNS setting just uncheck the automatic DNS & mention the DNS settings to be anything you wish. for example: 192.168.1.15 or anything you like except the router’s IP address. 

    Now all the computer systems over your network might still show the internet to be connected but will not resolve / open any websites.

    To enable network access in a specific computer, just go the properties of the network adapter of that specific computer & within the IP address menu mention any open DNS. i.e 208.67.222.222 208.67.220.220 or Google DNS would also do.

    DNS

    And that is all there is to it.

  • Fix: “Hidden” Attribute Option Greyed Out in Windows XP/Vista/7/8/8.1/10/11

    Fix: “Hidden” Attribute Option Greyed Out in Windows XP/Vista/7/8/8.1/10/11

    Is the “Hidden” attribute option greyed out for you in Windows XP/Vista/7/8/8.1/10/11?

    Then we’re here today with a fix for the same.

    The ability to set the “Hidden” attribute to files and folders in Windows OS is a great feature. This allows you to hide certain files and folders from the public eye.

    However, sometimes you may see that the option appears to be greyed out. This means that it doesn’t allow you to change the settings of the Hidden feature for the file/folder.

    In this article, we bring you two different ways to fix this issue.

    How to Fix “Hidden” Attribute Option Greyed Out?

    This little tip can save you from a lot of trouble when suddenly your drive or folder gets disappeared from Windows Explorer & you only see it as a hidden folder or file. When this is the case it usually indicates either a file system malfunction or a small-time virus attack.

    Fix “Hidden” Attribute Option Greyed Out using Command Prompt

    1. Right-click the file or folder & check if your properties window looks something like this i.e. the hidden option greyed out as marked below.hidden_attrib
    2. Don’t be alarmed. Just open the Command Prompt window by searching for it within the Windows search bar in the taskbar.
    3. Now, check out the command below:ATTRIB -H C:\Users\MyName\Desktop\TestFile.txt

      In the above command, the “C:\Users\MyName\Desktop\TestFile.txt” part (without quotes) shows the file location.

      Fix-Hidden-Attribute-Option-Greyed-Out-in-Windows-XP-Vista-7-8-8.1-10-11

      You can replace the bold text with the actual location of your file, which you wish to unhide on Windows. Now, to get the location in the format as above, navigate to the location where the file is saved and copy the entire address bar info (as shown in the screenshot below).

    4. If the path you gave above is of a folder, and you wish to unhide all the files and sub-folders within that folder, then add /S /D at the end of the above command.So, the command will look like this:
      C:\Users\MyName\Desktop\TestFolder /S /D

    Fix the “Hidden” Attribute Option Greyed Out by Reverting Settings

    If any changes made to the customization settings of a folder are causing this issue to happen, then reverting the changes you made can help fix the issue.

    Below are the steps you can follow to revert changes made to a folder’s customization settings easily.

    1. Navigate to the folder for which you wish to revert the customization settings applied.
    2. Right-click on the folder and click on “Properties”.
    3. From the Properties window, switch to the “Customize” tab.
    4. Within the Customize tab, click on the “Restore Defaults” option.
    5. Click on the “Apply” button and then click on “Ok”.

    That is all. You have now reverted the customization settings you applied to the folder.

    Final Words

    We hope the above article on how to fix “Hidden” Attribute Option Greyed Out in Windows XP/Vista/7/8/8.1/10/11 was easy to follow and informative to you.

    In case you have any questions on the steps listed above, feel free to leave a comment below with your queries and we will definitely help you out.


  • How to Make ISO Image of a DVD on Windows XP/Vista/7/8/8.1/10/11?

    In this article, we explain in detail how you can easily Make an ISO Image of a DVD.

    You might be having a disc or some files that you have on your computer and wish you make an image out of them. Many times the user wants to make a bootable DVD too.

    Most of the tools out there that let you create an ISO image from a DVD, CD, etc. are paid tools and honestly are quite expensive as well.

    However, today we are here with free full-version software that allows you to easily make ISO images of a DVD. The tool we will be using today is named “BurnAware Free”.

    Using Windows 11? Check out  How to Customize Windows 11 Taskbar.

    What is BurnAware Free?

    BurnAware Free is a freemium software solution that allows you to perform disc burning on your Windows PC.

    Well, there are premium paid versions of the BurnAware disc burning tool, which adds to the features provided by the BurnAware Free version.

    For instance, the “BurnAware Premium” version adds features such as disc-to-disc data copying, data recovery tools, and ISO unpacking features.

    There is also the “BurnAware Professional” version, which has all the features offered by BurnAware Premium and is focused on the commercial use of the application.

    As we are just looking at the DVD-to-ISO functionality of BurnAware, we will be looking only at the free version of the software.

    How to Make ISO Image of a DVD using BurnAware Free?

    1. To begin, download and install the latest version of BurnAware Free from here.
    2. After successful installation, go ahead and run the software.
    3. When the software window launches, click on the “Copy to ISO” option.
    4. In the next screen, select the DVD disc drive that you wish to copy files from.
    5. Below the disk selection, you will see a section with the title “Disc image path”.
    6. Click on the “Browse” button beside the “Disc image path” title.
    7. Navigate to the location on your PC where you wish to save the ISO file.
    8. Give a name for the file after selecting the location, and then click on the “Save” button.
    9. Insert the drive into the DVD drive slot that you selected in step 4.
      Make-ISO-Image-of-a-DVD-on-Windows
    10. Click on the “Copy” button within the BurnAware window.
    11. Wait until the copying process is completed.

    And that is it. After the process completes, you can see the new ISO file in the location selected in step 7.

    What Are the Best BurnAware Alternatives?

    Creating ISO files from DVD appears to be a simple task, and in my opinion, BurnAware does the job flawlessly.

    However, if for some reason(s), BurnAware doesn’t meet your requirements, then you don’t have to worry.

    There are several other free software solutions that do the same task of creating ISO files from DVD.

    So, you don’t really have to worry about paying to get the task done.

    Below are some of the best alternatives to BurnAware that help you convert DVDs to ISO.

    1. AnyBurn: Download AnyBurn 2022.
    2. ImgBurn: Download Latest ImgBurn Version.
    3. DVD to ISO: Download DVD to ISO Freeware.

    We hope this simple guide on how to create ISO from DVD was helpful and easy to understand.

    Got any questions? Feel free to ask us in the comments below.

  • How to System Restore Windows 7/8/8.1/10/11

    How to System Restore Windows 7/8/8.1/10/11

    In an unfortunate event of a system crash or data corruption, the System Restore feature of Windows is a real lifesaver. Are you wondering how to system restore Windows OS?

    In this article, we are going to take you through the process that will help you perform System Restore on computers running Windows operating system versions 7, 8, 8.1, 10, and 11.

    What is System Restore Feature in Windows OS?

    Microsoft Windows gives its users the privilege to create restore points (similar to a save point in video games).

    In an unlikely event of a system crash or data corruption that is not fixed by following other methods, a system restore can help take your Windows system back to a point that was error-free.

    System Restore is an inbuilt feature within the Microsoft Windows operating system.

    Moreover, users can create multiple restore points and then pick the latest error-free restore point while following the System Restore procedure. Thus, ensuring that the user gets back the most recent error-free state of their computer.

    When Should You Use the Windows System Restore Feature?

    You should use system restore when:

    • Your computer system starts crashing unexpectedly
    • Fails to boot
    • You detect a virus or other file corruption
    • Some programs or features got deleted somehow
    • For lots of other misc. problems

    How to System Restore Windows XP/7/8/8.1/10/11

    Below are the steps to restore Windows running the XP/7/8/8.1/10/11 versions.

    How to Restore Windows XP?

    • Launch the Start menu on your Windows XP machine.
    • Click on “All Programs”.
    • Now, click on “Accessories” within the new side window that opens up.
    • Next, click on “System Tools”.
    • Finally, click on “System Restore” and follow the instructions on-screen.

    How to Restore Windows 7?

    • Start Menu-> type “ system restore “ (without quotes) and press enter.

      system restore windows 7

    • On clicking next:

      restore1

    • Here you can select the date to which you want to restore your system or you can click the checkbox which says “Show more restore points”, to see more restore points you can choose from.
    • You can also check out what programs will be affected by your restore operation by clicking on “Scan for affected programs”.
    • After checking all the rights & making sure you have selected the right restore point, click next and then click on finish.

    Steps to Restore Windows 8/8.1?

    1. Go to the “Start” screen by either clicking on the Windows icon on the taskbar, or by pressing the Windows key on your keyboard.
    2. Type “System Restore” within the Start window search.
    3. Click on “System Restore” from the search results and then follow the on-screen instructions.

    How to System Restore Windows 10/Windows 11?

    The steps to perform System Restore are the same on Windows 10 and Windows 11. We have mentioned the steps below. The guide also works if you did an upgrade from Windows 10 to Windows 11 as well.

    1. Press the “Windows” key + “R” key on your keyboard to launch the Run window.
    2. Within the Run window, type “control” and press Enter to launch the Control Panel window.
    3. Inside Control Panel, search for “Recovery” and click on the first option as shown in the screenshot below.system restore windows 10/ windows 11
    4. On the next screen that appears, click on “Open System Restore”.system_restore_control_panel
    5. This will launch the System Restore window.
    6. Follow the on-screen steps by clicking on the “Next” button.
    7. Now, select the most recently available restore point to proceed.system_restore_windows_11
    8. Tick the “Scan for affected programs” checkbox.
    9. Click on “Next”, and then click on “Finish”.

    And that is it. Now the restore process will begin on your Windows 10/Windows 11 system.

    How To Perform Windows Restore from System Repair Disc or Startup Menu

    If you have not created a system repair disc for Windows 7, create one now following this guide. If you already have a repair disc, just boot from it. you will see some options like the screenshot given below:

    system-restore-windows

    Select System Restore and follow the instructions given therein.

    OR

    You can, Press F8 while on the system startup and select Advanced Startup options, then click on repair your computer. It will also take you to the screenshot given above. You can simply select “System Restore” and follow the onscreen instructions.


  • How to Change Windows Clock Format from 24-Hours to 12-Hours?

    How to Change Windows Clock Format from 24-Hours to 12-Hours?

    Are you looking for an easy guide on how to change the Windows clock format from 24 hours to 12 hours?

    In this article, we will take you through the steps to change the Windows clock format from 24 hours to 12 hours, or vice versa, depending on your preference.

    How to Change Windows Clock Formatd?

    There are different ways to change the Windows Clock Format from 24 hours to 12 hours depending on the version of the Windows operating system that runs on your computer.

    However, a common method that you can follow on any Windows version is by changing the clock format using the Control Panel.

    We will be following the method to change time format in Windows using the Control Panel, as it’s relatively easy to follow in comparison to other methods.

    Moreover, the steps are common across all the Windows versions starting from Windows 7 onwards.

    1. The first step is to launch the “Control Panel” on your computer. This can be done by searching for “Control Panel” in the Start menu or by going to the Settings menu and selecting “Control Panel”.
    2. Within the Control Panel window, you can see the “Change date, time, or number formats” option under the “Clock and Region” title. Click on this.Change-Windows-Clock-Format
    3. A new window will now open.
    4. In this window, under the “Date and time formats” option, you can see the “Short time” and “Long time” options.
    5. The “Short time” and “Long time” options will have drop-down options beside them.
    6. Select the option for “hh:mm tt” from this menu. Once you have selected the “hh:mm tt” option, click “OK” to save your changes.

    You can make the change as mentioned in step 5 above for the “Short time” or “Long time” clocks as per your need.

    All changes will be visible in the same window to verify before making the actual change.

    The clock on your Windows computer should now be displayed in the 12-hour format.

    To change the clock format from 12 hours to 24 hours, you need to select “HH:mm:ss”

    And that’s it. You have now successfully changed the time format on your computer.

    Final Words

    We have listed the steps above based on the options and titles as seen on the Windows 11 operating system.

    If you’re running an older version, the steps are the same.

    The only difference will be the actual text that represents the options we have showcased.

    In case you have any queries, feel free to reach out to us and we’re more than happy to help.