Category: Windows 7

  • What to do When You Cannot Start Windows At All?

    What to do When You Cannot Start Windows At All?

    Having trouble starting your Windows computer?

    Are you searching for what to do when you cannot start Windows at all?

    After reading this you will understand various system recovery options within Windows XP/7/8/8.1/10/11.

    What to do When You Cannot Start Windows At All?

    The System recovery options within Windows  include:

    • Last Known Good Configuration
    • Using Safe mode to start Windows
    • Checking if Display Resolution is the problem
    • Knowing the error before troubleshooting
    • Using Start-up Repair
    • Using System Restore
    • Using Backup/Restore
    • Checking Memory errors
    • Finally Re-installing Windows

    Last Known Good Configuration

    To use this feature, press the F8 key while the system is booting up, Go to the Advanced Boot Options & from the menu select “ Last Known Good Configuration” and press Enter. If your computer system boots fine, you are successfully fixed it.

    Using Safe Mode to start Windows

    To boot into Safe Mode. Press the F8 key while the system is booting up. This will show you a menu, Select Advanced Boot Options, from the options therein select Safe Mode from the list and press Enter.

    This will let you boot into safe mode that will enable Windows to boot only with some basic necessary files and drivers & disables everything that is not necessary for the system to boot. What this does is that it restricts any other program, let it be an Antivirus, display driver module, or any application running at startup, and gives us a fair idea of the problem & also lets us use system restore to restore the computer to an earlier time when your Windows was running fine. Safe Mode also lets us uninstall some unwanted programs or drivers that might be make the system unstable.

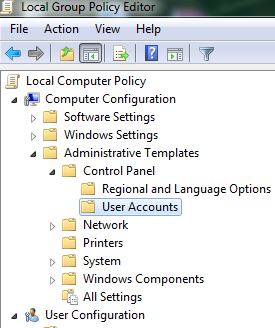
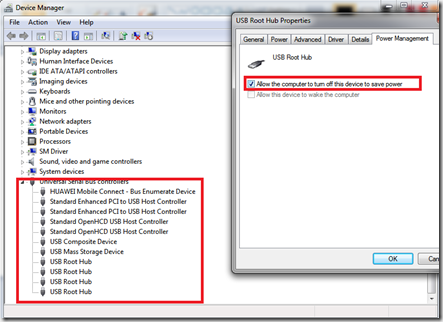
    Checking the Display Resolution

    Sometimes some bug or human error sets the Windows Display resolution to a value that your monitor cannot handle. In this condition, the system fails to boot as the monitor is unable to display that particular resolution transmitted by the Graphic/Display Adapter.

    To fix this, Press the F8 key while the system is booting, and select “Advanced Boot Options”. From the menu that will be displayed select “ Low-Resolution video mode” or “Enable VGA Mode”.

    This will set your resolution to a lower value & will fix any resolution-based problems. After booting into windows you can set your resolution to the recommended value* refer to the documentation of your monitor.

    To Change Resolution

    (Windows 7/Vista)

    Right-click on the desktop and click on change resolution.

    (Windows XP)

    Right Click on Desktop-> properties –> adapters

    Knowing the Error before troubleshooting

    It’s always hard to troubleshoot any problem if you don’t know the cause of it. To know the specific error you have to disable “Automatic Restart on System Failure”.

    To do that, Press the F8 key while the system is booting & select Advanced Boot Options. From the menu there select “Disable System Restart on System Failure”, this will enable you to look at the error next time it occurs and the computer will not restart automatically.

    If It’s a blue screen Error or better known as BSOD, you can follow this post to resolve it.

    Using Start-up Repair

    Startup repair is a tool built into Windows 7 to help users fix the common problems that restrict the user from booting into Windows.

    To use Startup Repair:

    • Press the F8 key & select Advanced Boot Options. From the menu displayed there select Repair Your Computer

    startup

    • When you select this option, the windows will continue to boot to the repair menu which looks like this:

    startup_repair

    • Now click on Startup Repair & follow the on-screen Instructions.

    If Startup Repair does not solve your issue, you can also choose System Restore from the options shown above & restore your computer to an earlier time when it was working fine.

    Click on System Restore, Select a Checkpoint from the calendar ( make sure you choose a date on which your computer was working fine ) & follow the onscreen instructions that appear.

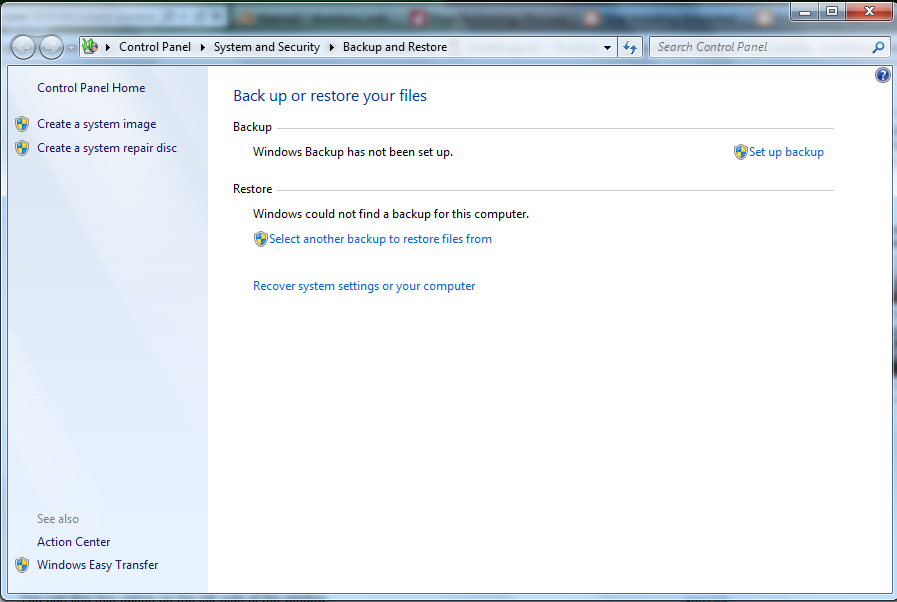
    Using Backup Restore ( System Image Recovery )

    Refer to the screenshot above, Follow the steps that led to the above menu to appear & then select “System Image Recovery”.

    Follow the instruction that appears on the screen.

    What to do When You Cannot Start Windows At All: Windows Memory Diagnostics

    Ram (Memory) plays an important role in the booting procedure. If your RAM is faulty, the computer system won’t boot properly.

    To check for errors in your RAM

    Refer to the screenshot above and select “Windows Memory Diagnostic”. This will check your RAM for errors. If errors are found you can simply get your RAM module replaced.

    If nothing works out – Re-Install Windows


  • How to Use Default Logon Picture for All Users in Windows Vista/7/10/11

    How to Use Default Logon Picture for All Users in Windows Vista/7/10/11

    Are you looking for a way to use default logon picture for all users in Windows Vista/7/10/11?

    Then you are at the right place.

    In this article, we will be taking you through the steps to set an image icon for all the user profiles on your Windows computer. The same method below can be followed on all the popular Windows versions including Windows Vista/ Windows 7/ Windows 8/Windows 8.1/Windows 10/Windows 11.

    How to Use Default Logon Picture for All Users in Windows?

    Group Policy editor is something that a lot of us know about, but how many of us do really use it a lot?

    To use default logon picture for all users in Windows computer, we basically edit the User Accounts within the “Group Policy Editor”, thus applying the change to all the users on the computer. This way, the administrator of the computer can have a standard logon picture set for all the people using the system.

    One important point to note here is that no customization will be allowed on a user level, once the default logon picture is set. If you set this configuration, then the only way you can allow individual logon picture customization is by disabling the feature.

    I am going to tell you a small trick to use a common default logon picture for all users in Windows 7. ( This also applies to Windows Vista/Windows 10/Windows 11).

    1. First, you must have a picture ready to put as the default logon picture. Select a pic and then place it in the location “C:\ProgramData\Microsoft\User Account Pictures”. Replace the guest.bmp file with your picture.
    2. Now, go to the start menu and type “gpedit.msc” or group policy editor and it will show up as the search result. Open it & navigate to :Computer Configuration -> Administrative Templates -> Control Panel -> User accountsgp1 
    3. Double Click on user accountsgp2
    4. Now click on Apply the default user logon picture to all users and you will see this :gp3
    5. Now Click on Enable and it’s all done.

    Final Words

    We hope you found this guide helpful and easy to follow.

    In case of any questions, feel free to reach out to us by leaving a comment below.

  • How to Create Windows 7 Repair Disc Easily?

    How to Create Windows 7 Repair Disc Easily?

    After reading this you will be able to create Windows 7 Repair Disc easily without any hassles.

    There are many possible scenarios where you will need this repair disc. Let’s say your windows fail to boot due to an error with some files or a virus and you need to repair your windows installation yourself. Microsoft has built into Windows 7 a feature under “Backup and Restore” that enables you to make a Windows 7 bootable repair disc, that can easily fix some of your problems when windows fail to boot.

    What is a Windows 7 Repair Disc?

    A Windows 7 repair disc is a bootable CD or DVD that contains a set of tools and options to repair or troubleshoot a Windows 7 system. It can be used to fix a variety of issues, such as problems with the operating system, corrupted or damaged system files, and problems with booting the system.

    Prerequisites to Create a Windows 7 Repair Disc

    There are basically 2 prerequisites that you require to create a Windows 7 repair disc.

    Firstly, you require a blank CD/DVD which you can burn into a Windows 7 repair disc.

    Also, you will need to ensure that your computer has a CD/DVD burner disc drive present, without which you will not be able to turn the CD/DVD into a Windows 7 repair disc.

    Lastly, you need to make sure that you log in as an administrator to the computer on which you are trying to create a bootable Windows 7 repair CD/DVD.

    How To Create a Windows 7 Repair Disc?

    Below are the steps you need to follow to create a Windows 7 repair disc in 2023.

    • Go to the Control panel ( Start Menu -> Control Panel )
    • Under System & Security Click on ” Backup your Computer”
    • Now, click on “Create a System Repair Image” (refer to the screenshot below).

    restore

    • After clicking on “Create a System Repair Image” you will be prompted to insert a disc to continue.

    drive

    • Select the disc option on this menu and click on “Create disc”.

    Follow the further instructions on-screen to proceed with creating a bootable Windows 7 repair disc.

    How to Use a Bootable Windows 7 Repair Disc?

    To use a bootable Windows 7 repair disc, you need to insert the disc into your computer and restart the PC.

    Make sure that your computer is able to boot from the CD/DVD drive.

    If it’s not already set to do so, then you’ll have to access the BIOS settings of your computer and change the boot order to boot from the CD/DVD first.

    After setting the computer to boot from the CD/DVD first, reboot the computer. This time, the computer will automatically read the bootable Windows 7 repair disc and then boot the contents of the same.

    Once the Windows 7 repair disc loads completely, you will be able to access the repair functions within Windows 7.

    The “Restore” function that’s available will help you take back your Windows update version to a previous one, in case that caused the issue.

    Just as in the case of the No Display Computer Screen Goes Black/Hangs/Blinks issue on Windows.

    Final Words

    Did this article help you to create/use a Windows 7 repair disc in 2023?

    If yes, then feel free to share this article with others to help them out as well.

  • How to Fix No Display Computer Screen Goes Black/Hangs/Blinks?

    How to Fix No Display Computer Screen Goes Black/Hangs/Blinks?

    Are you trying to fix the No Display Computer Screen Goes Black/Hangs/Blinks issue on Windows? Well, we’re here today with a detailed guide on different methods you can follow to fix the issue.

    What Causes a No Display Computer Screen Goes Black/Hangs/Blinks Issue on Windows?

    If you’re using a Windows computer and you suddenly see a black screen, it can be frustrating and worrying. There are a number of reasons why this might happen, such as:

    • Faulty or outdated graphic/display driver.
    • Virus/ related Malicious software.
    • Faulty hardware.

    How to Fix  No Display Computer Screen Goes Black/Hangs/Blinks issue on Windows?

    Fix-No-Display-Computer-Screen-Goes-Black-Hangs-Blinks-Windows

    Based on the above-mentioned causes of a black screen/display not working issue, below are some of the methods you can follow to fix No Display Computer Screen Goes Black/Hangs/Blinks issue on Windows?

    Method 1: Restart Your Computer

    Well, just like the tech jokes that you hear around, restarting your computer can solve lots of issues, much more than you think. So, in case the No Display Computer Screen goes Black issue is something new that you’re facing, then restarting your computer is the first thing you shouild try.

    You can also try modifying the “Turn OFF the Display” setting on your computer. To do the same, follow the steps below:

    1. Go to the Start menu on your computer and search for “Power Settings”.
    2. Within Power Settings, click on “Edit Power Plan”.
    3. Ensure that the “Turn Off the Display” setting is set to “Never”. This will prevent the display from turning off when the computer is in use.

    Method 2: Update Graphics Driver On Your Computer

    Outdated or corrupted graphics drivers can cause a black screen. To update the graphics card, go to the manufacturer’s website and download/install the latest driver for the graphics card that’s installed on your computer.

    If you’re not sure about the graphics card installed on your computer, you can follow these steps:

    1. Press the “Windows” key + “X” key to launch a pop-up menu bar. Within this menu bar, click on the option that says “Device Manager”.
    2. Within the Device Manager window that appears, expand the “Display adapters” option to find the graphics card installed on your computer.

    Method 3: Scan for Virus/Malware Infection

    The issue you’re facing could also be a result of a virus/malware infection on your computer. Newer Windows versions have inbuilt Windows Defender which can help you run a full virus/malware scan on your Windows computer.

    You can read our detailed article on how to keep your Windows 10/11 computer safe with Windows Defender features.

    Method 4: Hardware Issues

    The No Display Computer Screen Goes Black/Hangs/Blinks could also be a reason of faulty hardware on your computer. Take your computer to an authorized service center near you to get the hardware components checked and to troubleshoot the issue you’re facing professionally.

    Final Words

    We’ve tried to include some of the easiest and highly probable ways to fix the No Display Computer Screen Goes Black/Hangs/Blinks issue that you’re facing in this article.

    In case some other solution apart from the ones mentioned in this article helped you to fix the issue, do mention them in the comments below to help out other readers.

  • Fix : Windows 7 Installation Stop error 0x80FE0000 | 0x80FF0000

    Fix : Windows 7 Installation Stop error 0x80FE0000 | 0x80FF0000

    This post will help you Fix Windows 7 Installation Stop error / BSOD 0x80FE0000 | 0x80FF0000. Below are the steps to fix blue screen error 0x80FF0000 | 0x80FE0000 while installing Windows 7 | Vista with a message Could not set the offline locale information

    You might get this blue screen error for some of the possible reasons listed below :

    • Corrupted Hard Disk Drive with possible bad sectors
    • Windows Installation Disk problem
    • BIOS setting problem
    • You tried Installing Windows in a Logical Drive instead of Primary partition

    Before you continue reading this post, I suggest you read this article to know more about blue screen errors and possible steps to resolve them.

    Below are a few different methods to fix this stop error:

    Method 1 : Windows Installation Disk problem

    • If you are installing Windows Vista | 7 from a DVD, make sure that your DVD is not scratched or has any visible signs of damage
    • If you have an ISO file ( Disc Image ), you can use it to make a Installation USB drive to Install Windows
    • For How to make a USB installation drive Follow this link
    • After creating the USB Installation, try to install Windows again
    • If you still face an issue, go down to Method 2

    Method 2 : Check your Hard Disk Drive ( hdd ) for errors

    • Boot from Windows 7 | Vista Installation DVD / USB
    • Press Shift + F10
    • or,
    • Click on Repair your computer
    • Click Next
    • Click on Command Prompt
    • Now, if this your hard disk has multiple partitions, go to the partition you are trying to install Windows in.

    cmd

    • now, type chkdsk x:/f    –    ( X being your drive letter, example : C: , D: )

    Method 3 : Making Sure that you are not Installing Windows to a Logical Drive

    • Follow method 2 to open command prompt
    • In Command Prompt, type diskpart and press enter
    • Type List Disk (note down your disk number in case you have multiple hard disk drives installed in your PC )
    • Type Select Disk 0 (Replace 0 with the number of your drive. Example : Disk 0, Disk 1, Disk 2 )
    • Type List Partition
    • This should list all the partitions on your hard disk drive
    • Just make sure that the partition you are trying to install Windows on is not a Logical Drive (It must be a primary partition )

    cmd1


    Method 4 : Cleaning Your partition | DATA Backup Must before continuing

    Note : This method will clean all partitions on your hard disk. Before continuing, make sure you backup your data.

    • Follow Method 2 to open command prompt
    • Type Diskpart and press enter
    • Type List Disk (note down your disk number in case you have multiple hard disk drives installed in your PC )
    • Type Select Disk 0 (Replace 0 with the number of your drive. Example : Disk 0, Disk 1, Disk 2 )
    • Type Clean ( This will delete all partitions on your drive )
    • Now, type create partition primary & press Enter
    • Type format fs=ntfs
    • Note: This is a full format and will take some time to complete depending on the size of your disk

    cmd2

    • After the format is complete, try installing Windows again

    Method 5 : Check BIOS settings

    • Boot into the BIOS ( press DEL, F2, F10 ) ( refer your system documentation for details )
    • Locate options saying SATA Mode & set it to AHCI
    • Remember, The option to change the SATA type might vary depending on your BIOS make and system model. You just have to set the drive to AHCI, if available.


    If you still face an issue, please use the comment section to post your problem & I will try to help you

  • Fix : Stop error / BSOD 0x0000009F | 0x000000FE Windows 7, Vista (AMD specific)

    Fix : Stop error / BSOD 0x0000009F | 0x000000FE Windows 7, Vista (AMD specific)

    This post helps in fixing a AMD chipset based issue in Windows 7 or Windows Vista with stop error ( blue screen ) 0x0000009F or 0x000000FE. Both these error codes can be associated with some other problems too. But this problem being AMD chipset or specifically with some AMD EHCI drivers, that when put on standby or left Idle can crash your system with error codes mentioned above.

    There are two very simple methods to fix this issue:

    Method 1 : Microsoft Fixit ( Automated Fix )

    fixit

    • Click on the picture above to open the Fix it link
    • Download the fix and run it
    • Restart your Computer


    Method 2 : Turning off some power management features

    • Go to the start menu ( you can also use Run ( windows logo key + R )
    • type in devmgmt.msc & press enter
    • This will open device manager

    devmgmt

    • Now, expand the section that says Universal Serial Bus Controllers
    • Right Click USB root hub
    • Click on properties
    • Click on power management tab
    • uncheck Allow the Computer to turn off this device to save power
    • Press Ok

    devmgmt1

    • Restart your computer
    • Check your system for problem
    • If you still face a problem, please use the comment section and I will try to help you
  • Fix : Stop 0x0000009F: Driver power state failure in Windows 8 | 7

    Fix : Stop 0x0000009F: Driver power state failure in Windows 8 | 7

    This post will help you fix stop error : Driver_power_state_failure in Windows 8 | 7. This particular Blue screen error is also known with a bug check code 9for 0x0000009f, below are the steps to fix it. The most common cause of this error is out of date driver software of your installed hardware. Another cause is out of date BIOS or a recent change in hardware | Software. DRIVER_STATE_POWER_FAILURE is a blue screen error that occurs when there is a change in power state, i.e. when you shutdown, restart or put your computer to sleep, hibernation etc. So, while this process is running all of the hardware installed in your computer are directed to change their power state to lose power ( to shutdown ), but when there is a fault in a particular device driver, the corresponding device does not respond as Windows wants it to and hence you face this STOP error.

    Here are a few ways that you can fix this BSOD:

    Method 1 : Updating Driver Software

    • Go to Windows update ( type Update in start screen or Start menu )
    • Open the Update application
    • Now, Click on check for updates

    Windows update

    • Click on optional updates section & select any and all hardware device driver updates

    windows update1

    windows update 2

    • After the installation is complete, restart your computer.

    Alternatively,

    • You can go to your Motherboard / System / Independent Hardware manufacturer’s support website
    • Search for any driver updates that they might be offering and install them.


    Method 2 : Using Driver Verifier

    Before starting this procedure, it is recommended that you create a system restore point, so that you can fall back on it if something goes wrong.

    This process will help you pin point the exact driver that might be causing this blue screen error. Remember, if the Driver verifier find an issue your computer might throw a BSOD again. That is why we made a system restore point, so that we can simply run system repair and get the computer to it’s previous state.

    • Go to the start menu ( Windows 7 ) & Start screen ( Windows 8)
    • Type Verifier and press Enter
    • Click on Create custom settings (for code developers)
    • Click Next
    • Select individual settings from a full list
    • Next
    • Check these boxes from the list
      • Special Pool
      • Pool Tracking
      • Force IRQL Checking
      • Deadlock Detection
      • Security Checks (Windows 7)
      • Concurrency Stress Test (Windows 8)
      • DDI compliance checking (Windows 8)
      • Miscellaneous Checks
    • Click on Select driver names from a list
    • Click on Provider tab.
    • Check every driver that is not by Microsoft
    • Click on Finish
    • Restart your computer
    • It is highly recommended that you run this verifier for at least 24-36 hours

    For more information on Driver Verifier you can look at this support article by Microsoft


    Method 3 : Updating BIOS

    Updating your Computer’s BIOS is a critical process and need a fair bit of understanding on your part. It is always recommended that your only update your BIOS if highly necessary. Over the years motherboard / Computer manufacturers have made it easier for any user to update the BIOS, but still, it is a difficult process and if not done correctly, can brick your system and make it unusable. So, if you choose to update your BIOS, please do it at your own risk.

    • To Update your BIOS
    • Go to your Motherboard / Computer Manufacturer’s support website
    • Carefully locate your Motherboard / Computer make model and ver. and when 100% sure that you are at the right place, download the latest BIOS files
    • Carefully read the documentation associated / provided by the manufacturer on how to update BIOS
    • Before updating your BIOS, make sure that your computer, if a laptop / portable computer is at least 75% charged and if its a desktop computer, make sure that you have a stable backup power supply in case of a power loss.
    • Use the updater / or the software / options provided by your Motherboard / Computer manufacturer


    If you still face an issue, please write to us using the comments section.

  • Fix : Stop error 0x0000010e / 0x000000C1 BSOD in Windows 7, Vista

    Fix : Stop error 0x0000010e / 0x000000C1 BSOD in Windows 7, Vista

    This post will help you fix an issue with your Windows 7 or Windows Vista computer, where you receive a blue screen error 0x0000010E or 0x000000C1. Both these errors might display some other parameters along with them. A sample error message would look like :

    Stop 0x0000010E(xxxxxx, xxxxxx, xxxxxx, xxxxxx)
    VIDEO_MEMORY_MANAGEMENT_INTERNAL

    or

    Stop 0x000000C1 (xxxxx,xxxxx,xxxxx,xxxxx)
    SPECIAL_POOL_DETECTED_MEMORY_CORRUPTION

    The earlier one most common to Windows 7 and the later one to Windows Vista. Both of these error can be caused by quite a few reasons, but the most common ones and their solutions are listed below, so, Fix : Stop error 0x0000010e / 0x000000C1 BSOD in Windows 7, Vista

    Method 1 : Display Adapter / Video driver issue

    This Problem is most common with computers that have hybrid display engine ( using two graphic cards in a heterogeneous GPU configuration ) mixing on-board and dedicated card for power saving and performance, accordingly.

    • Download the latest display adapter drivers from your computer / motherboard / graphic adapter manufacturer’s support website.
    • If your computer uses a hybrid display configuration, make sure you download both the display adapter’s drivers.
    • Go to Control Panel
    • Select Classic / Small icons / large icons from the view by menu on the top right corner
    • Locate and open Programs and features
    • Locate your display adapter drivers ( some example include AMD Catalyst Control Centre, NVidia Control Panel)
    • Uninstall the drivers there (If you are not sure of what you are doing, please do not do it, instead contact a professional to help you out )
    • Now, Also look for other display adapter drivers ( Example : Intel, SIS, Via )
    • Uninstall them as well.
    • Restart your computer
    • Now, Install the driver(s) that your downloaded.

    Method 2 : Hotfix by Microsoft

    New : Hotfix by Microsoft ( Windows 7 )

    Microsoft has released a hotfix to fix this particular issue. Please download and install the same using this link

    Hotfix by Microsoft ( Windows Vista )

    Microsoft has released a hotfix for this issue with Windows Vista and Windows Server 2008. Use this link to download and install the hotfix


    Method 3 : Upgrading Memory

    This issue can also occur in situations where you are rendering memory intensive tasks and your system has low memory configuration to meet the demand. In this situation, upgrading your memory is a good way to retain system stability.

    Check your memory for errors

    • Go to the start menu
    • Type Memory diagnostic
    • Run the tool
    • It will check your RAM for errors next time you restart / start your computer and display a detailed report once you login
  • Fix : Open with submenu missing from Right Click options in Windows 7 , 8

    Fix : Open with submenu missing from Right Click options in Windows 7 , 8

    After reading this post, you will be able to fix an issue with your Windows computer, where when you right click on a file, the “Open with” sub menu is missing. This can happen dues a malfunction in Windows Registry settings, or due to a security program restricting your file opening permissions. It can also happen due to some corruption in system files.

    openwith

    Below are a few methods that should help you out:

    Method 1 : Adding Registry Values

    • Click here to download a registry patch that will enable your Open with submenu.
    • After downloading, Extract the file
    • Right Click the file and click on Merge
    • Make sure you are logged in as administrator

    openwith1


    Method 2 : Using System Repair Options

    • System Restore : Click here for Guide on using System Restore
      System Restore will restore you computer to an earlier time. You can choose the restore point from the available checkpoints. Just make sure you select the date on which the problem was not there.

    Alternatively,

    • You can run System File Checker
    • Go to Start menu and type CMD
      Right Click
      & click on Run as Administrator ( Windows  7 )
    • Press Windows Logo Key + X
    • Click on Command Prompt (Admin) ( Windows 8 )
    • Type SFC /SCANNOW
    • Press Enter
    • Let the process finish. This process will check for faulty system files and replace them if necessary

    Method 3 : Checking Security programs

    • If you are in a Domain or Workgroup in a corporate environment, it is suggested that you first check with your system administrator and make sure that the open with submenu is not locked out by a security software
    • Make sure you are logged in as Administrator
    • Disable your security software and restart your computer to check if the Open with submenu appears.
  • Fix : Folders / Explorer going transparent while dragging in Windows 8, 7, Vista, XP

    Fix : Folders / Explorer going transparent while dragging in Windows 8, 7, Vista, XP

    This post will help you fix an issue with your Windows based Computer, where, when you try to resize your folder view or even your Internet browser, the contents of that Window fade or let’s say turn translucent / transparent. Show Window Content while dragging, is a feature within Windows operating system that you can turn on or Off. But this particular problem can also occur due to some other reasons as well. Below are some of the possible solutions for this problem.

    Troubleshoot Method 1 : Check Windows Settings

    • Go to Control Panel
    • Click on Small icons ( top right corner ) ( to enable All control panel items )
    • Now, Click on Performance Information and tools
    • Click on Adjust Visual Effects

    performance_tool1

    • Now, Make sure that “Show Window Content While Dragging is checked”
    • If it’s already checked, just Uncheck it.
    • Click on Apply
    • and now, recheck the checkbox to re-enable the feature.
    • Click Apply and OK

    performance_tool


    If this does not solve your problem try:

    Troubleshoot Method 2 : Checking nVidia Options

    (Applies to nVidia Display card users only )

    • Right Click on desktop
    • Click on nVidia Control Panel

    nvidia

    • Now, Make sure that the options as shown in the screenshot below is set to “Let the 3D application decide”

    nvidia1

    • Now,
    • From the pane on the left hand side select Adjust Desktop size and position
    • Make sure, Enable Desktop resizing checkbox in unchecked.

    nvidia3


    Troubleshoot Method 3 : Updating the Device Drivers

    • First, Find out what Make and model your display /graphic card is.
    • The most common ones are : Intel, nVidia and AMD ( ATI )
    • You can refer your computer documentation or check the manufacturer’s support website to confirm your display card
    • You can also check device manager ( control panel ) to check what Display adapter you have.

    Now,

    • To update the device drivers you can either :
    • Go to the support website of your computer / display card / motherboard manufacturer and download / Install the drivers from there
    • OR
    • Go to Device Manager
    • Expand Display Adapters
    • Right Click the Adapter listed there & click on update driver ( make sure you are connected to Internet )
    • Select Automatic method
    • OR
    • Run Windows Update and install all the recommended and optional updates