Category: Windows 8

  • Align SSD / HDD partition for better performance in Windows 8, Windows 7, Windows Vista & XP

    Align SSD / HDD partition for better performance in Windows 8, Windows 7, Windows Vista & XP

    After reading this you will be able to align the your Solid State Drive (SSD) or a conventional Hard Disk Drive ( HDD ). Disk partitioning is rather a easy task these days where Windows automatically determines the best settings and partitions your Drive into volumes of your choice. Though the thing to check is that whether your drive is aligned or not. Alignment applies both to SSD & HDD, though SSD performance is somewhat more increased with a aligned drive partition. Check out this guide to first check whether your drive is properly aligned or not. If not, follow the simple steps to align your drive.

    Steps to Check Drive alignment

    • Automated way
    • Download this tool ( Click Here )
    • Run the tool to check if your disk is properly aligned or not
    • Manual Way
    • Go to Start Menu
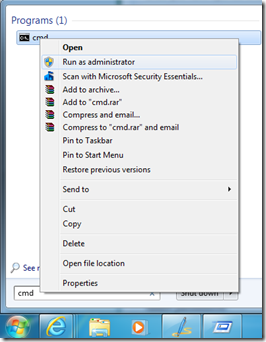
    • Type CMD
    • Right Click Command ( CMD ) displayed at the start menu search box
    • Click Run as Administrator
    • startmenu_cmd
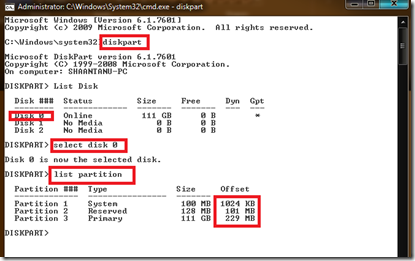
    • Type diskpart
    • Type List Disk
    • Type Select Disk x  ( X being the number assigned to your drive ) example 0, 1 , 2.
    • Check out the offset of the first partition & make sure it is divisible by 4 or 4096 ( KB )
    • Follow the screenshot below
    • SSD_align
    • Guide to Align the Partition
    • Reinstalling with proper Aligned Disk ( NOTE: This Operation will delete all your data, so take a backup first )
    • Boot with the Windows Disk
    • At the Drive Selection Menu Press Shift + F10 to bring up Command prompt
    • Type Diskpart
    • Type List Disk
    • Type Select Disk x ( x being the number of your disk) ( Refer screenshot above)
    • Type Clean ( Only use this command if you want to clean all partitions ) ( if you have multiple partitions and want to just delete one partition use the process below )
    • Type List partition
    • Select Partition x ( X being your primary partition )
    • Delete partition
    • Repeat the step if you have that 100 MB partition Windows makes.
    • Now,
    • Select Disk X ( X being the disk number )
    • Create partition primary align=4096
    • Active
    • Select Disk x
    • Select partition 0
    • Format /fs:NTFS Quick

    Note: You should perform a Secure Erase before following this guide to align & repartition if you are using a SSD. ( DO NOT FULL FORMAT THE SSD, EVER)
  • Windows 8 : Adding Signature in Windows 8 mail app

    Windows 8 : Adding Signature in Windows 8 mail app

    After reading this article you will be able to add signature in the Windows Mail app in Windows 8. Windows Mail app is a easy to use fun application that displays the fluid, clean & efficient user interface properties also known as “Windows 8 UI “ & formerly known as “Metro UI”. Though customizing this application might come as somewhat difficult to some users. This article primarily describes adding just the email signature in windows mail app. Though you can come across more customizable settings from the same steps.

    • Launch the Windows Mail app
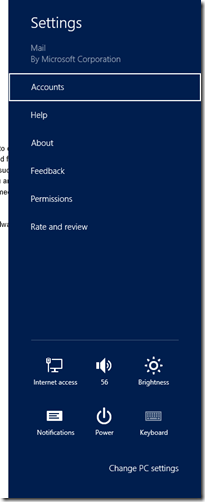
    • Press Windows Key + I
    • Windows Key is the one on your keyboard between CTRL & ALT buttons & generally has a Windows Logo imprinted on it.
    • mail_settings
    • Click on Accounts
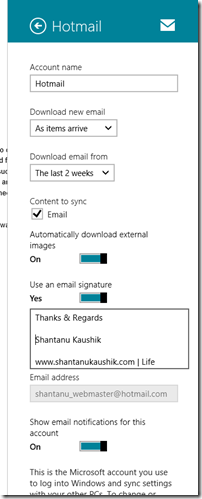
    • Select your account
    • Scroll down to the signature part
    • Add your signature
    • account_settinds
    • You can also change other settings here if you wish.
  • Using Windows 8 : Simplfied Usage : Customize Windows

    Using Windows 8 : Simplfied Usage : Customize Windows

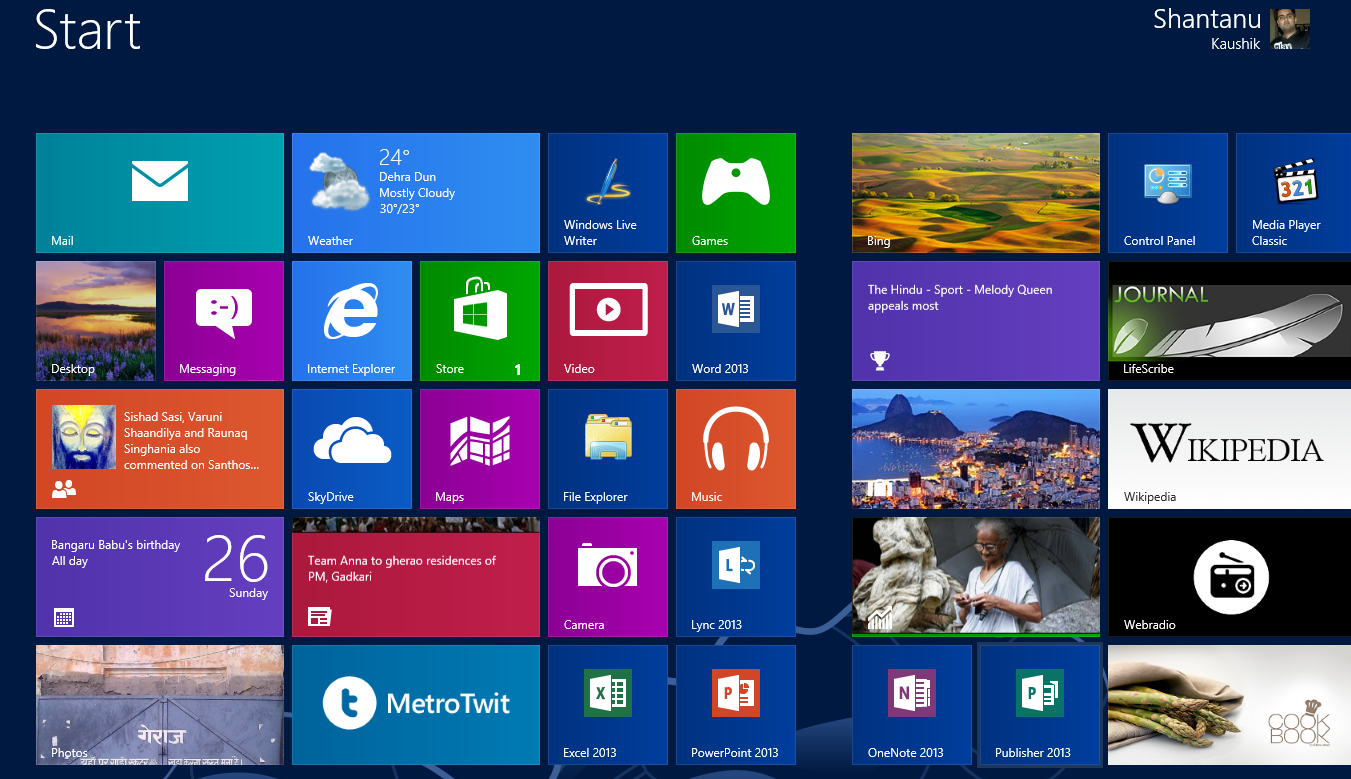
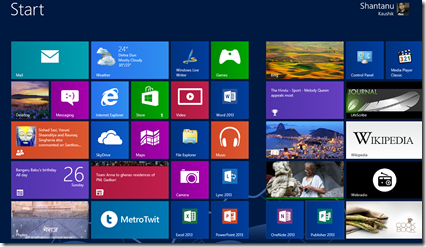
    After reading this article you will be able to understand & customize your Windows 8 PC for power use. This article explains the New  “Windows 8 style” UI based Start Screen that contains all your applications, the easy tools menu & three most basic & most used commands in Windows. This post will also cover a small tip that will enable you to view administrator tools in Start Menu.

    The three most basic & most used commands in Windows 8 :

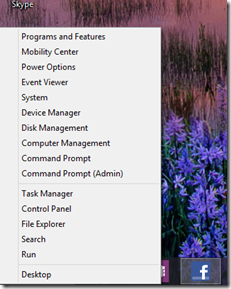
    • Winkey + X : to open the tools menu
    • right start
    • This can also be achieved by right click on the most Left bottom corner of your screen ( on the taskbar )
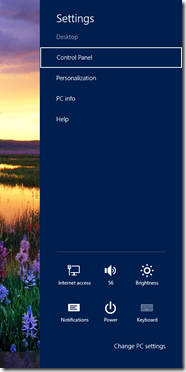
    • Winkey + I : This opens the Quick Settings menu. This menu contains many short links and control button, example: Power button, sound button, brightness etc.
    • quick
    • This can also be achieved by moving your mouse cursor to the top right corner of the screen.
    • Winkey : This single button press can be used to launch the start screen & to go back to the program you were using previously.

    Customizing Start Screen

    metro start

    Customizing this start screen is fairly easy. Follow the steps below to achieve the customization of your choice

    • Basic Customization
    • Changing Basic settings
    • On the start screen shown above, start typing start
    • From the listed results click on settings in the right pane
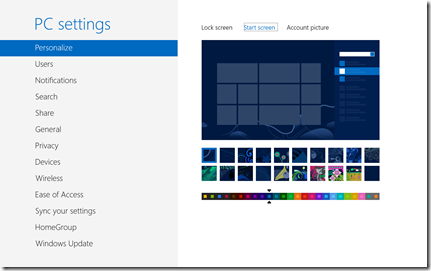
    • Now Click on Customize your start screen
    • settings_start_windows8
    • Here you can manage the color, the background picture and Tile settings.
    • Showing all Application ( tools/settings ) on the start screen
    • Go to Start
    • press Winkey + I
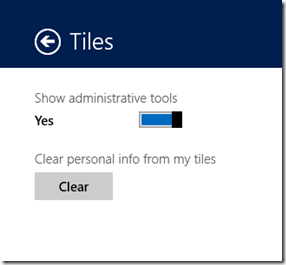
    • Click on Tiles
    • Follow the screenshot below
    • admin_tools
  • Microsoft Gets a New logo

    Microsoft Gets a New logo

    0815_Microsoft_Logo_breakdown-for-screen_jpg-450x0Microsoft today announced via The Official Microsoft blog , that Microsoft brand logo is getting a change. Microsoft has had the same logo for the last 25 years & with a new paradigm shift is already in progress in terms of computing & technology , it’s about time Microsoft got a new logo. Sometime back Microsoft Windows got a new logo, where the Windows Flag was dropped for a single colour logo that resembles Window frames. This time Microsoft as a Brand has got a new logo.

  • Fix: Laptop Battery running out quickly, Increase / optimize your battery life in Windows 8, Windows 7, Vista, XP

    Fix: Laptop Battery running out quickly, Increase / optimize your battery life in Windows 8, Windows 7, Vista, XP

    After reading this you will be able to fix some of the issues that might be affecting your laptop /notebook /netbook battery life. Battery life depends on a number of factors that includes selection of proper power plan, screen brightness, background programs, external devices, processor minimal power state & a few more.

    This guide includes a few steps to optimize your portable computer to provide you with better battery life.

    The First thing for Windows 7 and earlier version operating system users should do is that they should run the Microsoft Fix It tool: Click the image below:

    fixit

    After Running Microsoft Fix It try the steps below:

    • Make sure all the USB powered devices that you don’t need are unplugged or set the devices to be turned off to save power, to do this follow :
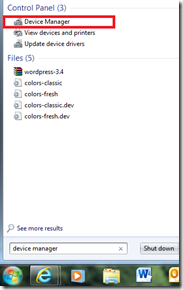
    • Go to Device Manager ( Control Panel )
    • device
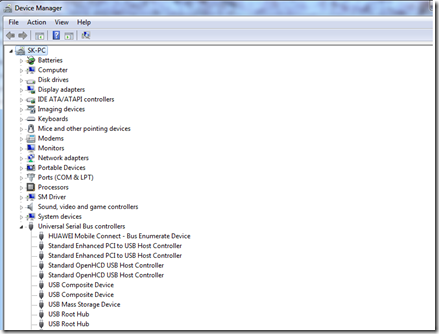
    • Click on Universal Serial Bus Controllers
    • device_usb
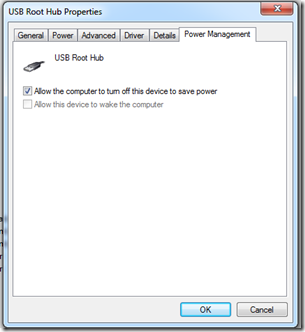
    • Right Click USB Root Hub & go to Properties
    • device_usb2
    • Make Sure the first option is checked
    • Repeat for all USB Root Hubs in Device Manager
    • Power Saving When Using Conventional Hard Disk Drives
    • If you are using the conventional Mechanical Hard Disk Drives you should disable “ Turn Off Hard disk “ Option in Power Options
    • To open power options
    • Go to Control Panel –> Power Options
    • Maintenance operation schedule
    • Windows XP users should Defrag their hard disk drives at regular intervals.
    • Windows 8, 7 & Vista users should check Maintenance options ( Action Center in Control Panel ) & make sure everything is running on schedule.
    • Sounds
    • For better Battery life you can disable sound scheme for Windows
    • Control panel –> Sound
    • Drivers
    • Make sure your computer has all the latest device drivers installed.
    • To update either run Windows Update or Visit your computer manufacturer’s website to get the updated Device drivers
    • Make sure Power Management driver is installed
    • Always use Balanced Power Plan
    • Opt for Power Saver power plan when you are running out of battery and want that extra kick
  • Windows 8 : Now Available to MSDN & TechNet Subscribers

    Windows 8 : Now Available to MSDN & TechNet Subscribers

    Windows 8 is now available to MSDN & TechNet Subscribers to download.

    Just to remind the ones not updated on Windows 8 Milestones & features :

    Windows 8 is the latest operating system by Microsoft which will be available to General Public for purchase on & after 26 October 2012. Windows 8 packs tons of new features including the much talked about Metro UI, Windows Store etc. Windows 8 is said to be completely redesigned. It packs the reliability of Windows 7 & new age UI & much more. So If you are a subscriber, head out to http://msdn.microsoft.com or http://technet.microsoft.com to download your copy of Windows 8.

  • Fix :Flickering Lines across the Computer Screen within Windows 8, 7, Vista, XP , any OS

    Fix :Flickering Lines across the Computer Screen within Windows 8, 7, Vista, XP , any OS

    After reading this article you will be able to solve the problem where corruption occurs on your screen or you see lines across your computer display. This problem might occur due to a Display driver problem, a display hardware error, Display connection cable problem or even a faulty display. If it’s a laptop & lines occur when you move your screen ( hinges move ), it could very well be the display cable problem connecting your motherboard/display adapter to your screen.

    Follow these steps to resolve the issue:

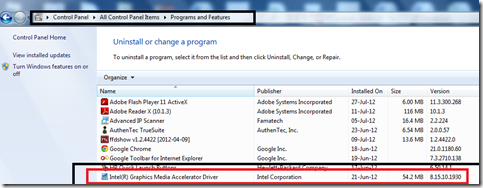
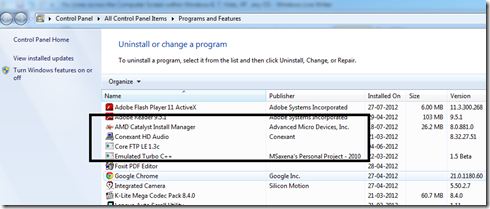
    • Go to, control panel & locate programs & features or simply type Uninstall a program.
    • From the list therein, locate the display driver with the help of the example screen shot given below:

    intel

    OR

    amd

    • Apart from the above examples, you can have a nVidia Display adapter as well. Select the appropriate program from the list following the screenshots above and click on uninstall.
    • Restart your computer
    • Now, Go to the Support website of either your computer manufacturer/Motherboard manufacturer or if you have a add-on Display adapter ( Graphics Card ), go to the Gfx Card Manufacturers support website.
      Example: http://support.intel.com or http://support.asus.com etc.
    • OR , to get latest drivers you can use WINDOWS UPDATE
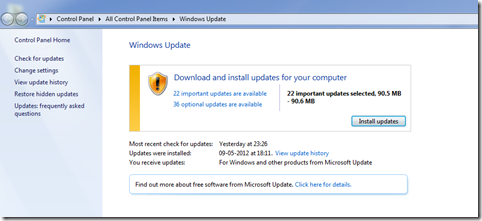
    • To run Windows Update, Go to start menu & in the start menu search box, type Windows Update & press Enter.

    update

    • Refer the above screenshot, you can either press Check for updates on the Top left hand corner or directly click on optional updates to check if new hardware drivers are available for your computer system.

    If This does not solve your issue,

    For Desktop Computer Systems

    • If you have a Add-on Graphics Adapter Installed, try pulling it out and checking the display on your on-board display option. If you do not have a motherboard with a on-board display, get another card to check if that works or try reseating your present graphics adapter properly into the slot.
    • Check the Display Cable ( Any type ) for damage. Also check both ends of the cable to make sure they are properly plugged in.
    • Check your Display Monitor with another computer of laptop device to make sure you don’t have a problem with your Display.
    • You can alternatively try to plug another monitor into your computer to check if that works properly.

    For Laptop ( All portable Computers )

    • Take out your laptop battery, press & hold your power button for a few seconds.
    • Reinsert the battery into the compartment & check if the problem persists.
    • If your laptop shows lines across the screen when you move the display panel ( move the hinges to adjust the display ) then your cable connecting your display to motherboard/display adapter might be wearing out, in this case the only recommended solution is to take the computer to a authorized dealership or support outlet.

    POWER PROBLEMS

    • Your Computer monitor might display some lines across the screen if there is a power surge or when the power input is lower or higher than the recommended range your monitor supports (Most of the time LOWER ), Check the documentation that came with your monitor to confirm the recommended power input.
  • Solution: Cannot Convert Basic Disk to Dynamic Disk

    Solution: Cannot Convert Basic Disk to Dynamic Disk

    After reading this post you will be able to fix the problems you might be having while converting a Basic Disk type to Dynamic Disk Type in Windows Disk Management.

    Introduction

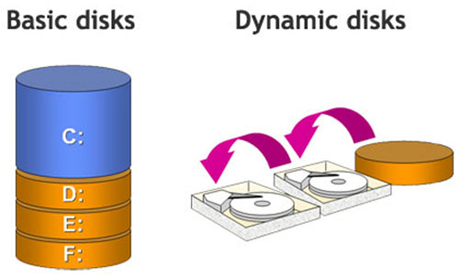
    Basic Disk is an older disk format that is used by all version of Windows going back to windows 95, 98 etc. Even today the default disk type used in our computer system is Basic.

    Whereas,

    Dynamic Disk type is supported with Windows XP professional & above editions of Windows. Dynamic Disk supports stripped volume, spanned volume, mirror volumes, simple volumes and RAID 5. Dynamic Disk type also supports disk management without restarting your computer.

    Error Message says

    • Package Name is Invalid

    Cause

    • Computer Name Contains “ Double Byte Character”

    Workaround

    • Go to Start menu
    • Right Click Computer
    • Click Properties
    • Under Computer name, domain, and workgroup settings, click Change settings.
    • On the Computer Name tab, click Change.
    • Type a new name under Computer name, and then click OK.
    • Type a Simple Computer name
    • OK
    • Restart your Computer
    • Convert Basic Disk to Dynamic Disk


    Workaround

  • FIX Windows Media Player unable to play certain type of media files

    FIX Windows Media Player unable to play certain type of media files

    After reading this post you will be able play to almost all commonly found media files. There are a lot of media file extensions that requires certain codecs to open/play. Default Windows installation does not support all the formats due to certain limitations. Some people download and install VLC player to play their Media files. VLC player can be found here. Though to play your media files within Windows Media player you can follow the steps below:

    • Head over to this website & download k-lite codec package
    • Or go to www.bing.com and search for k lite codec package.
    • Download the package
    • Install the package using Default/typical settings.
    • Open Windows Media Player and play your favourite file type.
    • Enjoy

    Note: Scan the Installation/Downloaded files with a good Antivirus Software before Installing.

  • Check your Laptop/Netbook/notebook/Ultra portable Computer’s battery healthy easily

    Check your Laptop/Netbook/notebook/Ultra portable Computer’s battery healthy easily

    After reading this guide, you will be able to check how healthy your computer battery is. When the computer is new it gives you good battery backup. But, as it gets old the backup goes considerably less than it used to be.

    To Check the current status of your battery now, you can use a built-in utility in Windows 7 to check the health of your battery.

    • Make Sure your charger is plugged in
    • Go to Start Menu
    • In the Start Search box type CMD
    • Right Click CMD and click Run as Administrator
    • Type powercfg –energy in the opened windows ( Command Prompt )
    • Windows will run a trace on your battery for 60 second and then save a report in your root drive Example: C:\energy-report.html
    • You can then double click the HTML file to open it with your web browser and read the report.
    • This report explains Errors, warnings etc.
    • To know the current charge capacity and health status, scroll down to the section that reads battery information
    • Here, see Design Capacity
    • Now, see the Last Full Charge Capacity
    • If, Both the numbers in Design Capacity & Last Full Charge differ a lot, let’s say for example the Design Capacity was 6500 & Last full charge is 2500. Your battery is not in a healthy state and is not holding most of the charge capacity it was designed for.
    • This would be the proper time to order a replacement battery.