The Windows operating system powers millions of computers across the globe and the operating system comes with lots of interesting and helpful features. One of the most handy Features of the Windows operating system is a built-in tool called Windows Remote Desktop and this particular feature enables you to establish a connection to remote computers and servers and then perform operations like configuration and data transfer.
This particular feature is around in the Windows operating system since the initial release of Windows NT in 1998 and is particularly helpful for system administrators because the feature allows them to conveniently access distant computers without having to leave their desks.
Also Read: How to Enable or Disable Desktop Search Bar in Windows 11
Here’s how to move files to and from the Remote Desktop in Windows 11 or Windows 10 if you have a remote computer. With the aid of this detailed user guide, it is possible to gain access to the neighbourhood resources. Using the Devices and Resources in a Remote Desktop session is required to transfer files to and from Remote Desktop in Windows 11 and Windows 10.
You can use this guide to set up your computer so that file transfers are conceivable. So without making any delay let’s check out the way to use Remote Desktop in Windows 10 and Windows 11 operating systems.
How to Use Remote Desktop in Windows 10 and 11 to Transfer Files
Using Windows 11/10, perform the following steps to transfer files to and from Remote Desktop:
1. Use the Taskbar search box to look for remote desktop connections.
2. Simply click the search result.
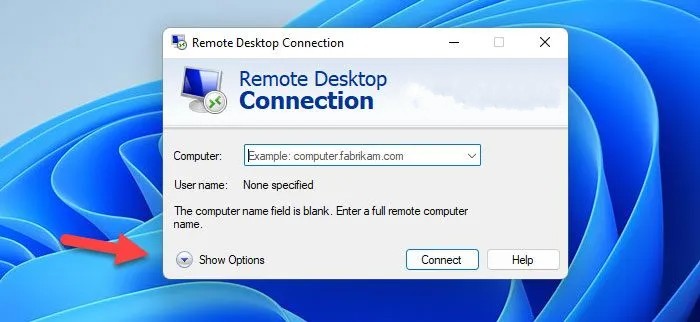
3. Click the Show Options button.
4. The Local Resources tab should be selected.
5. Pick “More” from the menu and Drives should be checked.
6. Choose the OK option.
7. Select the General tab.
8. Enter the user name and IP address.
9. Select Connect from the menu.
10. To locate the drive, launch the File Explorer.
Read on to discover more about these actions.
To begin, you must first launch the Remote Desktop Connection panel. To do that, enter “remote desktop connection” into the Taskbar search box and click on any result.
Click the Show Options button once it has opened on your screen, then select the Local Resources tab. Then, in the Local devices and resources section, click the More button. Then, check the Drives box. It is also possible to choose a specific drive from this menu. Expand the Drives section and select the drive you want to share in the Remote Desktop session.
After that, click the OK button to return to the General tab. You must enter the Logon settings here. In other words, you must enter your IP address as well as your username.
When you click the Connect button, the File Explorer opens and you can find the drives in the Redirected drives and folders section.
Any file can be copied to this folder and shared with the remote user. Similarly, if you want to transfer a file from one Remote Desktop computer to another, you must follow the same steps on that remote computer.
How can I move files from Remote Desktop to Windows 11 or 10?
You must adhere to the aforementioned instructions in order to transfer files from Remote Desktop to Windows 11 or Windows 10. You must use the local devices and resources, as was previously stated. To complete the tasks, it is advised to read the entire manual as described here.
What’s the best way to get files from Remote Desktop onto my computer?
This article can be used to transfer files from a Remote Desktop to your computer. Here’s how to move any file to or from Remote Desktop. The procedure is the same on both Windows 11 and Windows 10 regardless of which version of Windows you are using.
Does Microsoft Remote Desktop only support file transfers between Windows-based computers?
A remote desktop can share files with a local computer using Remote Desktop Connection (RDC), which makes use of Microsoft’s Remote Desktop Protocol (RDP). For all versions of Windows 10 (and Windows Server), Remote Desktop Protocol is available.
Microsoft conveniently offers RDP tools that let users connect to a Windows PC from a Mac, Linux, Android, or iOS device. Using the “Redirection” tab in the Remote Desktop app, Mac users can enable file sharing and remote desktop connection through the sharing of resources to a Windows machine.
Windows OS comes with Remote Desktop Connection (RDC), which lets users set their file/folder sharing preferences before connecting. Users can then transfer files over RDP with ease.
As you can clearly see, finding out how to transfer files over a remote desktop is fairly simple! We sincerely hope that this introduction to Remote Desktop Connection and the Remote Desktop app has provided you with the knowledge and self-assurance to explore even more of what remote desktop sessions have to offer.
We believe now you can able to use the feature in Windows operating system without any issues and if you find any problems then do let us know in the comments section below.
Leave a Reply