
Windows 11 is the latest version of the operating system by Microsoft and the same power millions of computers around the world. Microsoft has introduced the new Windows 11 operating system with a new user interface along with a modern approach in each and every element of the operating system.
However, not everyone will like the change that Microsoft has implemented. Some folks discover they long for Windows 7’s earlier versions and its totally different aesthetics from those times.
If you are someone who wants to have a look of Windows 7 on your Windows 11 powered computer then this article is meant for you. We will guide you to the way to make Windows 11 appear more like Windows 7. The process can be done with a couple of weeks and with the help of a free tool. With this, you’ll have the best of both worlds: a contemporary, safe operating system and a vintage appearance. So without making any further delay let’s dive into the article to check out the steps to make your Windows 11 computer look like Windows 7.
Steps to make Windows 11 look like Windows 7
1. Relocating the Start button and other apps to the taskbar’s centre may be the most visible change in Windows 11. For those who would rather have things the way they were before, Microsoft has thankfully made it simple to relocate it back to the left side of the screen.
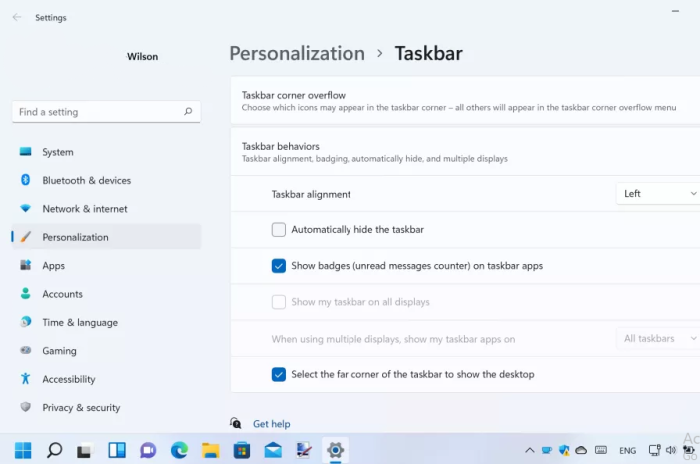
Search for the Taskbar Behaviors section by right-clicking a taskbar area that is empty and choosing Taskbar settings. Select the Left option from the Taskbar alignment drop-down menu by clicking it. All of the taskbar buttons, including the Start button, will be oriented to the left.
2. The Start menu from Windows 11 will still appear when you press the Start button, which is a small victory. However, by installing StartAllBack, you may nearly resemble Windows 7’s appearance and feel. The full version of the app costs $4.99, but there is also a free trial version available.
Choose the Remastered 7 option in the Welcome area after downloading and installing the software. By working your way through the Start Menu, Taskbar, Explorer, and Advanced areas of the software, you may further customize things while restoring the Windows 7 Start menu and taskbar immediately.
3. You have the option of adding fly-out menus for numerous objects as well as selecting which shortcuts will be shown in the Start Menu section. The Start button and other taskbar components’ appearances can be changed in the Taskbar area.
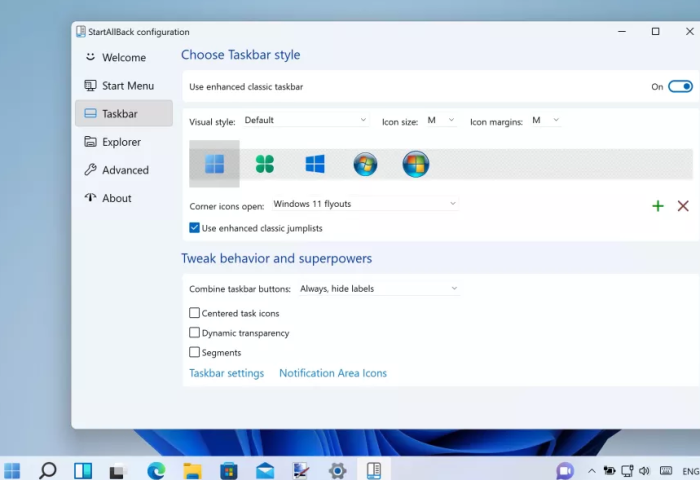
By deselecting the Use improved classic jumplists option when you right-click on a taskbar button to keep the more contemporary menu, you can mix features of Windows 11 and 7. The Classic context menu setting, which lets you switch between Windows 11’s old-style and new-style right-click menus, is one of the additional options in the Explorer area.
4. Microsoft has been encouraging users to use the Settings app instead of the Control Panel for some time now, and the transition has been ongoing. While this makes sense most of the time, you might miss the days of the Control Panel.
Although it is still possible to access this in Windows 11, it is not at all clear how to do so. There are other ways to access the Control Panel, but the simplest one is likely to open the Run dialogue by hitting Windows + R simultaneously, typing control, and then pressing Enter. If you want to make it simpler to access in the future, you can pin it to the taskbar by right-clicking the taskbar icon while it is running.
5. It’s fun to personalise your desktop with a photo you took or any image you like. However, if you want to go any further back in time, you can restore the basic Windows 7 wallpaper.
Unfortunately, Microsoft did not include this image with Windows 11, but it is available for download from a variety of websites, including the Windows Wallpaper Wiki. After downloading img0 (or Harmony), right-click an empty area on the desktop, pick Personalize, and then click Background. Navigate to the folder holding the photograph you just saved by clicking the Browse images option.
6. Windows 11 has additional components and functions that were not present in Windows 7, which means there are countless unnecessary pieces scattered about that you may not require.
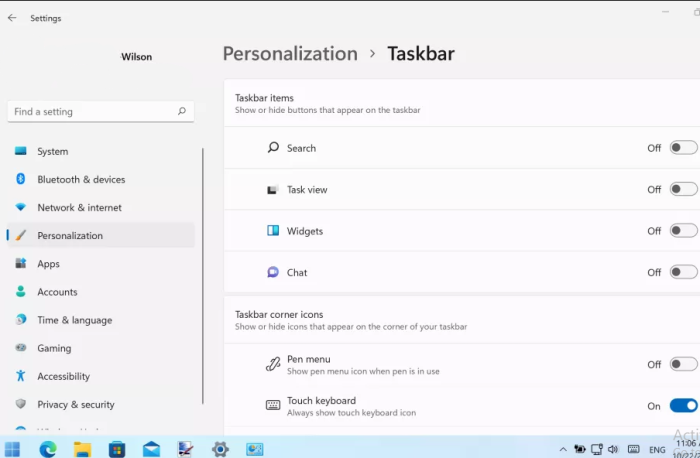
Windows 11’s taskbar, for example, includes shortcuts to Search, Task View, and Widgets. If you don’t want them, you can remove them entirely by right-clicking an empty portion of the taskbar and selecting Taskbar settings. Use the toggles in the Taskbar items section to disable any buttons you want to conceal.
7. Because of a bizarre change in Windows 11, you can no longer drag and drop items onto the taskbar to create a shortcut, or drag and drop files onto a taskbar button to open them in the related app – but you can change this by modifying the registry. Enter regedit after pressing Windows + R.
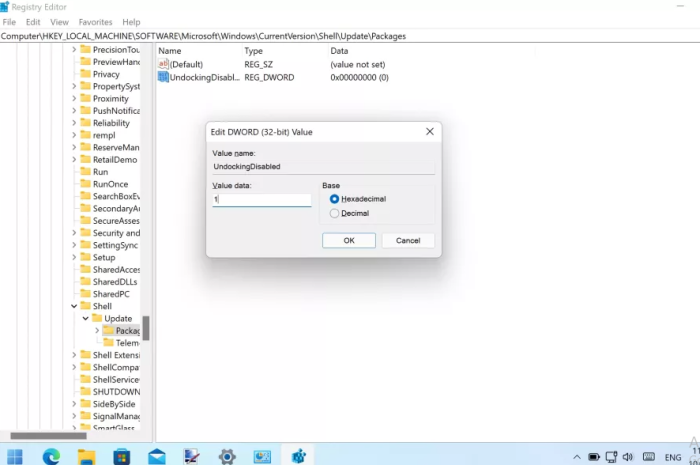
Create a new entry called UndockingDisabled by going to HKEY LOCAL MACHINE\SOFTWARE\Microsoft\Windows\CurrentVersion\Shell\ Update\Packages, selecting Edit > New > DWORD (32-bit) Value, and then clicking. To enable the new drag and drop functionality, double-click this new item and give it a value of 1 before restarting your computer.
8. Rounded edges are one of the aesthetic improvements Microsoft made to Windows 11, and it’s not something that appeals to everyone. Although it is not a built-in feature, the appropriately called Win11DisableRoundedCorners can be used to disable rounded corners on windows and programmes.
Double-click the downloaded application to start it. Click the More info link and then the Run anyhow button after Microsoft Defender SmartScreen appears. Round corners might then need to be swapped with square ones by clicking a User Account Control confirmation. If you change your mind, you can use the tool again to get them back.
9. Widgets are a feature of Windows 11 (click Windows + W to open the Widget panel), whereas Gadgets were a feature of Windows 7. Even though they are no longer officially supported, Gadgets can still be restored in Windows 10 with 8GadgetPack.
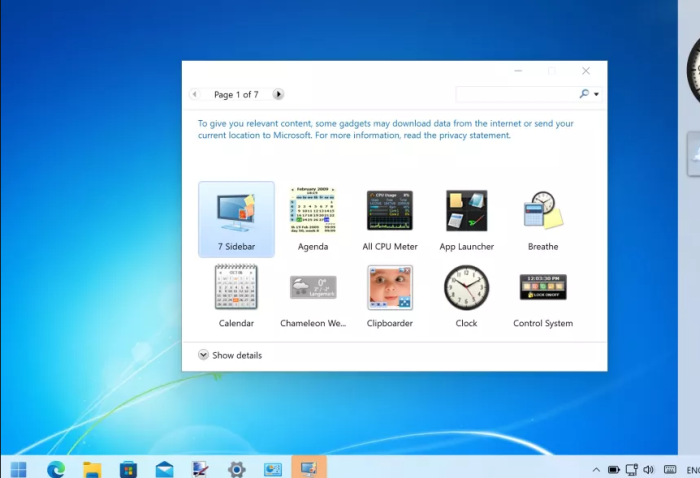
When you install this free tool, the Gadgets bar will show up on the right side of your screen. You may download it here. To add any tools or information panels that catch your eye, right-click a blank area and choose Add gadgets from the menu that appears.
10. The free programme Glass2k, which you can download here, is the only option if you want to replicate the Aero transparency effects utilized throughout Windows 7.
Once installed, you can choose the transparency level by selecting the title bar of any open window or running application with the right click menu. Glass2k will keep different settings for various apps and windows so you don’t have to continually fiddling with settings. You can enable Glass2k to start automatically with Windows.
So this is how you can make your Windows 11 computer look like Windows 7. If you find this useful then do share the same with your near and dear ones.
Leave a Reply