Windows spotlight is an amazing feature by Microsoft as the same showcases beautiful background images on your laptop or desktop but the same is coming with the learn about the picture feature and the same will offer more detailed information about an image that is displayed. However, if you are someone who don’t like the learn feature then you can easily disable the same. We will show you how to remove the Windows Spotlight ‘Learn about this picture’ desktop icon in Windows 11 in this article.
Previously, you could only turn on or enable Windows Spotlight on the lock screen, but Microsoft has released a new feature for Windows 11 that allows you to display Windows Spotlight backdrops on the desktop. You could find this icon annoying and there is no easy way to get rid of it. Therefore, you can utilise a Registry method described in this post if you wish to delete or hide this Windows Spotlight desktop icon.
A Learn about this picture icon is also added to the desktop’s top right corner when you select Windows Spotlight to display the desktop backdrops on your Windows 11 machine. This icon may be moved to any location on the desktop, and you can use it to go to the next image.
Everything is great, everything functions, and it appears to be a standard desktop icon. However, unlike other desktop icons, the Windows Spotlight desktop icon cannot be deleted, deleted with the Shift+Del hotkey, copied, pasted, or moved to a folder. Therefore, the Registry method given to this article can be tried by people who desire to remove the Windows Spotlight desktop icon.
Get rid of Windows Spotlight Learn about this picture desktop icon’s details
The Registry should be backed up before employing this Registry trick so that it may be restored if necessary. After doing that, proceed as follows:
• You need to open Windows Registry Editor.
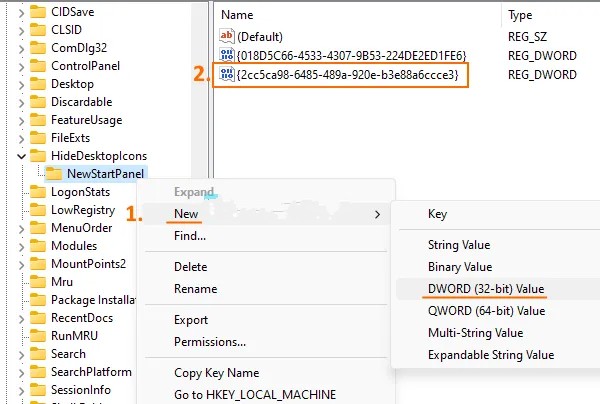
• After that, select the NewStartPanel key.
• Make a DWORD value of type “{2cc5ca98-6485-489a-920e-b3e88a6ccce3}”
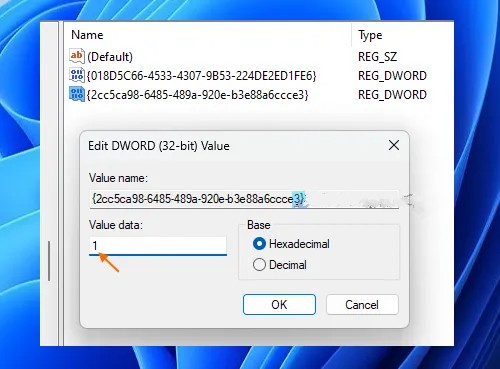
• Add 1 to the Value data.
• Refresh your page.
Now let’s check the steps in more detailed manner.
1. To begin with, launch Windows Registry Editor using the Search box in Windows 11 or 10. Regedit can simply be entered by typing it and pressing the Enter key.
2. Select the NewStartPanel key in Registry Editor, which is located under the HKEY CURRENT USER root key. The path looks like this:
HKEY_CURRENT_USER\Software\Microsoft\Windows\CurrentVersion\Explorer\HideDesktopIcons\NewStartPanel

3. Now expand the New menu on the right-click context menu of the NewStartPanel, select the DWORD (32-bit) Value option, and click OK. That DWORD value should then be renamed to “{2cc5ca98-6485-489a-920e-b3e88a6ccce3}”.
4. To access its edit box, double-click on that value. Enter 1 in the Value data field after the box has been opened. To continue, click OK.
5. Finally, open the context menu on your Windows 11 desktop and choose Refresh from the context menu or the F5 hotkey. The Windows Spotlight symbol will disappear after refreshing the desktop.
Repeat the above instructions, but this time remove the value “2cc5ca98-6485-489a-920e-b3e88a6ccce3” to make the Learn about this picture icon appear on the desktop once more.
This is the sole built-in method available as of right now for getting rid of the Windows Spotlight symbol off the desktop of Windows 11. We might be able to achieve that with upcoming releases by utilising the Settings app or another method as well. Use this Registry trick until then.
How can desktop icons be hidden in Windows 10?
There are a few normal alternatives available to you to hide desktop icons on a Windows 10 or Windows 11 PC. They are:
• making use of the desktop context menu
• Group Policy Editor
• Desktop Icon Setup.
The Desktop Icon Settings option allows you to hide/unhide icons for the Recycle Bin, This PC, user folder, Network, and other desktop items, whereas the first two options enable you hide all desktop icons (including desktop shortcuts).
We believe now you can easily do the job and if you find any doubts then do let us know in the comments section below. If you find this useful then don’t forget to share this article with your near and dear ones and keep browsing for more tips and tricks.
Leave a Reply