Author: Vince Topsky

  • The 10 Worst Things About Windows 11

    The 10 Worst Things About Windows 11

    Although Windows 11 has largely garnered excellent feedback, It is also the main focus of a number of jabs. With its freshly refined appearance, Windows 11 is being marketed by Microsoft as an upgradation of Windows 10, although many users think it is really worse than Windows Vista. Some may disagree with or dismiss the complaints outlined below. When others experience the new operating system, they will feel justifiable indignation and outrage. Some of these concerns have received a lot of attention, particularly on social media and tech news sites.   we’ve compiled a list of the top issues users have about Windows 11.

    1. Too Many Hardware Requirements for Windows 11

    The stringent hardware requirements of Windows 11 were much discussed at the time of its release. This issue primarily affects users who want to upgrade their existing PC to Windows 11. The company does not want you to update to Windows 11; instead, it wants you to purchase a new computer that is preloaded with Windows 11. Microsoft also appears to be concerned in DIY PC builders. Because there is no opportunity to purchase a standalone licence for Windows 11 as there is for Windows 10, people seeking to upgrade from Windows 7 or build their own PC must first install Windows 10 and then go through the free upgrade procedure.

    To be honest, many of Windows 11’s system requirements are shockingly low—a 1GHz CPU, 4GB of RAM, and 64GB of storage. Those sound like specifications from a decade ago. The real roadblocks are three distinct hardware requirements.

    • The CPU must be relatively new, within the last three years.
    • The PC must be equipped with a TPM security chip.
    • The firmware on the PC must support Secure Boot.

    The final two specifications are now commonplace on PCs. The latest CPU requirement, which has kept us from upgrading numerous of our PCs, the main obstacle is that it delays most upgraders.

    1. Windows 11 Makes It Too Difficult to Change Default Apps

    To set a default app in Windows 11, you must designate each file type to the programme you want to use for it individually. This means that instead of changing one setting to make CyberLink PhotoDirector your default photo software for all photographs, you must go through all of the file formats and protocols that a web browser supports: BMP, DNG, JPG, PNG, TIFF, NEF, and so on. There’s no reason why default app settings should be that complex. Fortunately, Microsoft is allegedly working on improvements to Windows 11 that will make it easier to set the default browser (Opens in a new window); ideally, this will be extended to photographs and other media formats.

    1. To use Windows 11, you must have a Microsoft Account.

    Users must sign in to a Microsoft account to use Windows 11 Home Edition, which provides several benefits such as single sign-in for Office, backup to OneDrive, syncing settings across Multiple device support, full-disk encryption for the main drive, and the option to reinstall Windows without a serial number are all included.. We dare you to find a single Mac user who does not sign into an Apple account to use their machine, let alone a Chromebook user who does not sign into a Google account. But when they have to sign into a Windows account, folks go crazy(Opens in a new window). Actually, this prerequisite only applies to Windows 11 Home. Since only the technorati care, I anticipate the largest complainers would be using Windows 11 Pro, which doesn’t require you to sign in.

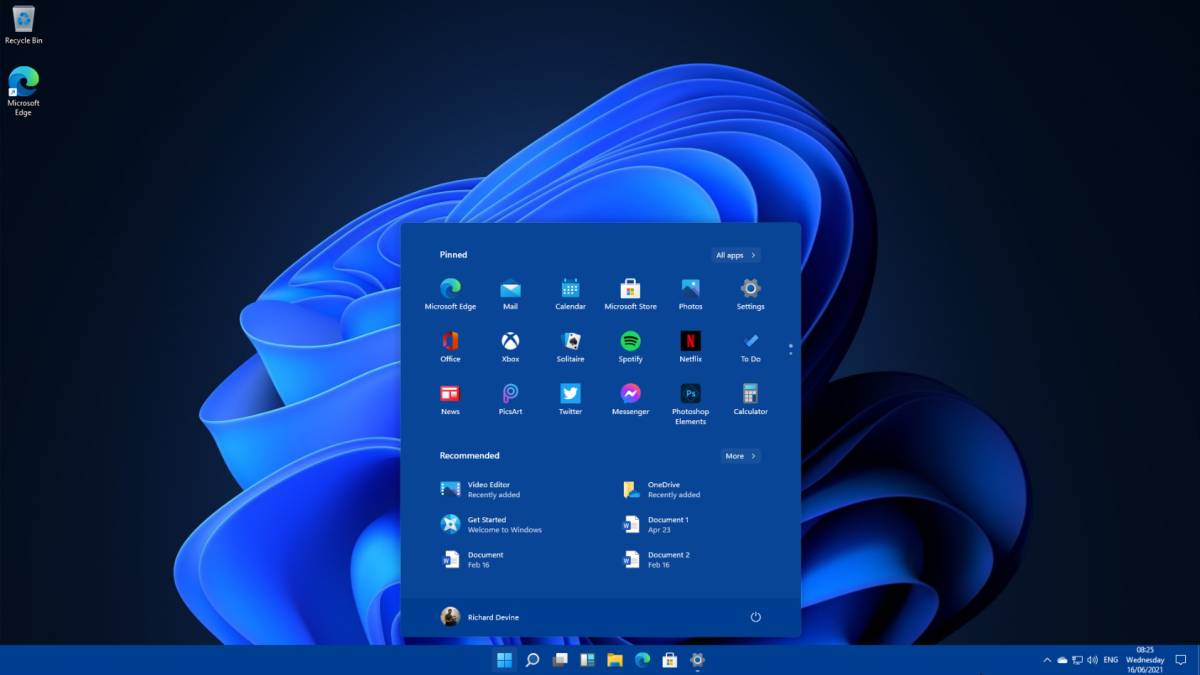
    1. The Start Menu in Windows 11 is less functional than the Start Menu in Windows 10.

     The Start button and Start menu are important topics of dispute in almost every major new version of Windows. The Windows 10 Start menu, in my opinion, does it right and is an underutilised feature. There is nothing as convenient in MacOS. The launchpad is present, but it lacks the immediacy and integration of the Windows Start menu. The new Windows 11 Start menu is modelled after the similar Chrome OS launcher, which We believe is bad. Because everything in Windows 10 is in the lower-left corner, the menu does not obscure apps running in the middle of the screen. Fortunately, if you go into Settings, you can left-align Windows 11’s Start button.

    Right above the Start button in Windows 10, the Start menu provides quick access to the power, settings, and folders. Additionally, it prioritises newly installed and frequently used programmes (if you enable this). With Windows 11, all of that is lost in favour of suggested and pinned app and document iconography. Despite their lack of popularity, I like the Start menu tiles because they enable you prioritise apps based on the size of the tile. Use a larger tile for a more significant app that you want to be prominently seen. I don’t have to look for Spotify or WhatsApp because I have large tiles for such services. Additionally, they work considerably better on touch screens.

    1. The Taskbar in Windows 11 Is Less Useful Than the Taskbar in Windows 10.

     One issue with Windows 11’s centred taskbar is that the Start button is not centred. It’s at the far left end of the taskbar, and its location fluctuates as you launch more apps.

    Fortunately, there is a solution to this issue. Orient the Taskbar to the left. As a result, the Start button remains in the same place it has for decades. It would be fantastic if Microsoft added the option to centre the Start button for people who prefer that layout. Whatever your preference, once you’ve chosen a location for the button, it should stay in place.

    In other Taskbar-related updates, the app buttons are less descriptive. They don’t show you which programmes are running and which are just pinned, similar to how it works in macOS. They cannot be made broader, and they do not display download or processing status as Windows apps do. Finally, the Windows 11 taskbar lacks drag-and-drop capabilities, though Microsoft is said to be working on improving this in future versions.

    1. Windows 11 “forces” the use of the Edge browser.

    Microsoft Edge is now required to be used as the web browser, which some Windows 11 users find to be inconvenient. This complaint has generated more commotion than is appropriate, but it is untrue. On Windows 11, you can use any web browser you like, but some restricted OS services, like the built-in weather and search tools, automatically launch Edge. On the new operating system, We can joyfully install Chrome and Firefox. Based on the  limited reluctance, We are grown to like Edge’s style and features, which make Chrome and Firefox seem antiquated and constrained. On Chrome OS, iOS, or iPadOS, you might want to try changing the default browser. While there are other browsers available in the Apple App Store, Cupertino requires them to use Apple’s Safari web browser as the underlying web rendering engine.

    1. Windows 11 does away with the Action Center, and its replacements are awful

    One of the best Windows updates in a long time, the Window 10 Action Center is now gone in Windows 11, replaced by a jumble of distinct settings and notification panels akin to those in macOS. The accessible networks and Wi-Fi settings are not opened by clicking the Wi-Fi icon. The Volume Mixer is no longer reachable via the Toolbar,  In one practical, customizable panel, the Windows 10 Action Center integrates quick settings and notifications. It won’t be forgotten. As you’ll see in the next section, the change is also detrimental to tablet users.

    1. Tablets Will Take a Step Back With Windows 11.

    Its OK using the Surface Go entirely as a touch tablet running Windows 10—and never even purchased a keyboard for it. We find it more functional this way than on an iPad, mostly because swiping in from the right opens the Action Center and sliding in from the left opens the task view. Both of these actions have regrettably ended. Another incredibly useful tablet motion, swiping down from the top to close an app, is now gone. Yes, there are new three-finger gestures that minimise an app and open the task view, but they are less handy when holding the tablet by the sides, which is the natural way to hold it. And discovered that Windows 11 doesn’t always consistently switch to the new, watered-down tablet mode, which means that the on-screen keyboard doesn’t display when You tap in a text box.

    1. With Windows 11, you still require third-party antivirus software.

    while Windows Defender has significantly improved over the past few years and that Windows 11 enhances security, you still need third-party antivirus software. Independent malware testing laboratories’ evaluations of the renamed Microsoft Defender Antivirus are conflicting, and it performs less well than its rivals in terms of phishing defense.

    1. Windows 11 Isn’t New.

    Even though Windows 8 was hated and did significant damage to the OS’s reputation, it did make daring innovations to Windows. Aside from a few features like Snap Layouts, Windows 11 is essentially a carbon copy of Chrome OS and macOS. That is not a solid excuse to upgrade your operating system. If you want to produce a Chrome OS clone to target the education market, create a second OS rather than skinning your main product to seem like it.

    So what are your thoughts on the new version of the Windows operating system? Do let us know in the comments section below and stay tuned with us for more interesting information about the Windows operating system and tutorials to make your life easy while working on the Windows powered computers.

  • The Best New Features in Windows 11’s Photos App

    The Best New Features in Windows 11’s Photos App

    Along with the new Windows 11 operating system, Microsoft has introduced the new version of its photos app and the same matches with the designing setup of the latest version of the Windows operating system. Microsoft has also implemented new features in the photos app as well. These minor changes make it easier to browse through a collection of images or movies and the same will make your life easy.

    The major change is a new filmstip that displays tiny thumbnails of each photo in a given folder, collection, or album at the bottom of the photo viewer. Jumping between them is made simpler, as is choosing numerous photos to access the new “multi-view” UI. Let’s dive into the article to check out all the new features of the photos app.

    1. Updated Design for the Photos App

    The window style of the Photos app has undergone the most visible change between Windows 10 and 11. It now makes advantage of softened corners and Microsoft’s Fluent Design System’s Mica material, a new semi-transparent texture. If we increase the brightness on test monitors, we can just make out the slight Mica effect. It’s less visible and more perceptual. The new software, of course, supports both Light and Dark modes:

    2. A New Button Layout is Available

    The primary menu options remain the same (Collection, Albums, People, Folders, and Video Editor), but all of the buttons in the top right corner have been updated. In contrast to Windows 10’s New Video button, the first button in that group is now just New. When you tap the new button, you’ll see options like New Video Project, Automatic Video, Import Backup, and Album. The latter three options display in Windows 10 Photos as you select the New Video button; with the earlier OS, the Album option appears only when you switch to the Album tab.

    3. Zoom In Using the Improved Photo View

    The app now displays your image in the window edge-to-edge when you click a photo from your collection. This is significant because the app functions as both the OS’s default photo viewer and photo editor. Back and forth between photos is possible by using the arrow keys.
    In contrast, Windows 10 displays a border that is either white or black depending on your theme settings:

    For a clear view of your image, that the Windows 11 version launches without the toolbar at the top. How about those photo-editing tools, though? The new toolbar and a filmstrip view of other photographs you’ve opened appear when you simply tap the image with the mouse pointer or your finger on a touch device (shown below). When you select Fullscreen, the image practically fills the screen as if it were your wallpaper.
    The functionality of the new toolbar buttons are obvious, but when you hover over any of the icons, tooltips appear to explain you what they’re for. Adding to that: See All Favorites, Zoom In, Zoom Out, Rotate, Edit Image, Mark Up, Delete, Favorite, and File Information are listed from left to right.

    4. Use the New Multi-View Option to Compare Images

    A multi-view choice is entirely new to Windows 11. You can view all of the photographs you’ve chosen in a collage. It can be obtained by choosing images from the filmstrip view, however we wish you could just check the appropriate boxes or use the Ctrl key. Also, Multi-View is limited to images included in the same folder. We didn’t have access to the filmstrip control when browsing synced photographs from OneDrive. All photos should function for both the Collection view and the Album view, if possible.

    5. Powerful and flexible new editing tools

    Additionally, Windows 11 has redesigned the interfaces for cropping, adjusting, and filtering. Simplicity is emphasised. The different lighting adjustments—Brightness, Contrast, Shadows, and so on—were hidden in Windows 10 Photos, but they are now readily available in Windows 11. However, unlike some other programmes from firms like Adobe, you still can’t double-click a slider to reset it to its default position.

    The new version does away with the general lighting and colour sliders available in Windows 10, which we occasionally found useful during testing. For comparison, here is the Windows 10 Photos adjustment UI (which compels you to use dark mode—a good thing):

    Windows 11’s Crop and Rotate view shifts the tools from the right side to the bottom: There is still no auto-straighten like in Apple Photos, and instead it uses corner outline handles that are more touch-friendly than circles. We do, however, love the way it presents the finished product with the original background in shadow. By tapping the Free icon in the bottom centre, you may also configure common aspect ratios such as 16-by-9, 4-by-3, square, and so on. Additionally, you may flip the image, which is useful with modern smartphone selfie cameras that produce mirror images.

    Although there isn’t a huge selection of filters available on the Filters menu, it does have the vital Auto Enhance feature. We appreciate that each filter’s strength can be changed using a slider.

    The Mark Up tool hasn’t altered much other than the fact that it was formerly known as Draw and is now accessible from both the Editing page and the initial photo view.

    6. How Does the Photos App’s Video Editing Work?

    Photos still has all the automated and manual video editing features of its predecessor, as you would have surmised from the toolbar buttons listed above. Trims and splits are still possible, and you can also add background music, titles, filters, motion, and even 3D overlays. It’s a powerful capability that most people probably aren’t even aware of because it’s integrated into the Photos app rather than existing as a distinct Videos app. Even without videos, you may still use it to create interesting slide shows.

    Microsoft Photos Will Get Better Eventually: It’s unlikely that the Photos app in Windows 11 will stay just how it is now. The Windows 10 version has, in fact, undergone numerous changes and redesigns throughout time. As fresh Windows 11 upgrades are released, we anticipate seeing new functionality and interface designs. The current app, or at least its use as a tool for making short edits to photographs, can suit individuals without demanding photo editing needs wonderfully in the interim.

    So these are the new features of the Microsoft photos app and if you didn’t find the features then you need to update the application by heading to the official store of the operating system. Keep browsing our website for more interesting and contains and tutorials related to the Windows operating system.

  • The Best Apps in the Windows 11 Store in 2022

    The Best Apps in the Windows 11 Store in 2022

    The Microsoft Store app, also known as the Windows app store, simplifies the process of finding, installing, and uninstalling apps on Windows 11. Apps from the Microsoft Store are more trustworthy than apps from other stores because they have been reviewed by Microsoft professionals for security, technical compliance, and content. They also run in a sandbox, which prevents them from wreaking havoc on other portions of your system. We appreciate desktop app shops, such as the App Store for macOS, because it, like the Windows Store, allows you to reinstall purchased apps on any computer that you’re signed in to.

    The Amazon AppStore has made it possible for Windows 11 computers to run Android apps, which is the big news for the Microsoft Store. But only genuine Windows programmes are included in this compilation. The variety is expanding in more ways than one since Microsoft recently made it simpler for developers to convert both conventional Windows applications and PWA apps (basically app-like websites) for inclusion in the store. PWA apps and UWP apps (Universal Windows Platform apps) are also now more readily available. Anyways let’s dive into the article to check out the best apps in the Windows 11 store in 2022.

    1. Creative Cloud Express by Adobe

    With its new, simple web application, Adobe hopes to democratise good design by making it available to amateur designers. Using templates and stock imagery, you may use the Creative Cloud Express app to create appealing Facebook posts, Instagram stories, logos, or posters. Use it to produce marketing materials, assignments for school, presentations for the workplace, and other tasks that profit from visual impact. It offers an amazing toolkit with a wealth of design components, many of which are freely usable. You can also share your work with clients or other coworkers. A membership includes a lot more templates and stock materials ($9.99 per month).

    2. Photoshop Express by Adobe

    With Adobe Photoshop Express, you can edit your images with funky filters in addition to the standard tools for exposure, contrast, and colour saturation. The sharing options, blemish removal capabilities, and practical cropping tools complete this attractive app that runs on mobile devices as well. It’s also a lot simpler than Photoshop in its whole. Although you can accomplish a lot of things for nothing, a $4.99 monthly subscription unlocks a lot more effects.

    3. Amazon Prime Music Unlimited

    A stunning and reasonably priced music streaming service has been launched by the online retail and web services behemoth. Granted, Spotify has a sizable repertoire and some great social and multi-device control features, but if you spend the money on Amazon Music Unlimited, you get significantly better sound quality and a library with 75 million music that is just as sizable. If you have the appropriate tools, you can use the programme to play in Windows’ more direct Exclusive mode and listen to spatial audio.

    The software allows you to save your sounds for offline listening. Standard service (just 2 million tracks at 320kbps) is free with a Prime subscription, and Hi-Res and 75 million tunes are available for $7.99 per month. A free account (no credit card required) provides you ad-supported stations and playlists but no on-demand listening options.

    4. Firefox

    You read that correctly—you can now download the dependable Firefox web browser from the app store on your computer. We still adore this open-source, independent option even if Windows 11 ships with a fantastic browser in the form of Microsoft Edge. One of the features that users like best is the optional Container tabs, which prevent you from erasing cookies or using a different browser to log in to (or out of) several accounts on the same website. With password syncing, extensions, and solid web standards compliance, Firefox continues to be a quick, adaptable, and privacy-focused browser.

    5. Instagram

    Anyone who is connected to the zeitgeist nowadays won’t want to live without the app Instagram(Opens in a new window). View the selfies, engage in direct messaging chats, view who is following whom, and submit your own memes while you watch the stories. The PWA app has everything. The ability to access the camera on your PC is one thing it lacks, but you can upload locally stored pictures.

    6. Microsoft 365 Personal

    A Microsoft Store app that acts as a central location for all of the bundled applications and your documents is now available for our Editors’ Choice office suite. You can launch documents in the web versions of the suite apps from the Microsoft Office app, which is what is installed when you select Microsoft 365 from the store, or you can locally install the entire suite of apps. The centre also provides you access to Microsoft To Do, Teams, Family Safety, and Skype in addition to the productivity apps. While members receive a terabyte of online storage and downloadable Office software, free users can only utilise the online versions of Office apps.

    7. Windows OneNote

    Don’t forget to keep notes from meetings, sketches, new contacts, and inspiration moments for trips. Keep them in OneNote and arrange them there. All of your notes are synced across all of your devices with this note-taking app, which runs on every platform. Include audio, video, math calculations, and even photographs from the internet. OneNote allows you to password-protect portions so that they are hidden from prying eyes and can be used by students for planning and organising lesson materials. There is no need to create and save files, unlike with a word processor, and searching your full collection of notes is simple.

    8. Twitter

    Twitter is a need of modern life and a method to stay informed, whether you love it for its breaking trends or despise it for all of its anonymous trolls. You can view what your favourite politicians and celebrities are currently ranting about by downloading the Windows Store app, which is a PWA. You may use the app to move between different accounts for all of your tweeting, retweeting, and hearting. Ads do display in your feed, but it’s completely free.

    9. WhatsApp

    More than 5 billion people use WhatsApp worldwide, so chances are good that you communicate with anyone who lives outside of the US or doesn’t have an iPhone. You can use the Windows Store app to call people on video and make voice calls in addition to sending and receiving end-to-end encrypted text messages. With this straightforward Windows Store app, you can send voice messages, emoji, and photographs as well as update your profile. Fortunately, you may now use the same WhatsApp account on multiple computers, just not at once (just tap the Use Here button). With no advertisements or upgrade options, it is free.

    10. Netflix

    Watch your favourite shows from the well-liked streaming service in gorgeous 4K on the screen of your Windows computer or tablet. You can download (some) shows using the Windows Netflix app for offline watching. For various viewers, switch account profiles, and add or remove shows from your list. However, accessing your web browser is still necessary to manage your account.

    These are the few best apps in the Windows store, share your favourite application in the comments section below and stay tuned with us for more interesting information about the Windows operating system at your fingertips.

  • How to Run Android Apps in Windows 11

    How to Run Android Apps in Windows 11

    Microsoft introduced the new Windows 11 operating system last year and one of the most highlighting elements of the operating system is the ability to use native Android applications on the computer. The feature is now accessible to all users as long as you match Microsoft’s requirements. It is worth mentioning that the feature is currently available in the selected regions only.

    The feature is currently available in the regions like the United States and some other European countries but it is not available in India. Users may now download Android apps on their Windows 11 PCs. Users can install Android apps on their Windows PCs by visiting the Amazon Appstore, which is accessible via the official Microsoft Store.

    Installing the Windows Subsystem for Android and the Amazon Appstore is required, and your PC must meet minimum requirements in order to run Android apps on Windows. Android apps will function like any other native Windows software once everything is set up. If you are interested in using Android applications on your Windows 11 powered computer then this article is meant for us today we will guide you on the way to set up the same and the way to use Android applications. So without making any further delay let’s dive into the article to check out the guide.

    How to set up and run Android apps on Windows 11

    1. Look up the device requirements

    Your system needs to fulfil a few prerequisites in order for Android apps to work on Windows 11. Open Settings > System > About, then look for the following information:

    • RAM: A minimum of 8GB of RAM is required for your computer, while 16GB is preferred. This will appear under the Device specs section as Installed RAM.

    • Processor: Your CPU will be mentioned under the device specifications as the “Processor,” and it must be:

    • Intel Core i3 generation 8 or higher

    • AMD Ryzen 3000 or higher (as a minimum)

    • Minimum Qualcomm Snapdragon 8c or higher

    • Storage Type: An internal SSD must be installed in your computer. Go to Settings > System > Storage > Advanced storage settings > Disk and volumes if you’re unsure of what you have. Under your volume, the page should say SSD. If it reads HDD, your options are limited.

    2. Activate the Virtual Machine Platform

    To enjoy the Android applications on your computer you must need to enable the Virtual Machine Platform, which will enable your computer to mimic several operating systems, is one of the most difficult steps in this procedure. The good news is that this is usually enabled by default on Windows 10 computers and all those that came with Windows 11.

    However, configuring this might need you to explore your PC’s BIOS/UEFI configuration. Depending on the maker of your machine, Microsoft provides specific instructions(Opens in a new window) on how to enable this feature. Virtualization should also be able to be enabled via the Control Panel. Go to the search result for “Turn Windows features on or off” and select it. Click OK after selecting the Virtual Machine Platform choice.

    3. Windows 11 update

    Make sure that you are running Build 22000.526, Microsoft expanded its support for Android applications. To find out what OS build you’re using by heading to Settings > System > About > Windows specs and check for OS build. Open Settings > Windows Update to check your build if it fails the test. then click Check for Updates. If you find the latest version of the Windows operating system on your computer after scanning for the update then download and install it as soon as possible.

    4. Microsoft Store App Update

    After updating the computer to the latest version of the Windows operating system, now you must update the official store and download the Amazon Appstore from the Microsoft Store in order to access Android apps. You can able to check the version of the Microsoft Store you are using, click your profile symbol and then select App Settings. You must upgrade. When you click Library, by choosing the Get updates option.

    5. Install the Android Windows Subsystem

    Once everything is updated, you need to open the Microsoft Store and type “Amazon Appstore” into the search bar, then choose to Install > Set Up. The Windows Subsystem for Android will then be requested of you, as it is necessary for Windows to simulate Android.

    After clicking Download, let the feature install. When it’s done, select Next and then Restart your computer. The Amazon Appstore should be set up when the computer restarts.

    6. The Amazon Appstore set up

    The Windows 11 App List includes the Amazon Appstore. Tap on the option called the “All Apps” > “Amazon Appstore” from the Start menu. After then, in order to access the storefront, you are required to check in with your Amazon account. Once you’ve logged in, you may explore and download Android apps from the Amazon Appstore on your Windows 11 powered computer.

    It is worth mentioning that the number of apps is lower than what the Amazon Appstore typically offers because the app is currently in preview. To find something to install, you can use the search bar or any of the categories listed in the store.

    7. Add an Android application to Windows 11

    Installing the Amazon Kindle Android app will serve as an illustration. Click the Get button to download it to your computer when it appears in the search results.

    The application can be minimized, made full-screen, or used to multitask using Snap Layouts once it has been downloaded. Later, you can also locate it in the App List.

    That’s it! This is how you can use and run Android apps in Windows 11. If you find this guide helpful then don’t forget to share this with your near and dear ones.

  • Top 20 Windows 11 Keyboard Shortcuts

    Top 20 Windows 11 Keyboard Shortcuts

    Despite the availability of voice-to-text, touch screens, and other forms of PC input, we still interact with our computers largely through the keyboard. The majority of you are familiar with standard keyboard shortcuts like Ctrl-C for copying, Ctrl-V for pasting, and Alt-Tab for switching between windows. But Windows 11 includes a number of potent, lesser-known key combinations, many of which make use of the Windows key.

    Additionally, Windows has special-function keys that vary from keyboard to keyboard. Media keys like volume, play/pause, and mute are especially helpful. Leaving those aside, let’s look at our favourite keyboard shortcuts for Windows 11 powered PC.

    We’ll list the most practical shortcuts that have been carried over from Windows 10 first (1–13), followed by the brand-new shortcuts for Windows 11 (14–20). They are informally arranged in order of how frequently We use them and how valuable We think they are.

    1. Taking Screenshots

    The screen capture interface for Snipping Tool is unlocked by pressing Windows Key-Shift-S. A full window, the entire screen, or a rectangle or other freeform shape you design are all screenshotted. The option to open the snapshot in an editing window for editing and sharing is shown in a notification panel. Although there are other ways to take screenshots in Windows 11.

    2. Use Windows Key-V to paste history

    This key combination activates Clipboard History, one of Windows’ greatest additions in the previous 20 years. Without having to switch between documents or webpages for each item, you can copy many items from one and paste them into another using the clipboard history. It functions with text and pictures that you’ve copied to the clipboard. The panel that appears in Windows 11 is combined with the following keyboard shortcut, which is important to keep in mind.

    3. Special Characters

    By pressing this key combination, a panel containing emoji, special characters, symbols, and even animated GIFs is displayed. To enter em dashes and en dashes, We frequently use it. Additionally, it works well for entering Greek letters, accented characters, and other symbols that aren’t available on a typical US keyboard. This tool’s ability to give you quick access to the symbols you’ve most recently used is a useful feature.

    4. Task View

    To move between open applications, you can still utilize the familiar Alt-Tab keyboard shortcut (holding down the Alt key after the initial press shows all apps in the current desktop). When using the Windows key type, you can see and move between all of your different desktops and all of the open applications on each one. This is known as the complete Task view. Apps can then be moved from one desktop to another by dragging them. Since if We prefer to have separate desktops for professional and personal use, Windows Key-Tab enables you to drag an app’s tile to the proper desktop when a personal one, like WhatsApp, inadvertently appears on the latter.

    5. Vocal typing

    When you press the Windows Key-H, Voice Typing launches, allowing you to speak text instead of using your fingers to type it. Anywhere you’d ordinarily type can be voice-typed. You may be astounded by how advanced speech recognition has grown if you haven’t used it in a while. The shortcut still functions on Windows 10, but the user experience is now much more straightforward. The H stands for “hear,” which is a quick way to remember this shortcut.

    6. Desktop switch

    Press Ctrl-Windows Key-Left/Right Arrow in Windows 11 to swiftly switch between virtual desktops.Swiping four fingers left or right on a trackpad-equipped laptop accomplishes the same task.

    7. Display the desktop

    Windows Key-D displays the empty desktop. It’s helpful when you want to start again with a clean slate but your screen is overloaded with numerous programme windows. Alternatively, you can enable desktop peek, which enables you to accomplish the same thing by moving the pointer to the bottom-right corner of the screen.

    8. Task Manager

    Since the early versions of Windows, there has been a keyboard shortcut that launches the Task Manager. When your computer is acting sluggish and you want to identify the programme using up the most CPU or RAM, it can be useful. Task Manager is your friend if you need to end a troublesome programme or process. Press Ctrl-Shift-Esc.

    9. Game Bar

    Use the Windows Key-G keyboard shortcut to access the Xbox Game Bar. For things like performance, audio preferences, friend activity, and screen recording, it provides a tonne of buttons and displays.

    10. Screen Lock

    Simply locking the computer to the lock screen, press Windows Key-L. It’s helpful when using a computer in a company or public setting if you don’t want it left accessible to the public or left fully off.

    11. Settings

    The Windows Settings programme is launched by pressing the Windows Key-I. The Windows 11 interface makes this less visible than it was in Windows 10, so using the keyboard shortcut can help. You might recall it as the I for information.

    12. Launch Menu

    We must admit that despite how beneficial it is, We rarely utilize this keyboard shortcut. Windows Key-S (or Windows Key-Q), which opens the Search panel and allows you to search both your computer and the internet.

    13. File Explorer

    Another key command that We intend to use more frequently is Windows Key-E, which launches the File Explorer.

    14. Widgets

    With the new Windows 11 keyboard shortcut, Windows Key-W, the Widgets panel is displayed. When it opens, use Tab to navigate between sections and the arrow keys to move between items inside a section. As seen in the Weather widget up top, the selected item has an outline surrounding it.

    15. Fast Settings

    This shortcut launches the new Quick Settings panel, which takes the place of various Action Center features in Windows 10 . You may switch between Wi-Fi, Bluetooth, Airplane mode, Battery Saver, Focus Assist, and Accessibility functions once the panel is open. Sliders can also be used to change the speaker volume and screen brightness. Clicking the pencil icon allows you to edit the options, and clicking the gear icon opens the complete Windows 11 Settings app.

    16. Notifications

    Windows Key-N launches the Notification panel, which in Windows 10 was previously found in the Action Center, as an alternative to the prior shortcut. You see your calendar and any notifications that have arrived at the bottom, as you might expect. Unfortunately, the calendar has been much diminished in Windows 11; you can no longer view or add events to your schedule.

    17. Snap Layouts with Windows Key-Z

    The Snap Layouts function is activated by this combo. It’s quicker than using the mouse to hold the maximise button over a window, but it works similarly.

    18. Resize to half-screen with the Windows Key-Alt-Up Arrow

    The current application will exactly fill the top half of the screen after pressing these keys together. Similar to this, you may use the Windows Key + Alt + Down, Left, and Right Arrows to make the app take up exactly half of the screen in those directions.

    19. Media Casting

    You can project (kast?) your screen to a wireless monitor using Windows Key-K. Although you may also add a button to the Quick Settings panel, using this shortcut will save you the time.

    20. Chat in Groups

    The new Windows 11 keyboard shortcut C is for chat launches the personal Microsoft Teams chat. Microsoft will likely have little success with this personal version because not even many Windows users utilize it. The ability to text chat with SMS to phone users without the need for a separate account creation is a huge positive for it, too.

    So start using the most important shortcuts in your Windows 11 computer and improve your productivity.

  • Customizing Windows 11: How to Change Default Apps

    Customizing Windows 11: How to Change Default Apps

    Microsoft’s desktop OS gains some fantastic new features and beautiful design upgrades with the latest version of the operating system called the Windows 11 operating system and which was introduced last year, but nothing is made simpler. A good example is the procedure for changing default apps. The difficulties of switching the default web browser from the Microsoft Edge browser to, say, the very popular Google Chrome or Firefox, outraged IT experts who follow Windows. Months after the release of Windows 11, Microsoft has responded to these complaints and made it simpler to change your preferred browser. If you are someone who faced difficulties switching the default applications then this article is meant for you as today we will demonstrate how to adjust that setting as well as how to alter other Windows 11 default programmes.

    In comparison, it’s always been simple to select, for instance, a default music player in Windows 10 (which many people still use). To begin, in the Default Apps area of the settings, select the programme listed below a function (such as Email, Music Player, Photo Viewer, or Web Browser). Then, select a new default app that supports the media type. All you have to do is that.

    How to Modify Windows 11’s Default Apps

    Let’s check out the way to modify the default applications of the new Windows 11 operating system.

    1. Open the Settings app, then select the Apps option from the menu on the left. Compared to Windows 10, the Settings app is more difficult to find. You must look for a grey gear icon in Windows 11. In Windows 11, the Settings icon is not automatically present but can be added.

    2. Select Default applications. Every application on your computer is listed in Windows 11. You can perform a search for an app or the file type you want to link to an app.

    3. You may view a list of all the file types an app is capable of processing by clicking on the app you wish to select as the default for a certain file type.

    4. To change the default app for a certain file type, click on it. Then, a menu similar to the one below appears.

    5. Simply selecting an app from the list is the final step. In addition, Microsoft did not apply rounded corners to this app selection dialogue box, making it one of the few window kinds. You must then repeat the procedure for each type of file you want to use with that application.

    6. Another method for changing the default app is to right-click on a file in File Explorer, select Open With from the context menu (which is more consistently and conveniently the second option in Windows 11), and then select the Choose another app option. By checking the box next to “Always use this app to open [extension] files,” the identical app selection window that was displayed during the first process is now visible. Just click OK after checking the box.
    A Simpler Approach, Just for Browsers

    A new button comes on the Default Apps page of Settings with the April 2022 release. It should be noted that on one of our test Windows 11 systems, an optional upgrade was required: Cumulative Update for Windows 11 for x64-based Systems (KB5011563).

    If the app is a web browser, the default settings interface is the same as what was previously mentioned. In that situation, you’ll get the following choice when you’re on the browser’s default app settings page:

    Simply click the Set Default button located on the right side of this screen. Here, Opera, a dependable alternative programme, has been set as the default web browser. The same holds true for Brave, Chrome, Vivaldi, and other web browsers. However, you still need to set a default for each file type the application may open for other non-browser types of programmes.

    Alternatively, you can install it.

    In order to use the first technique, you must be aware of the file types you wish to deal with, but I assume the majority of PC users are already aware that JPG is an image and DOC is a document. Nevertheless, because Windows 10 allows you to accomplish this for all pertinent file types at once, changing default programmes is still simpler in version 10 than in version 11. During the setup process of some programmes, you can choose to have this done automatically. Examples include VLC, a media library Swiss Army knife, and Firefox, a well-known web browser with a privacy-focused design.

    Firefox

    Firefox on Windows 11 prompts you to choose whether you want it to be your default browser when you launch it for the first time. Firefox keeps displaying a banner with this prompt across the top of the browser window if you don’t choose this option on the first time. During testing, selecting either the choice from the banner or the one at startup completed the task without any hassle.

    VLC Media Player

    A classic open-source programme known for its ability to play virtually any media file is called VLC. VLC is set as the default media player for over 70 file types when VLC is chosen to be the default media player during installation. Sadly, the Groove music app and Movies & TV app continued to be the only ones that could open certain crucial file types (note that the latter is being replaced by a new Windows 11 Media Player). File Extensions Association is a preference in VLC that merely directs you to the Settings > Apps > Default Apps section as was previously stated.

    So this is how you can able to customize Windows 11 operating system and you can follow our tutorials to know more about the operating system.

  • How to Downgrade From Windows 11 to Windows 10

    How to Downgrade From Windows 11 to Windows 10

    Windows 11 is the latest version of the operating system by Microsoft for computers and the new operating system has been introduced with many changes on the board. The company has done a massive change in the taskbar and Microsoft tried to refresh each and every element of the operating system. However, if you didn’t like the latest Windows 11 after switching from Windows 10 then this article is meant for you.

    Well, if you didn’t impress with the new design and the makeover of the latest operating system of Microsoft then you can able to downgrade from Windows 11 and go back to your favourite Windows 10 operating system. The tech giant Microsoft has made a straightforward option to make you return two Windows 10 and the same can be done on the Settings page of the latest windows 11 operating system. When you upgrade your computer from Windows 10 operating system to the latest Windows 11 operating system, the computer keeps a copy of Windows 10 and the validity of the copy is 10 days, so you can revert to the previous version of the operating system comfortably. Keep in mind that if you return to the old version of the operating system from Windows 11, you may need to reinstall several apps and programmes. That means the items which you saved on your PC while running Windows 11 will not be carried over to Windows 10. If you are ok with this, then read on.

    Steps to downgrade from Windows 11 to the Windows 10 operating system,

    As I mentioned above, Microsoft provides you ten days of time to downgrade from Windows 11 to Windows 10 and you can do the same by following the steps which are listed below.

    • First of all, you need to make sure that you are going to downgrade from Windows 11 in less than 10 days of upgrading the computer. You need to open the Settings application by clicking on the start menu of the computer which is running on Windows 11.
    • After that, click on System and select> Recovery. You should see Return to the beginning: If this version does not work, revert return to Windows 10. To proceed, click the Back button.
    • Now you will get a pop-up box that will ask the reason for the downgrade from Windows 11 to Windows 10 operating system. Check your response and then click Next.
    • Then your computer will offer next pop-up offers installing the most recent updates to resolve any issues you’ve encountered. Click the option called No, thank you button to skip that step.
    • The following pop-up warns you that you won’t be able to use your PC until the process is complete, that you’ll have to reinstall some apps and programmes, and that you’ll lose any changes you made to your settings after installing Windows 11. Click Next to continue.
    • The following popup urges you to remember your password in order to avoid being locked out. Next, click.
    • Microsoft thanks you for trying Windows 11 in the next popup. Click Return to Windows 10.
    • The procedure has finally begun. It may take some time to downgrade from Windows 11 to Windows 10, so be patient. Sign into your recovered Windows 10 environment after the downgrade is complete. You should look for any applications you installed or settings you updated in Windows 11 to see if they need to be reinstalled or changed.

    That’s it! This is how you can downgrade from Windows 11 to Windows 10 operating system within 10 days of time.

    After 10 days, downgrade

    However, if you want to downgrade from Windows 11 to Windows 10 operating system after 10 days then you need to follow some other steps to perform the task. You may use a simple Microsoft command line tool to check the number of days remaining and even extend the deadline to as many as 60. (Opens in a new window). So let’s check out the way to downgrade from Windows 11 to Windows 10 after 10 days of validity.

    You need to type cmd into the search field. Click the Run as administrator link in the search results to launch a command prompt with administrative privileges.

    Now enter DISM /Online /Get-OSUninstallWindow at the command prompt. The number following the phrase Uninstall Window denotes the number of days remaining.

    To extend the deadline, type: DISM /Online /Set-OSUninstallWindow /Value:days>, replacing days> with the number of days you want to apply. To set the downgrade deadline to 25 days, use DISM /Online /Set-OSUninstallWindow /Value:25. You can set the deadline to as few as two days or as many as 60.

    Then, using the up arrow key, bring up the DISM /Online /Get-OSUninstallWindow command. Enter to rerun that command and confirm that the number of days you specified is now in effect. You can now return to Settings and use the Go back command whenever you want before the new number of days expires.

    So this is how you can able to downgrade from Windows 11 to Windows 10 operating system. If you find any doubts then do let us know in the comments section below. Keep browsing our website for more tips and tricks to make your life easy.

  • How to Use Safe Mode to Diagnose a Problem in Windows 10 or Windows 11

    How to Use Safe Mode to Diagnose a Problem in Windows 10 or Windows 11

    Do you have a Windows powered computer that frequently freezes, crashes, or issues in performance? It may be an unreliable piece of hardware, an odd driver, or even a subpar application. Start the operating system in Safe Mode, which opens Windows in a clean, immaculate, barebones manner by stopping specific drivers and other programmes from launching, to figure out the root of the issue on a Windows 10 or 11 PC.

    If Windows runs smoothly in Safe Mode, it usually signifies that a certain driver, service, or other plugin that would ordinarily launch automatically is at fault.
    There are a few potential dangers and challenges before you try to restart your computer in Safe Mode, most of which rely on the kind of Windows account you use.

    First, avoid choosing a Safe Mode that does not load network drivers since a Microsoft account requires network access to login. If you do, you might not be able to enter your password to log in.

    Second, establish a different authentication method in addition to your password. For use in the event that the password sign-in is not available or isn’t functioning under a certain Safe Mode setting, options include a PIN, image password, fingerprint recognition, face recognition, and/or security key.

    Third, some of the alternate authentication techniques might not function depending on the Safe Mode option you select. You’ll have to use your standard password to get in in that scenario.

    Fourth, you should make sure your regular password is accessible if you’re using a Microsoft account in case the other authentication methods are unavailable. Go to Settings > Accounts > Sign-in choices in Windows 10 or 11 to accomplish this. Locate the setting by saying Turn off Windows Hello and only permit Microsoft account sign-in on this device (Recommended) to increase security. If you want to switch back to a standard bootup after using Safe Mode, you can always turn it back on.

    The best way to launch Windows in safe mode

    1. Click the search bar or icon at the bottom of your screen in Windows 10 or 11. Input the msconfig command and hit Enter.

    2. The System Configuration tool is also accessible from the Start menu. In Windows 10, select the Start button, navigate to the Apps section, and select the Windows Administrative Tools folder. Select the System Configuration shortcut.

    3. Click the Start button in Windows 11 and then select the All Apps link. Select the Windows Tools option by navigating to the bottom of the Apps list. Double-click the shortcut for System Configuration in the Windows Tools screen.

    4. Your current setting in the System Configuration box is most likely Normal Startup or Selective Startup. The Safe Mode setting you should test first if you’re using a local account is Diagnostic startup, which loads only the most fundamental drivers and services. The drivers and services for audio, networking, and certain other features won’t load with this choice, so you won’t be able to use or test those features. Therefore, avoid using the Diagnostic startup with a Microsoft account as you won’t be able to sign in.

    5. Choose the second Diagnostic startup option if you are logged in with a local account. Press OK. Click the Restart button on the System Configuration message to restart your computer right away.

    Secure Booting

    Sign back into Windows after your computer has restarted and try to duplicate the problem you were having. Whether or whether the problem persists, you’ll need to conduct additional testing to narrow it down. Relaunch the System Configuration tool. Select the Boot option. Select the Safe boot option. Under Safe Boot, there are four options.:

    • Minimal loads the absolute bare minimum of drivers required for Windows to function while still bringing you to the GUI so you can use your mouse to navigate.

    • You’ll need to know how to open Windows without the GUI available for this one because Alternate Shell launches Safe Mode with the command prompt.

    • Computers connected to Microsoft’s Active Directory in a business setting have the option of using Active Directory Repair.

    • In order to access and verify network connectivity, Network loads the appropriate network drivers in the Windows GUI.

    The Minimal and Network options are the most useful for the average person seeking to solve an issue. If you’re using a local account, select Minimal, and Network if you’re using a Microsoft account or need network connectivity to troubleshoot the problem. Restart your computer and sign in again with your password. Then attempt to duplicate the problem.

    If the problem goes away, you can always enter System Configuration again and attempt booting into Normal mode to check if the problem is truly gone. Otherwise, some of the other choices in System Configuration’s Boot section may be useful. No GUI, Boot log, Base video, or OS boot information may be used with Diagnostic startup or Safe boot. You can enable any or all of the following four options:

    • No GUI Boot—No GUI Boot just eliminates the animated dots during startup, which is ineffective for troubleshooting.

    • Boot Log—A boot log is a particular text file that displays you which drivers were loaded and which were not loaded at startup, making it a useful choice for troubleshooting. Restart your computer after enabling the Boot log. Log in to Windows. Open File Explorer and navigate to the following file: C:\Windows\ntbtlog.txt. Check the file for each driver’s status.

    • Base Visual—Instead of the drivers for your unique video card or hardware, Base Video loads the drivers for common VGA graphics. As a result, this option is useful for troubleshooting issues with your graphic display.

    • As your computer boots up, OS boot information displays a list of drivers and other information.

    Reboot your computer with each option checked one by one and see if the problem goes away after you log back in.

    Quickly Booting to Safe Mode

    1. Other ways to enter Safe Mode are available in Windows 10 and Windows 11. To access the recovery option in Windows 10, navigate to Settings > Update & security. Select Restart now by clicking the Restart now option in the Advanced Startup section. Open the Recovery menu in Windows 11 by going to Settings > System. Select Restart now by clicking the Restart now option in the Advanced Startup section.

    2. Navigate to Troubleshoot > Advanced options > Startup Settings in the box for Choose an option. Restart by clicking the button.

    3. On the next starting settings screen, press one of the keys numbered 1 through 9 to select a startup type, such as 1 to enable debugging, To enable safe mode like wise. Click the button to restart. After logging back into Windows, try to replicate the wrong behaviour.


  • 10 Big Reasons Not to Upgrade to Windows 11

    10 Big Reasons Not to Upgrade to Windows 11

    Don’t upgrade to Windows 11 if you don’t want to buy a new computer or give up your beloved, functional interface. Everything works exactly as well—and in some cases, even better—on Windows 10. You’ll never see a Microsoft Windows upgrade that isn’t greeted with vehement criticism, and while Windows 11 hasn’t seen as much scepticism as some earlier iterations of the operating system, it doesn’t mean everything is perfect. Its hardware specifications have been the main point of contention. Long-term users continue to get incensed by minor complaints about UI changes that amount to “someone moved my cheese.” Windows 11 functions mostly in a similar way to Windows 10 does. The software it uses is identical, and the peripheral hardware it supports is identical as well. However, there are a number of good justifications for delaying the Windows 11 upgrade.

    Like the majority of desktop operating systems, whether they are produced by Apple or Microsoft, the goal of a new edition is to persuade you to purchase a new machine. Since upgrading your current hardware doesn’t bring in any money for these IT behemoths, they are less interested in seeing you do it. It’s not a big adjustment to move between Windows 10 and Windows 11, even though I still prefer to use Windows 10 and have used Windows 11 extensively. However, there are several factors that may make you want to stay on the tried-and-true version of Windows 10 rather than upgrade to Windows 11. The fact that Windows 10 did a lot of things right and Windows 11 messes them up is the root of many of the arguments. Please feel free to add further justifications in the comments section below.

    1. For Windows 11, you might need to buy a new computer.

    When Windows 11 first launched, the new hardware requirements caused the largest stir among Windows commentators. The demand for a more recent CPU was the more common barrier to upgrading, according to my experience, but the need for a TPM security chip received a lot of digital print. I tested a total of three or four PCs, all of which had TPM chips but older-than-required CPUs. Additionally, if your computer still uses a 32-bit processor, which is extremely uncommon, you won’t be able to install the OS because it only supports 64-bit Intel/AMD and Arm processors.

    All of that is related to updating current PCs. There are still other reasons to get a computer that runs Windows 10 if you’re in the market for one, as you’ll see below. There is still a good selection of computers with Windows 10 already installed, and Windows 11 can be downgraded to Windows 10.

    2. Better Taskbar in Windows 10

    For some users, it’s a huge issue that Windows 10 allows you to display taskbar buttons that are wider and more informative, as well as to position it across the bottom, on the side, or even at the top of the screen. Both are lacking in Windows 11. The entries in 10 are consistently at the same location. The icon locations, even the location of the Start button, change as apps are opened and closed in 11 if the default centre alignment is used. Fortunately, Windows 11 allows you to left-align the taskbar, which fixes that final problem, but the others still exist. Another issue is that, unlike Windows 10, the Taskbar calendar does not allow you to add or view events. Another is that it doesn’t provide as much drag-and-drop support as its predecessor. Microsoft is going back on this decision, bringing the feature back in upcoming editions of Windows 11, yet when I try to drag a file onto an app icon in the taskbar, I still get the universal No symbol.

    3. The Start Menu in Windows 10 Is Better

    The new Windows 11 Start menu does not display recently installed or commonly used applications. It provides the ambiguous “Suggested” programmes that may be based on those criteria, but I haven’t found it as useful as Windows 10’s obvious sections for those categories. The icons in 11 do not display any app information like the tiles in Windows 10. The previous operating system also provides quick access to Power (Shut down, Restart, and Sleep) and the Settings app.

    4. Windows 11 lacks an always-available search box.

    Yes, you can bring up the search box in Windows 11 by clicking a Taskbar icon or pressing Windows Key-S, but there’s nothing like having it there all the time, in the same area, waiting for your inquiries. This is available in Windows 10, right next to the Start button. The business has even begun to decorate the right side of the box with amusing topical illustrations, a rare indication that Microsoft is still improving Windows 10.

    5. Windows 11’s Tablet Performance Isn’t as Good as Windows 10’s

    I’ve written about the difficult experience of using Windows 11 on a tablet, and while Microsoft claims to have improved it, I find the reverse. Swiping in from the left and right in Windows 10 brings up the highly handy Task view and Action. You could close an app by pulling your finger down from the top of the screen, and apps defaulted to full screen, which makes sense on a tablet. Windows 11 features whole new motions that require several fingers. Though these are more Apple-like, I doubt they will convert many iPad users to Surface Go customers.

    6. Windows 11 necessitates the use of a Microsoft Account.

    There are no Mac users who do not sign in to an Apple account, nor are there any Chromebook or Android users who do not check in to a Google account. However, some Windows users are adamant about avoiding signing into an account on their computer. If you are one of these persons, there is no reason for you to update to Windows 11. At least according to the Home version. The Pro edition does not have this need, though based on test releases, it appears that this loophole will be closed in the future.

    You only need to sign in once during setup for the Home version. After that, you can select a local account to use for regular PC usage. Similar to other operating systems, utilizing a Microsoft account while using the OS gives you access to OneDrive backup, Store apps, Xbox games, Microsoft Family parental controls, and Phone Link, which lets you use the features of your Android phone on your PC.

    7. The Action Center is no longer available in Windows 11.

    Instead of the neat all-in-one Action Center for alerts and quick settings, Windows 11 divides its tasks in a disconnected, seemingly illogical manner, mirroring the jumbled splay of notification boxes seen in macOS (though not quite that bad). In Windows 10, you may modify the sound by tapping the speaker symbol, change the Wi-Fi by using the Wi-Fi button, and check your battery status by tapping the battery indicator. These conveniences are grouped together in Windows 11, so pressing the sound icon pulls up the battery and Wi-Fi options, which you don’t need. In this instance, Windows 11 is less efficient.

    8. There’s no need to hurry; you still have three years.

    What’s the rush to upgrade to Windows 11 when Microsoft will continue to support Windows 10 until October 2025? If you’re happy with Windows 10, as I am, there’s no incentive to update. Since the release of version 11, I’ve noticed additional features introduced to version 10. Possessing stated that, some people enjoy having the most recent items and designs. I’ve had no issues with Windows 11—I used it solely for a month while working remotely—and there are clearly tempting features, such as the redesigned appearance and more-soothing system noises. However, if you choose, you may maintain Windows 10 for the time being, and many of us will.

    9. File Explorer matters

    Microsoft has tried many things to make Windows 11 attractive and interesting but the right-click context menus was good in the Windows 10 operating system and that is one of the biggest reason to not upgrade your computer to the latest version of the Windows operating system.

    10. You will miss some interesting elements

    The developers of Windows 11 have done many things to make the operating system modern and avoid the many interesting features of Windows 10. You will not able to get the Timeline as well as Live Tiles in the latest version of the Windows operating system. If you love those interesting features then this is another reason for you to not upgrade your computer to Windows 11.

  • How to Connect Your Android Phone to Your Windows 11 PC

    How to Connect Your Android Phone to Your Windows 11 PC

    You take a photo using your phone and want to see it on a larger screen. You receive a text message but don’t want to take out your phone to respond because you’re working on your computer. Well, the latest Windows 11 operating system has a solution for this and Windows 11 enables users to view the photo or respond to text message or calls on the computer without taking the Android smartphone from pocket.

    All you need to connect your Android smartphone to your Windows 11 computer. Most impressively, some Android phone models allow you to run many mobile apps on your computer at the same time as well. It is worth mentioning that the iPhones are not supported for this particular feature. But users who are using macOS can able to text and call from their desktop. Apple’s silicon-based Macs are far more advanced, as they can run mobile applications.  Windows users can now claim at least parity with Microsoft’s mobile-to-desktop capabilities, which was upgraded in March.

    You can connect an iPhone to a computer running Windows 11, but you won’t get the same level of experience that Android users receive. Microsoft has claimed that it wants to offer the same functionality that iPhones have to Windows, but Apple has traditionally been unwilling to free people from their dependence on its products. Having said that, an iPhone can be connected to a Windows PC for basic file-transfer functionality. However, in this article, we will demonstrate how to connect an Android phone and a Windows 11 PC for a more robust mobile-and-desktop integrated solution.

    Anyways, let’s come back to our topic to connect your Android smartphone to your Windows 11 PC to carry out various activities without touching the smartphone.

     What is Required to Begin

    During its initial setup, Windows 11 asks you to connect your smartphone. We’ll walk you through the process and call out a few items you should be aware of before you begin, assuming you didn’t do so at the time.

    Installing the Link to Windows app from the Google Play Store on your phone and signing in with the same Microsoft account you use on your PC are two requirements that are crucial. The app comes preinstalled on some phones. Since the Phone Link programme comes preinstalled on every Windows 11 PC, there are no issues on the PC end of the connection.

    Another requirement is that the phone be in Bluetooth and WiFi range of the PC since, while display and control occur on the PC, the apps continue to function on the phone.

    Furthermore, Android 7 or later is required to enable Android-to-Windows 11 capabilities. Any PC running Windows 11 is compatible. We utilised a Surface Laptop 3 and a Samsung Galaxy S21 Ultra to put the system through its paces. In terms of functions, the phone model is more essential than the PC model.

    Microsoft has simplified its phone-linking method with the latest version. Phone Link is a PC app, whereas Link to Windows is a mobile app. Link to Windows previously only worked with some Samsung models and Surface Duo phones (Opens in a new window) (some Honor models were recently added for users in China). These devices will continue to gain functionality, such as the ability to mirror Android apps on a PC. This is distinct from Windows 11’s much-touted ability to run Android apps, in which the apps actually operate on PC hardware.

    Finally, the Link to Windows system can be installed on various PCs for the same phone, so if you switch between a desktop at home and a laptop on the go, it will operate on both.

     How to connect your Android smartphone to your Windows 11 PC in Steps

    •  On your Windows 11 PC, launch the Phone Link app. This is the first page of a four-step setup process.
    •  Enter your Microsoft account information. If you already signed in to an account during PC setup, just accept the account in the wizard.
    •  Download and install the Link to Windows mobile app. You may acquire it by searching for it in Google Play or by typing www.aka.ms/yourpc(Opens in a new window) into your mobile browser. On newer Samsung and Surface Duo phones, click down the Quick settings shade and select Link to Windows. Long-press it to access the syncing options.
    •  Connect your phone and PC. You can pair via a QR code or by typing a text code presented in the PC’s Phone Link app into the phone’s companion app. Remember to use the in-app camera to scan the QR code in the Link to Windows app on the phone. That’s it once you’ve completed either pairing procedure. You’re done!

    What Are Your Options for a Connected Phone?

    As previously said, the fancier features are limited to specific phone models, but connecting to any Android phone you set up allows you to receive and respond to text messages, see and manage notifications, make and answer calls, and see images on the computer instantaneously.

    Microsoft has changed the app’s UI to display primary features (Messages, Calls, Apps, Photos) across the top. When you click on the system tray icon, you now see recent apps as well as a View All Apps link. Notifications are hidden in a panel on the left.

    The number of notifications that are waiting for you is displayed on a badge in the taskbar item for Phone Link. You may decide which apps to receive notifications from and whether to respond on the phone or the PC. Additionally, not all events take place within the app. In the lower-right corner of the screen, in the Windows Notification toast, you can reply to messages directly.

    You won’t see the Apps area in the top menu if your phone is not one of the more advanced models. Accessing text messages and photographs from your phone on your PC is one of the most practical functions, and it works with any Android device. Even with less sophisticated models, you can see images on your PC immediately after taking them with your phone and drag them into a document or another tool that works with photos, like Photoshop.

    So what are you waiting for? Use this method to connect your Android phone to your Windows 11 PC and enjoy the freedom of accessing messages calls and photos on the computer and the same will not interrupt your working flow as well.