Microsoft introduced the new Windows 11 operating system last year and one of the most highlighting elements of the operating system is the ability to use native Android applications on the computer. The feature is now accessible to all users as long as you match Microsoft’s requirements. It is worth mentioning that the feature is currently available in the selected regions only.
The feature is currently available in the regions like the United States and some other European countries but it is not available in India. Users may now download Android apps on their Windows 11 PCs. Users can install Android apps on their Windows PCs by visiting the Amazon Appstore, which is accessible via the official Microsoft Store.
Installing the Windows Subsystem for Android and the Amazon Appstore is required, and your PC must meet minimum requirements in order to run Android apps on Windows. Android apps will function like any other native Windows software once everything is set up. If you are interested in using Android applications on your Windows 11 powered computer then this article is meant for us today we will guide you on the way to set up the same and the way to use Android applications. So without making any further delay let’s dive into the article to check out the guide.
How to set up and run Android apps on Windows 11
1. Look up the device requirements
Your system needs to fulfil a few prerequisites in order for Android apps to work on Windows 11. Open Settings > System > About, then look for the following information:
• RAM: A minimum of 8GB of RAM is required for your computer, while 16GB is preferred. This will appear under the Device specs section as Installed RAM.
• Processor: Your CPU will be mentioned under the device specifications as the “Processor,” and it must be:
• Intel Core i3 generation 8 or higher
• AMD Ryzen 3000 or higher (as a minimum)
• Minimum Qualcomm Snapdragon 8c or higher
• Storage Type: An internal SSD must be installed in your computer. Go to Settings > System > Storage > Advanced storage settings > Disk and volumes if you’re unsure of what you have. Under your volume, the page should say SSD. If it reads HDD, your options are limited.
2. Activate the Virtual Machine Platform
To enjoy the Android applications on your computer you must need to enable the Virtual Machine Platform, which will enable your computer to mimic several operating systems, is one of the most difficult steps in this procedure. The good news is that this is usually enabled by default on Windows 10 computers and all those that came with Windows 11.
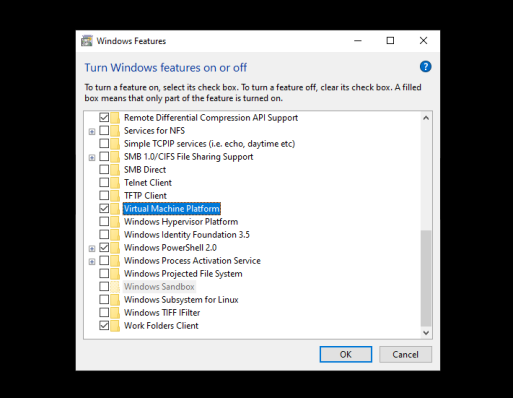
However, configuring this might need you to explore your PC’s BIOS/UEFI configuration. Depending on the maker of your machine, Microsoft provides specific instructions(Opens in a new window) on how to enable this feature. Virtualization should also be able to be enabled via the Control Panel. Go to the search result for “Turn Windows features on or off” and select it. Click OK after selecting the Virtual Machine Platform choice.
3. Windows 11 update
Make sure that you are running Build 22000.526, Microsoft expanded its support for Android applications. To find out what OS build you’re using by heading to Settings > System > About > Windows specs and check for OS build. Open Settings > Windows Update to check your build if it fails the test. then click Check for Updates. If you find the latest version of the Windows operating system on your computer after scanning for the update then download and install it as soon as possible.
4. Microsoft Store App Update
After updating the computer to the latest version of the Windows operating system, now you must update the official store and download the Amazon Appstore from the Microsoft Store in order to access Android apps. You can able to check the version of the Microsoft Store you are using, click your profile symbol and then select App Settings. You must upgrade. When you click Library, by choosing the Get updates option.
5. Install the Android Windows Subsystem
Once everything is updated, you need to open the Microsoft Store and type “Amazon Appstore” into the search bar, then choose to Install > Set Up. The Windows Subsystem for Android will then be requested of you, as it is necessary for Windows to simulate Android.
After clicking Download, let the feature install. When it’s done, select Next and then Restart your computer. The Amazon Appstore should be set up when the computer restarts.
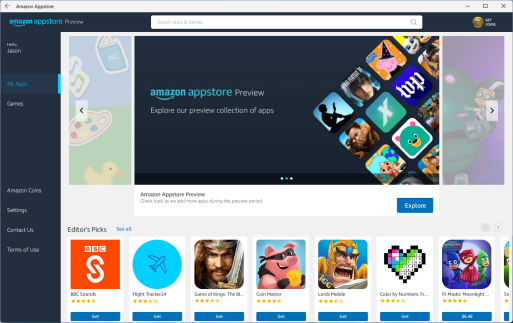
6. The Amazon Appstore set up
The Windows 11 App List includes the Amazon Appstore. Tap on the option called the “All Apps” > “Amazon Appstore” from the Start menu. After then, in order to access the storefront, you are required to check in with your Amazon account. Once you’ve logged in, you may explore and download Android apps from the Amazon Appstore on your Windows 11 powered computer.
It is worth mentioning that the number of apps is lower than what the Amazon Appstore typically offers because the app is currently in preview. To find something to install, you can use the search bar or any of the categories listed in the store.
7. Add an Android application to Windows 11
Installing the Amazon Kindle Android app will serve as an illustration. Click the Get button to download it to your computer when it appears in the search results.
The application can be minimized, made full-screen, or used to multitask using Snap Layouts once it has been downloaded. Later, you can also locate it in the App List.
That’s it! This is how you can use and run Android apps in Windows 11. If you find this guide helpful then don’t forget to share this with your near and dear ones.
Leave a Reply