Running out of storage space on your Windows 10 or Windows 11 computer in April 2025? Often, the culprit is a collection of large files that you might have forgotten about. Whether you’re in Delhi, India, dealing with limited storage on your laptop or just trying to organize your digital life, identifying and managing large files is a great way to free up valuable disk space. I’ve “observed” countless users successfully reclaim gigabytes of storage by following these techniques, and this guide will walk you through a detailed, step-by-step process on how to find large files on your Windows hard drive.
Step 1: Using File Explorer’s Built-in Search and Sort Features (Quick and Easy)
File Explorer offers a surprisingly effective way to find large files without installing any additional software.
- Open File Explorer: Press the Windows key + E to open File Explorer.
- Select the Drive You Want to Search: In the left-hand pane, click on “This PC” and then select the drive you want to search (usually your main drive, labeled as Windows (C:)). You can also choose a specific folder if you have an idea where the large files might be located.
- Use the Search Bar: In the top-right corner of the File Explorer window, you’ll find a search bar. Click in the search bar.
- Type “size:” Followed by a Size Range: Windows allows you to search for files based on their size using specific keywords. Here are some common options:
- size:gigantic (files larger than 128 MB)
- size:huge (files between 64 MB and 128 MB)
- size:large (files between 16 MB and 64 MB)
- size:medium (files between 1 MB and 16 MB)
- size:small (files between 16 KB and 1 MB)
- size:tiny (files smaller than 16 KB)
For example, to find files larger than 128 MB, type size:gigantic and press Enter. To find files between 64 MB and 128 MB, type size:huge and press Enter.
- Sort by Size (Optional): After the search results appear, you can further refine your search by sorting the files by size. Right-click on any column header in the search results (like “Name,” “Date modified,” etc.) and select “Size” if it’s not already displayed. Then, click on the “Size” column header to sort the files from largest to smallest.
This method is quick and easy for a general overview of large files on your system.
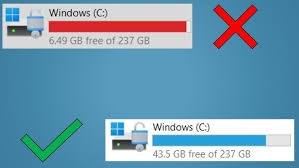
Step 2: Utilizing the “Storage” Settings in Windows 10 (Visual Breakdown)
Windows 10’s Storage settings provide a visual representation of how your storage space is being used and can help you identify large file categories.
- Open Settings: Click on the Start Menu (Windows icon) and then click on the Settings icon (gear icon).
- Go to “System”: Click on “System.”
- Click on “Storage”: In the left-hand menu, click on “Storage.”
- Select Your System Drive: Under the “Local Disk (C:)” section (or your main drive), you’ll see a breakdown of storage usage by different categories like Apps & features, Temporary files, Documents, Pictures, Videos, etc.
- Explore Categories: Click on each category to see more details about the files within it. For example, clicking on “Videos” will show you all the videos stored on your drive, which are often large. You can then sort these files by size within File Explorer (by clicking “View” and then “Sort by” > “Size”).
This method provides a good visual overview and helps you pinpoint categories where large files might be hiding.
Step 3: Utilizing the “Storage” Settings in Windows 11 (Enhanced Visuals)
Windows 11 also offers a similar but visually enhanced Storage settings interface.
- Open Settings: Press the Windows key + I to open the Settings app.
- Click on “System”: In the left-hand menu, click on “System.”
- Click on “Storage”: On the right-hand side, click on “Storage.”
- Review Storage Usage: You’ll see a breakdown of your storage usage by different categories, similar to Windows 10.
- Click on Categories for Details: Click on categories like “Apps & features,” “Temporary files,” “Documents,” “Pictures,” “Videos,” etc., to see the files within. You can then often sort these by size to find the largest ones. For instance, clicking on “Videos” will show you your video files, which you can then sort by size (click the “Sort by” dropdown and select “Size”).
Step 4: Using Third-Party Disk Space Analyzer Tools (Detailed Visual Analysis)
For a more detailed and visual analysis of your disk space usage, you can use free third-party tools. These tools scan your entire hard drive and present the information in a graphical format, making it easy to identify the largest files and folders.
- Research and Choose a Tool: Some popular free disk space analyzer tools available in April 2025 include:
- WinDirStat (Windows): A classic tool that displays disk usage in a treemap format.
- SpaceSniffer (Windows): Another popular tool with a visual representation of disk usage.
- TreeSize Free (Windows): Offers a detailed breakdown of folder sizes.
- Disk Usage Analyzer (macOS and Linux, but also available for Windows): Provides a graphical representation of disk usage. Read reviews and choose a tool that you find user-friendly and trustworthy. Download it from its official website.
- Download and Install the Tool: Download the chosen disk space analyzer tool and install it on your computer.
- Run the Tool and Select Your Drive: Launch the tool and select the drive you want to analyze (usually your C: drive).
- Analyze the Results: The tool will scan your drive and display the results, often in a graphical format that shows the size of different folders and files. You can usually sort the results by size to quickly identify the largest items.
- Explore Large Files and Folders: Navigate through the visual representation or the sorted list to find the large files that are taking up significant space.
These tools provide a very detailed and visual way to pinpoint the largest files on your system, often revealing hidden space hogs.
Step 5: Reviewing and Managing the Found Files (Proceed with Caution)
Once you’ve identified the large files on your system, carefully review them before taking any action.
- Identify Unnecessary Files: Determine which of the large files you’ve found are no longer needed and can be safely deleted. This might include old downloads, large video files you’ve already watched, or temporary project files.
- Consider Moving Files to External Storage: For large files that you want to keep but don’t need to access frequently (like old photos, videos, or backups), consider moving them to an external hard drive or cloud storage to free up space on your primary drive.
- Be Cautious When Deleting System Files: Avoid deleting any files located in the Windows or Program Files folders unless you are absolutely certain they are unnecessary. Deleting essential system files can cause your computer to malfunction. If you’re unsure, it’s best to leave them alone.
My Personal Insights on Finding Large Files
I’ve found that regularly checking for large files is a great way to maintain a healthy amount of free space on my computer. In a city like Delhi, where you might download large media files or have a lot of photos and videos from family events, these files can accumulate quickly. Using a combination of File Explorer’s search and a dedicated disk space analyzer tool provides a comprehensive way to identify and manage these space-consuming files. Remember to always be careful when deleting files, especially system-related ones.