Category: Windows 8.1

  • Fix : Broken libraries in Windows 8.1 | Restore Default Libraries

    Fix : Broken libraries in Windows 8.1 | Restore Default Libraries

    This post will help you fix broken libraries in Windows 8 , 8.1 & Windows 7 | Restore Default Libraries. This post also shows you the steps to show & restore your libraries in Windows operating system. Sometimes the library folders get corrupted & the whole functionality of the libraries is affected. This post will also fix the issue when you cannot find your files stored in the libraries or open the library folders at all.

    Below are the steps to fix Windows Libraries :

    Step 1 : Show the Libraries

    • Go to This PC ( Computer )
    • Click on View
    • Click on Navigation Pane
    • Check “show all folders”
    • Check “Show Libraries”
    • Do not uncheck anything that is already checked

    restore_libraries_8

    Step 2 : Restore Default Libraries

    • Now,
    • Locate your libraries in the left hand pane
    • Right Click
    • Click on Restore Default Libraries

    restore_libraries_8_1

    • That’s it.

    If you still face an issue with your libraries, please use the comment section & i will try to help.

  • How to : Enable Local Administrator Account in Windows 8.1

    How to : Enable Local Administrator Account in Windows 8.1

    This post is a collection of steps on How to enable local administrator account in Windows 8.1 . The same steps can be followed in Windows 8 as well. Windows 8 / 8.1 by default has the local Administrator account disabled. Follow the steps below to enable the local ( built-in) administrator account in Windows 8.

    • Follow this article to List Local users MMC
    • Now, Right Click the User Account that says Administrator
    • Click on Properties

    local_administrator_account

    • Now, here, Uncheck the box that says Account is disabled
    • Click on Apply
    • Click on Ok
    • Your Built-in ( Local ) administrator account is now active
    • You can choose to set a password for the same by:
    • Right Clicking the Administrator account
    • Click on Set password

    If you face a problem with the steps mentioned above or need assistance with a certain step, please use comments section to post your query

  • How to : List Local users MMC in Windows 8, 8.1

    How to : List Local users MMC in Windows 8, 8.1

    This post is a step by step on How to list local users MMC in Windows 8 | 8.1 .Microsoft Management Console (MMC), is a built-in extensible common presentation service for management applications. MMC snap-ins are commonly used by Microsoft or other third party programs to interact with host integration services within the operating system.  MMC can be used to add /remove snap-ins according to the need of the administrator. Some of the most common management consoles in Windows Operating system are gpedit.msc & rsop.msc ( Resultant Set of Policy )

    Below are the steps to List Local users & Groups in Microsoft Management Console (MMC):

    • Press Windows Logo Key + X
    • Press A ( This will open command prompt with elevated privileges | Administrator mode )

    cmd_admin_win8

    • Now, within the command prompt type MMC  & press enter

    mmc


    • Now, within the File Menu on the top left corner
    • Click on Add/Remove Snap-in…

    mmc1

    • Locate & select Local Users and Groups
    • Click on Add
    • Click OK
    • A New Windows will pop open

    mmc2

    • Here, Select Local Computer
    • Click on Finish
    • Press OK

    mmc3

    • Now, a new entry named Local Users and Groups (Local) Can be seen
    • Here, if you notice are listed all the users in your system.

    mmc4

    • Now, Click on File
    • Click on Save
    • Give a name to this management console, so that you can use it later

    mmc5


    If you need further help or face an issue implementing any of the above mentioned steps, feel free to drop a line to me & I will try to help out.

  • How to Install Windows Live mail / essentials in Windows 8 | POP Support

    How to Install Windows Live mail / essentials in Windows 8 | POP Support

    This post is a How to Install Windows live mail desktop ( essentials ) in Windows 8 |POP support. Many of you have written to me saying that they are really sad that Windows 8 mail app does not support POP ( Post office Protocol ) & you wish to use POP as your email settings. And many email providers does not support / charge extra for IMAP.In Windows 7 days, I used to install Windows Live Essentials for Windows Live mail, messenger, photo gallery, live writer and some other sets of essentials programs. This post helps you do exactly that. Just follow the steps mentioned below :

    • Go to http://get.live.com
    • Click on Download Now
    • After the Download Completes, Run the program

    Windows live mail

    • Click on Choose the programs you want to Install

    Windows live mail1

    • Select Windows Live Mail & uncheck every other box ( Unless you need those extra applications )

    Windows live mail2

    • Click on Install
    • Let the process Finish
    • It might take a while, depending on your Internet connection speed.
    • Now,
    • You can use the POP3 type email settings with Windows Live Mail in Windows 8, Without using the Default Windows 8 mail app.

    If you have any queries or comments, please feel free to use the comment section

  • Fix : Windows 8 Installation error : Product key not verified : Check installation Media

    Fix : Windows 8 Installation error : Product key not verified : Check installation Media

    Fix : Windows 8 couldn’t verify the product key , Check installation media. This post fixes the Windows 8 Installation error where setup says “ We couldn’t verify the product key,. Please check your installation media . Below is the screenshot of the error i received while trying to install Windows 8. This post applies to Windows 8.1 as well. This guide will help you when you are sure that you are using correct product key for your Windows 8 | 8.1 installation, and you are receiving an unexpected error. Below are a few fixes that helped me and should help you :

    product key not verified

    Tip 1 : Check Installation Media

    • If it’s a DVD, make sure it is not scratched and inserted properly
    • If its a USB drive and you used the Microsoft USB DVD Tool to make it:
      • Check the ISO file you used to make this installation media
      • Try to remake the media using the USB tool
      • or
      • Try using the same tool to burn a DVD if you can
      • Make sure that you have enough space on the USB drive that you are using to Install Windows.
      • Also, make sure that the USB drive is inserted properly into the USB port.
      • Make sure that you insert your USB drive directly into the system and not through a external USB hub


    Tip 2 :USB 3.0

    • If your system supports USB 3.0, it is possible that for some reason the setup is not able to read it properly.
    • Try Inserting your USB drive into a USB 2.0 port.


    Tip 3 : Change BIOS settings for USB

    • At the time of system start up
    • Press DEL, F2, F10 or refer your system documentation for the key binding assigned to boot into the BIOS
    • Locate the options for USB and make sure USB Legacy support is turned on
    • Secondly, if there is an emulation setting for USB, set it to CD/DVD
    • and,
    • Make sure it is not set to hard disk


    If you still face an issue, please use the comment section and I will try and help you further

  • Guide : Installing / upgrading Windows 8.1 preview

    Guide : Installing / upgrading Windows 8.1 preview

    This post is a recommended read if you are about to install Windows 8.1 preview on your pc. Windows 8.1 preview is a pre-release software from Microsoft which is publicly available to download. Being a pre-release software, only advanced computer users and people willing to get their hands on something new and exciting from Microsoft should get the Windows 8.1 preview.

    Things to know before proceeding:

    • Currently 13 base languages are supported. This means that if you are upgrading from Windows 8 to Windows 8.1 preview via Windows store, your current Windows 8 installation should be installed with one of the 13 supported base languages. The supported languages are :
    • Arabic
    • English (US)
    • Chinese (Simplified)
    • Chinese (Traditional)
    • French
    • German
    • Japanese
    • Korean
    • Portuguese
    • Russian
    • Spanish
    • Swedish
    • Turkish
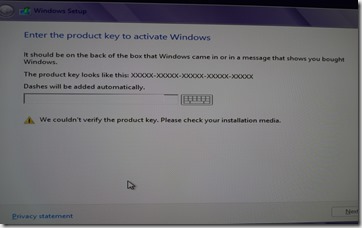
    • If you have installed your current operating system with some other language. You should not continue, else you will be presented with an error message “The update is not applicable to your computer”
    • If you are installing the Windows 8.1 preview by booting from a bootable DVD / USB drive, make sure to select the language from the above mentioned thirteen languages.
    • Windows 8.1 Preview requires the same configuration as Windows 8
    • Your current hardware and Windows 8 device drivers should work with Windows 8.1
    • If you uninstall Windows 8.1 in future and return back to Windows 8, you will have to reinstall your apps.
    • If it highly recommended that your take a proper backup of your computer before proceeding.

    Things to do before installing Windows 8.1 Preview:

    • Make sure to disable or uninstall any Antivirus program ( but retain licensing information of your product for future installation )
    • Create a custom refresh image for your current Windows 8 operating system. This will help you in future when you might want to uninstall the 8.1 preview and return to Windows 8
    • Do a clean boot before installing Windows 8.1 preview from Windows Store
    • Detach any peripheral device that is not needed at the time of installation and plug these devices back after the installation is complete
    • Download the Windows 8.1 preview product guide from here

    Hope you have a great experience trying this preview version of Windows 8.1. If you face any problems with this pre-release software, please use the comment section to start a discussion and express your views.