Are you looking for a way to use default logon picture for all users in Windows Vista/7/10/11?
Then you are at the right place.
In this article, we will be taking you through the steps to set an image icon for all the user profiles on your Windows computer. The same method below can be followed on all the popular Windows versions including Windows Vista/ Windows 7/ Windows 8/Windows 8.1/Windows 10/Windows 11.
How to Use Default Logon Picture for All Users in Windows?
Group Policy editor is something that a lot of us know about, but how many of us do really use it a lot?
To use default logon picture for all users in Windows computer, we basically edit the User Accounts within the “Group Policy Editor”, thus applying the change to all the users on the computer. This way, the administrator of the computer can have a standard logon picture set for all the people using the system.
One important point to note here is that no customization will be allowed on a user level, once the default logon picture is set. If you set this configuration, then the only way you can allow individual logon picture customization is by disabling the feature.
I am going to tell you a small trick to use a common default logon picture for all users in Windows 7. ( This also applies to Windows Vista/Windows 10/Windows 11).
- First, you must have a picture ready to put as the default logon picture. Select a pic and then place it in the location “C:\ProgramData\Microsoft\User Account Pictures”. Replace the guest.bmp file with your picture.
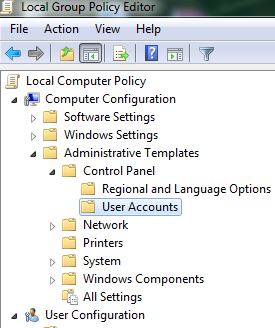
- Now, go to the start menu and type “gpedit.msc” or group policy editor and it will show up as the search result. Open it & navigate to :Computer Configuration -> Administrative Templates -> Control Panel -> User accounts

- Double Click on user accounts

- Now click on Apply the default user logon picture to all users and you will see this :

- Now Click on Enable and it’s all done.


Final Words
We hope you found this guide helpful and easy to follow.
In case of any questions, feel free to reach out to us by leaving a comment below.