After reading this article you will be able to fix a problem ( more of an inconvenience) with Windows 10, where when you open Windows explorer, the left hand navigation pane shows you multiple entries for the same drives. This looks cluttered and confuses the user. Though, its technically not a problem, but might prove to be a hassle.
Follow the steps below to fix Duplicate Drive letter entry Windows 10
Before following this post, I would recommend that you backup your registry or setup a system restore point. If you are not sure how to set a system restore point follow this post. If you wish to backup your registry in Windows 10, click here.
Assuming that you have backed up your Registry and set a system restore point by now, let’s start:
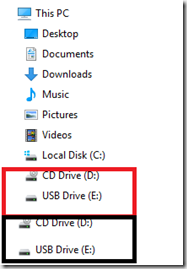
The duplicate entries in Windows 10 explorer should look something like this:

To fix:
- Press Windows Logo key + X to bring up the power menu in Windows 10
- Now, Press A & Click on Yes to the prompt that appears.
- In the Command prompt, type REGEDIT and press enter.
- The Registry editor will open with elevated privileges

- Now, navigate to HKEY_LOCAL_MACHINE\SOFTWARE\Microsoft\Windows\CurrentVersion\Explorer\Desktop\NameSpace\DelegateFolders

- Now, Right click the key under DelegatedFolders, that looks like the one below:

- Press Delete & confirm with yes when prompted.
- Now, If you are running Windows 10 64 bit, you need to again navigate to:
- HKEY_LOCAL_MACHINE\SOFTWARE\Wow6432Node\Microsoft\Windows\CurrentVersion\Explorer\Desktop\NameSpace\DelegateFolders
- Delete the key as you did in the steps above.
- Now, Restart your computer & check if the issue has been resolved or not.
- For me, it did.

If this method worked for you or if you have any follow questions or comments, please use the comment box to write to me.