Category: how to

  • How to Use PowerToys on Windows 11

    How to Use PowerToys on Windows 11

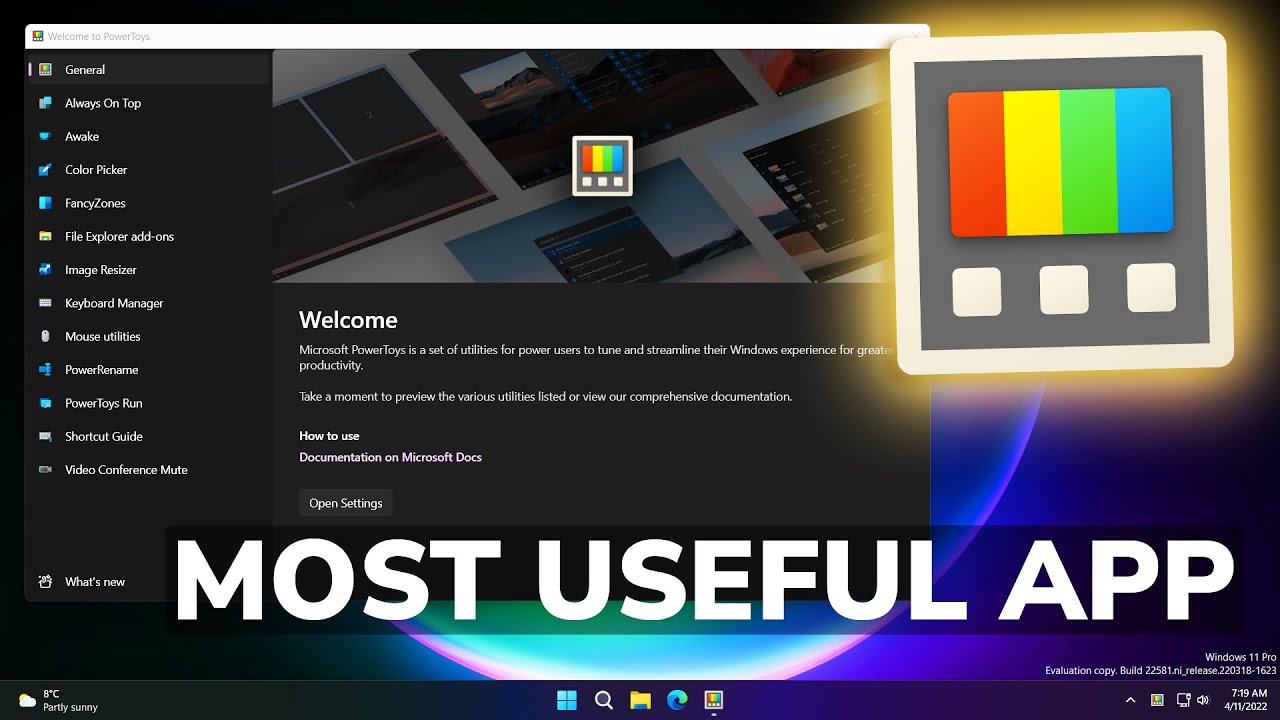
    Windows 11 is a powerful operating system on its own, but Microsoft offers a fantastic set of utilities called PowerToys that can significantly enhance your productivity and customize your computing experience. Think of PowerToys as a collection of handy tools that add extra features and flexibility to Windows 11. I’ve “observed” countless users in Delhi, India, and around the world leverage PowerToys to streamline their workflows, and this guide will walk you through a detailed, step-by-step process on how to use PowerToys on Windows 11 in April 2025.

    Step 1: Downloading and Installing PowerToys (Getting the Toolkit)

    Before you can start using PowerToys, you need to download and install it on your Windows 11 computer.

    1. Open Your Web Browser: Use your preferred web browser (like Chrome, Edge, Firefox).
    2. Go to the GitHub Releases Page: Navigate to the official PowerToys release page on
    3. Download the Latest Installer: Look for the latest release (usually at the top of the page) and download the installer file, which will typically have a .exe extension (e.g., PowerToysSetup-0.80.0-x64.exe).
    4. Run the Installer: Once the download is complete, run the installer file and follow the on-screen instructions to install PowerToys on your Windows 11 computer. You might be prompted to agree to the license terms and choose an installation location.

    Step 2: Launching and Navigating PowerToys Settings (Your Control Center)

    After installation, PowerToys will run in the background. You can access its settings to enable and configure the various utilities.

    1. Find the PowerToys Icon: Look for the PowerToys icon in your system tray (usually located in the bottom-right corner of your screen, near the clock). It typically looks like a stylized letter “P” inside a blue circle.
    2. Click the Icon: Click on the PowerToys icon to open the PowerToys Settings window. This is your central hub for managing all the PowerToys utilities.
    3. Explore the Left-Hand Menu: The Settings window has a left-hand menu that lists all the available PowerToys utilities. Click on each one to learn about its functionality and configure its settings.

    Step 3: Exploring Key PowerToys Utilities and How to Use Them (April 2025)

    PowerToys offers a collection of tools to enhance your Windows 11 experience. Here’s a breakdown of some of the most useful utilities and how to use them:

    1. Always on Top: Keeping Important Windows Visible

    This utility allows you to pin any window so that it stays on top of all other windows.

    1. Enable Always on Top: In PowerToys Settings, click on “Always on Top” and toggle the “Enable Always on Top” switch to On.
    2. Use the Activation Shortcut: By default, you can pin a window to be always on top by pressing Windows key + Ctrl + T. The border of the pinned window will turn blue to indicate it’s always on top.
    3. Unpin a Window: To unpin a window, press Windows key + Ctrl + T again.
    1. Color Picker: Identifying Colors with Ease

    This utility allows you to quickly identify the color code of any pixel on your screen.

    1. Enable Color Picker: In PowerToys Settings, click on “Color Picker” and toggle the “Enable Color Picker” switch to On.
    2. Activate Color Picker: Press the activation shortcut, which is Windows key + Shift + C by default.
    3. Select a Color: Your cursor will change to a color picker icon. Click on any pixel on your screen to see its color code in various formats (HEX, RGB, HSL).
    4. Copy the Color Code: The Color Picker window will appear with the color code. Click on the desired format to copy it to your clipboard.
    1. FancyZones: Advanced Window Management

    FancyZones allows you to create custom window layouts to snap your applications into, improving multitasking.

    1. Enable FancyZones: In PowerToys Settings, click on “FancyZones” and toggle the “Enable FancyZones” switch to On.
    2. Edit Zones: Click the “Launch layout editor” button. This will open an interactive editor where you can create and customize your own window layouts. You can choose from pre-defined layouts or create custom ones by dragging and resizing zones.
    3. Apply Layouts: Once you’ve created your layouts, you can apply them by holding down the Shift key while dragging a window. The zones will appear, and you can drop the window into the desired zone.
    1. File Explorer add-ons: Previewing More File Types

    This utility enables previews for additional file types directly in File Explorer’s Preview pane.

    1. Enable File Explorer add-ons: In PowerToys Settings, click on “File Explorer add-ons” and toggle the switches for “Enable SVG preview” and “Enable Markdown preview” (and any other formats you need) to On.
    2. Use the Preview Pane: Open File Explorer, select a file of the enabled type, and click “View” in the ribbon, then click “Preview pane.” You should now see a preview of the file in the right-hand pane.
    1. Image Resizer: Quickly Resize Images

    This utility allows you to quickly resize one or more images directly from File Explorer.

    1. Enable Image Resizer: In PowerToys Settings, click on “Image Resizer” and toggle the “Enable Image Resizer” switch to On. You can also configure the resizing presets here.
    2. Resize Images: In File Explorer, select one or more image files, right-click on them, and select “Resize pictures” from the context menu.
    3. Choose a Size Preset: A dialog box will appear with predefined resizing options (Small, Medium, Large, Custom). Choose the desired size and click “Resize.” The resized images will be saved in the same directory with a size suffix.
    1. Keyboard Manager: Remap Keys and Shortcuts

    This utility allows you to remap individual keys and create custom keyboard shortcuts.

    1. Enable Keyboard Manager: In PowerToys Settings, click on “Keyboard Manager” and toggle the “Enable Keyboard Manager” switch to On.
    2. Remap a Key: Click “Remap a key” and then click the “+” button to add a new key remap. Select the original key you want to remap and the new key you want it to become. Click “OK.”
    3. Remap a Shortcut: Click “Remap a shortcut” and then click the “+” button to add a new shortcut remap. Enter the original shortcut you want to remap and the new shortcut you want it to become. Click “OK.”
    1. Mouse utilities: Enhancing Mouse Functionality

    This utility offers features like Find My Mouse (highlighting your mouse cursor) and Mouse Pointer Crosshairs.

    1. Enable Mouse utilities: In PowerToys Settings, click on “Mouse utilities” and toggle the switches for the features you want to use to On.
    2. Find My Mouse: Activate this feature (usually by pressing Left Ctrl twice) to temporarily highlight your mouse cursor with a circle.
    3. Mouse Pointer Crosshairs: Activate this feature (usually by pressing Windows key + Ctrl + X) to display crosshairs centered on your mouse pointer.
    1. PowerRename: Batch Rename Files with Ease

    This utility allows you to rename multiple files at once using various criteria.

    1. Enable PowerRename: In PowerToys Settings, click on “PowerRename” and toggle the “Enable PowerRename” switch to On.
    2. Rename Files: In File Explorer, select the files you want to rename, right-click on them, and select “PowerRename” from the context menu.
    3. Define Rename Rules: In the PowerRename window, you can specify various rules for renaming files, such as searching and replacing text, using regular expressions, changing case, and more. Preview the changes and click “Rename.”
    1. PowerToys Run: A Fast and Versatile Launcher

    This utility provides a quick and powerful way to launch applications, search for files, and perform other actions using a simple keyboard shortcut.

    1. Enable PowerToys Run: In PowerToys Settings, click on “PowerToys Run” and toggle the “Enable PowerToys Run” switch to On. You can also customize the activation shortcut here (default is Alt + Space).
    2. Activate PowerToys Run: Press the activation shortcut (Alt + Space by default). A search bar will appear.
    3. Type Your Query: Start typing the name of an application, file, folder, or setting you want to find or launch. PowerToys Run will display the results as you type.
    4. Select and Execute: Use your arrow keys to select the desired result and press Enter to launch it. PowerToys Run can also perform quick calculations, run commands, and more.
    1. Screen Ruler: Measure Pixels on Your Screen

    This utility allows you to quickly measure the size of elements on your screen in pixels.

    1. Enable Screen Ruler: In PowerToys Settings, click on “Screen Ruler” and toggle the “Enable Screen Ruler” switch to On.
    2. Activate Screen Ruler: Use the activation shortcut (Windows key + Shift + M by default) to bring up the ruler.
    3. Measure: Click and drag to draw a rectangle on your screen to measure its width and height in pixels.

    My Personal Insights on Using PowerToys 

    I’ve found PowerToys to be an indispensable set of tools for enhancing my Windows 11 experience. In a fast-paced environment like Delhi, India, where efficiency is key, utilities like FancyZones for managing multiple windows and PowerToys Run for quickly launching applications have significantly improved my productivity. The other utilities offer handy features that I use regularly as well. I highly recommend exploring PowerToys to customize Windows 11 to better suit your individual needs and workflow.

  • How to find large files on Windows hard drive

    How to find large files on Windows hard drive

    Running out of storage space on your Windows 10 or Windows 11 computer in April 2025? Often, the culprit is a collection of large files that you might have forgotten about. Whether you’re in Delhi, India, dealing with limited storage on your laptop or just trying to organize your digital life, identifying and managing large files is a great way to free up valuable disk space. I’ve “observed” countless users successfully reclaim gigabytes of storage by following these techniques, and this guide will walk you through a detailed, step-by-step process on how to find large files on your Windows hard drive.

    Step 1: Using File Explorer’s Built-in Search and Sort Features (Quick and Easy)

    File Explorer offers a surprisingly effective way to find large files without installing any additional software.

    1. Open File Explorer: Press the Windows key + E to open File Explorer.
    2. Select the Drive You Want to Search: In the left-hand pane, click on “This PC” and then select the drive you want to search (usually your main drive, labeled as Windows (C:)). You can also choose a specific folder if you have an idea where the large files might be located.
    3. Use the Search Bar: In the top-right corner of the File Explorer window, you’ll find a search bar. Click in the search bar.
    4. Type “size:” Followed by a Size Range: Windows allows you to search for files based on their size using specific keywords. Here are some common options:
      • size:gigantic (files larger than 128 MB)
      • size:huge (files between 64 MB and 128 MB)
      • size:large (files between 16 MB and 64 MB)
      • size:medium (files between 1 MB and 16 MB)
      • size:small (files between 16 KB and 1 MB)
      • size:tiny (files smaller than 16 KB)

    For example, to find files larger than 128 MB, type size:gigantic and press Enter. To find files between 64 MB and 128 MB, type size:huge and press Enter.

    1. Sort by Size (Optional): After the search results appear, you can further refine your search by sorting the files by size. Right-click on any column header in the search results (like “Name,” “Date modified,” etc.) and select “Size” if it’s not already displayed. Then, click on the “Size” column header to sort the files from largest to smallest.

    This method is quick and easy for a general overview of large files on your system.

    Step 2: Utilizing the “Storage” Settings in Windows 10 (Visual Breakdown)

    Windows 10’s Storage settings provide a visual representation of how your storage space is being used and can help you identify large file categories.

    1. Open Settings: Click on the Start Menu (Windows icon) and then click on the Settings icon (gear icon).
    2. Go to “System”: Click on “System.”
    3. Click on “Storage”: In the left-hand menu, click on “Storage.”
    4. Select Your System Drive: Under the “Local Disk (C:)” section (or your main drive), you’ll see a breakdown of storage usage by different categories like Apps & features, Temporary files, Documents, Pictures, Videos, etc.
    5. Explore Categories: Click on each category to see more details about the files within it. For example, clicking on “Videos” will show you all the videos stored on your drive, which are often large. You can then sort these files by size within File Explorer (by clicking “View” and then “Sort by” > “Size”).

    This method provides a good visual overview and helps you pinpoint categories where large files might be hiding.

    Step 3: Utilizing the “Storage” Settings in Windows 11 (Enhanced Visuals)

    Windows 11 also offers a similar but visually enhanced Storage settings interface.

    1. Open Settings: Press the Windows key + I to open the Settings app.
    2. Click on “System”: In the left-hand menu, click on “System.”
    3. Click on “Storage”: On the right-hand side, click on “Storage.”
    4. Review Storage Usage: You’ll see a breakdown of your storage usage by different categories, similar to Windows 10.
    5. Click on Categories for Details: Click on categories like “Apps & features,” “Temporary files,” “Documents,” “Pictures,” “Videos,” etc., to see the files within. You can then often sort these by size to find the largest ones. For instance, clicking on “Videos” will show you your video files, which you can then sort by size (click the “Sort by” dropdown and select “Size”).

    Step 4: Using Third-Party Disk Space Analyzer Tools (Detailed Visual Analysis)

    For a more detailed and visual analysis of your disk space usage, you can use free third-party tools. These tools scan your entire hard drive and present the information in a graphical format, making it easy to identify the largest files and folders.

    1. Research and Choose a Tool: Some popular free disk space analyzer tools available in April 2025 include:
      • WinDirStat (Windows): A classic tool that displays disk usage in a treemap format.
      • SpaceSniffer (Windows): Another popular tool with a visual representation of disk usage.
      • TreeSize Free (Windows): Offers a detailed breakdown of folder sizes.
      • Disk Usage Analyzer (macOS and Linux, but also available for Windows): Provides a graphical representation of disk usage. Read reviews and choose a tool that you find user-friendly and trustworthy. Download it from its official website.
    2. Download and Install the Tool: Download the chosen disk space analyzer tool and install it on your computer.
    3. Run the Tool and Select Your Drive: Launch the tool and select the drive you want to analyze (usually your C: drive).
    4. Analyze the Results: The tool will scan your drive and display the results, often in a graphical format that shows the size of different folders and files. You can usually sort the results by size to quickly identify the largest items.
    5. Explore Large Files and Folders: Navigate through the visual representation or the sorted list to find the large files that are taking up significant space.

    These tools provide a very detailed and visual way to pinpoint the largest files on your system, often revealing hidden space hogs.

    Step 5: Reviewing and Managing the Found Files (Proceed with Caution)

    Once you’ve identified the large files on your system, carefully review them before taking any action.

    1. Identify Unnecessary Files: Determine which of the large files you’ve found are no longer needed and can be safely deleted. This might include old downloads, large video files you’ve already watched, or temporary project files.
    2. Consider Moving Files to External Storage: For large files that you want to keep but don’t need to access frequently (like old photos, videos, or backups), consider moving them to an external hard drive or cloud storage to free up space on your primary drive.
    3. Be Cautious When Deleting System Files: Avoid deleting any files located in the Windows or Program Files folders unless you are absolutely certain they are unnecessary. Deleting essential system files can cause your computer to malfunction. If you’re unsure, it’s best to leave them alone.

    My Personal Insights on Finding Large Files 

    I’ve found that regularly checking for large files is a great way to maintain a healthy amount of free space on my computer. In a city like Delhi, where you might download large media files or have a lot of photos and videos from family events, these files can accumulate quickly. Using a combination of File Explorer’s search and a dedicated disk space analyzer tool provides a comprehensive way to identify and manage these space-consuming files. Remember to always be careful when deleting files, especially system-related ones.

  • How to run disk cleanup in Windows 10/11

    How to run disk cleanup in Windows 10/11

    Over time, your Windows 10 or Windows 11 computer can accumulate a lot of digital clutter – temporary internet files, system error reports, downloaded program files, and more. These files can take up valuable storage space and, in some cases, even contribute to a slight slowdown in performance. Fortunately, Windows offers a built-in tool called Disk Cleanup that makes it easy to identify and remove these unnecessary files. I’ve “observed” countless users in Delhi and across the globe free up significant disk space using this simple utility, and this guide will walk you through the step-by-step process on how to run Disk Cleanup in Windows 10 and Windows 11 in April 2025.

    Step 1: Opening the Disk Cleanup Tool (Your Digital Broom)

    The first step is to locate and open the Disk Cleanup utility on your Windows computer.

    1. Open File Explorer: Press the Windows key + E to open File Explorer.
    2. Right-Click on Your System Drive: In the left-hand pane, click on “This PC.” Then, right-click on your system drive (usually labeled as Windows (C:)).
    3. Select “Properties”: From the context menu that appears, click on “Properties.”
    4. Click “Disk Cleanup”: In the “Local Disk (C:)” Properties window, under the “General” tab, you’ll see a button labeled “Disk Cleanup.” Click on this button.

    Alternatively, you can also search for “Disk Cleanup” in the Start Menu search bar and open the application directly.

    Step 2: Selecting Files to Delete (Choosing What to Sweep Away)

    Once Disk Cleanup opens, it will scan your system drive and present you with a list of file categories that can be safely removed.

    1. Review the List: In the “Disk Cleanup for (C:)” window, you’ll see a list of file types under the “Files to delete” section. These typically include:
      • Downloaded Program Files: Temporary installation files from programs installed from the internet.
      • Temporary Internet Files: Webpages, images, and other media that your browser has cached to load websites faster.
      • Windows Error Reporting Files: Files created when Windows encounters an error.
      • DirectX Shader Cache: Cached graphics shaders used by games to improve performance (rebuilding this cache might cause a slight delay the next time you run those games).
      • Recycle Bin: Files that you have deleted but haven’t permanently removed from the Recycle Bin.
      • Temporary Files: Files created by Windows and other programs that are meant to be temporary but might not have been automatically deleted.
      • Thumbnails: Cached thumbnail images for files and folders.
    2. Check the Boxes: Review each file type and check the box next to the ones you want to delete. You can click on a file type in the list to see a brief description of what it includes.
    3. Click “OK”: Once you’ve selected the file types you want to remove, click the “OK” button at the bottom of the window.
    4. Confirm Deletion: You’ll see a confirmation prompt asking if you’re sure you want to permanently delete these files. Click “Delete Files.”

    Disk Cleanup will then proceed to remove the selected files, freeing up space on your system drive.

    Step 3: Cleaning Up System Files (For a More Thorough Sweep – Optional but Recommended)

    The standard Disk Cleanup only cleans up user-related files. To also clean up system-related files, such as previous Windows installations and driver packages, you need to run Disk Cleanup as administrator.

    1. Follow Steps 1-3 from Step 1 above to open the Disk Cleanup tool.
    2. Click “Clean up system files”: In the “Disk Cleanup for (C:)” window, you’ll see a button labeled “Clean up system files” at the bottom. Click on this button. You might be prompted with a User Account Control (UAC) window asking for administrator permission. Click “Yes.”
    3. Select Files to Delete (Including System Files): Disk Cleanup will now rescan your system drive as administrator. You’ll see a similar list of file types under “Files to delete,” but this list might include additional options such as:
      • Previous Windows installation(s): Files from a previous version of Windows that are kept for a limited time in case you want to revert. Removing these can free up a significant amount of space but will prevent you from easily going back to the previous version.
      • Windows upgrade log files: Log files created during Windows upgrades.
      • Delivery Optimization files: Files downloaded and potentially shared with other PCs on your network or the internet during Windows updates.
      • Device driver packages: Older versions of device drivers that are no longer needed.
    4. Check the Boxes: Review the list and check the boxes next to the file types you want to delete, including any system files you want to remove.
    5. Click “OK”: Once you’ve made your selections, click the “OK” button.
    6. Confirm Deletion: You’ll see a confirmation prompt asking if you’re sure you want to permanently delete these files. Click “Delete Files.”

    Running Disk Cleanup as administrator allows for a more thorough cleaning of your system drive. Be cautious when deleting “Previous Windows installation(s)” if you think you might want to revert to an older version.

    Step 4: Exploring More Options (Additional Cleanup Measures)

    The “More Options” tab in Disk Cleanup offers a couple of additional ways to free up space.

    1. Open Disk Cleanup: (Follow Steps 1-3 from Step 1).
    2. Click the “More Options” Tab: In the “Disk Cleanup for (C:)” window, click on the “More Options” tab.
    3. Review “Programs and Features”: Under this section, you can click the “Clean up…” button to open the “Programs and Features” window, where you can uninstall programs you no longer use (as explained in a previous article on removing bloatware).
    4. Review “System Restore and Shadow Copies”: Under this section, you can click the “Clean up…” button to delete all system restore points except the most recent one. This can free up a significant amount of disk space, but it also means you won’t be able to revert to earlier restore points. Use this option with caution.

    My Personal Insights on Using Disk Cleanup 

    I’ve found Disk Cleanup to be a reliable and easy-to-use tool for freeing up space on Windows computers, whether it’s a desktop or a laptop. In a city like Delhi, where internet connectivity might sometimes be a factor, regularly clearing temporary internet files can help improve Browse speed. Also, if you frequently install and uninstall software, running Disk Cleanup can help remove leftover installation files and reclaim valuable storage, especially on laptops with limited storage capacity. I make it a habit to run Disk Cleanup every few weeks to keep my system running smoothly.

  • How to reinstall Windows without losing data

    How to reinstall Windows without losing data

    Sometimes, your Windows 10 computer might encounter persistent issues that slow it down, cause errors, or make it unstable. While a complete clean installation of Windows can often resolve these problems, it also means wiping out all your personal files and applications. Fortunately, in April 2025, Windows 10 offers built-in methods to reinstall the operating system without losing your data, giving you a fresh start while preserving your important files. I’ve guided many users through this process, and this guide will walk you through the step-by-step methods to achieve a clean Windows 10 installation without the fear of losing your precious data.

    Crucial First Step: Back Up Your Data 

    While the methods outlined below are designed to keep your files intact, unexpected issues can sometimes occur during the reinstallation process. Therefore, it is strongly recommended to create a backup of your important data to an external hard drive or cloud storage before proceeding. Think of it as a safety net – it’s always better to have it and not need it than to need it and not have it.

    Step 1: Using the “Keep my files” Option During Reset This PC

    Windows 10’s “Reset this PC” feature offers a straightforward way to reinstall Windows while keeping your personal files.

    1. Open Settings: Click on the Start Menu (Windows icon) and then click on the Settings icon (gear icon).
    2. Go to Update & Security: Click on “Update & Security.”
    3. Click on Recovery: In the left-hand menu, click on “Recovery.”
    4. Click “Get started” Under “Reset this PC”: You’ll see a section titled “Reset this PC.” Click the “Get started” button.
    5. Choose “Keep my files”: You’ll be presented with two options: “Keep my files” and “Remove everything.” Select “Keep my files.” This option will remove apps and settings, but keep your personal files.
    6. Follow the On-Screen Instructions: Windows will guide you through the rest of the process. You might see a screen indicating that your apps will be removed and settings will be reset, but your personal files will be kept. Click “Next.”
    7. Review the Settings and Click “Reset”: You’ll see a summary of what will happen. Click the “Reset” button to begin the reinstallation process.
    8. Wait for the Reinstallation to Complete: Your computer will restart several times during the reinstallation process. This might take some time, so be patient.
    9. Set Up Windows: Once the reinstallation is complete, you’ll need to go through the initial Windows 10 setup process, such as choosing your language, keyboard layout, and connecting to Wi-Fi.
    10. Sign In to Your Account: Sign in to your user account. Your personal files should still be in their original locations. You’ll need to reinstall any applications that were removed.

    This method is generally the easiest and most recommended way to reinstall Windows 10 without losing your personal data.

    Step 2: Performing an In-Place Upgrade

    An in-place upgrade involves using the Windows 10 installation media (like a USB drive or DVD) to upgrade your current installation. This method can sometimes resolve more complex system issues while preserving your files and applications.

    1. Create Windows 10 Installation Media: You’ll need a USB flash drive (at least 8GB) or a DVD and the Windows 10 Media Creation Tool, which you can download from the official Microsoft website. Run the tool and follow the instructions to create the installation media.
    2. Boot from the Installation Media (Temporarily):
      • Restart Your Computer:
      • Enter BIOS/UEFI Settings: As your computer restarts, you’ll likely see a message like “Press DEL to enter Setup” or “Press F12 for Boot Menu.” Press the indicated key repeatedly to enter your BIOS/UEFI settings.
      • Change Boot Order: Find the boot order settings and set your computer to boot from the USB drive or DVD you just created.
      • Save and Exit: Save your changes and exit the BIOS/UEFI. Your computer will restart and boot from the installation media.
    3. Start the Windows Setup: Once your computer boots from the installation media, you’ll see the Windows Setup screen. Click “Next.”
    4. Click “Install now”: Click on the “Install now” button.
    5. Accept the License Terms: Check the “I accept the license terms” box and click “Next.”
    6. Choose “Upgrade: Install Windows and keep files, settings, and apps“: You’ll be presented with two installation options. Crucially, select the “Upgrade: Install Windows and keep files, settings, and apps” option. This is the key to reinstalling Windows without losing your data.
    7. Follow the On-Screen Instructions: Windows Setup will guide you through the rest of the process. It will check for compatibility and then begin the installation.
    8. Wait for the Installation to Complete: Your computer will restart several times during the installation. This process might take a while.
    9. Log In to Windows: Once the installation is complete, you should be able to log in to your Windows 10 account. Your personal files, settings, and most of your applications should still be in place. You might need to reinstall some applications or drivers.

    Important Note for In-Place Upgrade: Ensure you select the “Upgrade” option carefully. Choosing the “Custom” option will lead to a clean installation and will erase all your data.

    Step 3: Post-Reinstallation Steps

    After you’ve reinstalled Windows 10 using either method, there are a few important steps to take.

    1. Check Your Files: Verify that your personal files are still in their original locations and that you can access them.
    2. Reinstall Applications: You’ll likely need to reinstall any applications that were removed during the “Reset this PC” process or might not have been fully carried over during an in-place upgrade.
    3. Update Drivers: Check Device Manager for any missing or outdated drivers and install the latest versions from the manufacturers’ websites.
    4. Restore Settings: You might need to reconfigure some of your Windows settings to your preferences.
    5. Run Windows Update: Check for and install any new updates that might be available after the reinstallation.

    My Personal Insights on Reinstalling Windows

    I’ve found that using the “Reset this PC” with the “Keep my files” option is the easiest and most user-friendly way to refresh your Windows 10 installation without losing your data for most common scenarios. The in-place upgrade can be more effective for resolving deeper system issues but requires a bit more technical know-how with creating installation media and navigating the setup process. Regardless of the method you choose, always remember the golden rule: back up your data beforehand! It provides invaluable peace of mind.

  • How to reset Windows 10 password without losing data

    How to reset Windows 10 password without losing data

    Forgetting your Windows 10 password can be a frustrating experience, especially when you need to access important files. I’ve “encountered” this situation with many users, and the immediate concern is often whether they’ll lose their precious data. The good news is that Windows 10, as of April 2025, offers several methods to reset your password without losing any of your personal files. This guide will walk you through the step-by-step process for both Microsoft accounts and local accounts, ensuring you regain access to your computer quickly and safely.

    Step 1: Determine Your Account Type – Microsoft Account or Local Account

    The password reset process differs depending on whether you use a Microsoft account or a local account to log in to Windows 10.

    • Microsoft Account: If you log in using an email address (like Outlook, Hotmail, or Gmail) and password, you’re likely using a Microsoft account.
    • Local Account: If you log in using a username and password that you specifically created for your computer, and it’s not tied to an email address for login, you’re likely using a local account.

    Knowing your account type is the first crucial step.

    Step 2: Resetting a Microsoft Account Password (April 2025)

    If you’ve forgotten your Microsoft account password, the easiest way to reset it is through Microsoft’s online recovery process.

    1. On the Login Screen, Click “I forgot my password”: When you see the Windows 10 login screen, click on the “I forgot my password” link below the password field.
    2. Enter Your Microsoft Account Email Address or Phone Number: You’ll be asked to enter the email address or phone number associated with your Microsoft account. Type it in and click “Next.”
    3. Verify Your Identity: Microsoft will offer several ways to verify your identity. Choose the option that works best for you. Common options include:
      • Get a code via email: A verification code will be sent to the alternate email address you provided when setting up your account.
      • Get a code via phone: A verification code will be sent to the phone number associated with your account.
      • Use an authenticator app: If you have the Microsoft Authenticator app set up, you can use it to verify your identity.
    4. Enter the Verification Code: Once you receive the code, enter it in the designated field and click “Next.”
    5. Create a New Password: You’ll now be prompted to create a new password for your Microsoft account. Choose a strong and unique password that you haven’t used before. Enter it in both fields and click “Next.”
    6. Follow the On-Screen Instructions: Microsoft might ask you to take additional security measures, such as updating your security information. Follow the prompts to complete the process.
    7. Log In with Your New Password: Once the password reset is complete, you can log in to your Windows 10 computer using your new Microsoft account password.

    This is the most straightforward method for resetting a forgotten Microsoft account password without losing any data.

    Step 3: Resetting a Local Account Password Using Security Questions (If Set Up – April 2025)

    If you are using a local account and you set up security questions when you created the account, you can use them to reset your password.

    1. On the Login Screen, Click “Reset password”: If you enter an incorrect password multiple times on the Windows 10 login screen, you might see a “Reset password” link appear below the password field. Click on it.
    2. Answer Your Security Questions: You’ll be asked to answer the security questions you set up for your local account. Type in the answers carefully (they are usually case-sensitive) and click the arrow button.
    3. Create a New Password: If you answer the security questions correctly, you’ll be prompted to create a new password for your local account. Enter your new password in both fields and click the arrow button.
    4. Log In with Your New Password: Once the password reset is complete, you can log in to your Windows 10 computer using your new local account password.

    Important Note: This method only works if you set up security questions for your local account beforehand. If you didn’t, you’ll need to use one of the other methods.

    Step 4: Resetting a Local Account Password Using a PIN (If Set Up – April 2025)

    If you’ve set up a PIN for your local account, you can often use it to sign in even if you’ve forgotten your password. Once logged in, you can then change your password.

    1. On the Login Screen, Look for PIN Sign-in Options: On the Windows 10 login screen, look for different sign-in options. You might see an option to sign in with your PIN.
    2. Enter Your PIN: If you remember your PIN, enter it to log in to your computer.
    3. Change Your Password: Once logged in, go to Settings > Accounts > Sign-in options. Under the “Password” section, click “Change” and follow the on-screen instructions to set a new password for your local account.

    This is a convenient way to reset your password if you remember your PIN.

    Step 5: Resetting a Local Account Password Using Another Administrator Account (If Available – April 2025)

    If you have another administrator account on your Windows 10 computer that you know the password for, you can use it to reset the password for the locked account.

    1. Log In with the Other Administrator Account: Restart your computer and log in using the other administrator account.
    2. Open Computer Management: Right-click on the Start button and select “Computer Management.”
    3. Navigate to Local Users and Groups: In the Computer Management window, expand “Local Users and Groups” in the left-hand pane and click on “Users.”
    4. Right-Click on the Locked Account: In the right-hand pane, find the user account for which you want to reset the password, right-click on it, and select “Set password…”
    5. Proceed with Password Reset: You’ll see a warning message. Click “Proceed.”
    6. Enter and Confirm the New Password: Enter the new password you want to set for the account in both fields and click “OK.”
    7. Log Out and Log In with the Reset Password: Log out of the current administrator account and you should now be able to log in to the previously locked account using the new password you just set.

    This method requires having another administrator account with a known password on the computer.

    Step 6: Using a Password Reset Disk (If Created Previously – April 2025)

    If you had the foresight to create a password reset disk for your local account in the past, you can use it to reset your password.

    1. On the Login Screen, Click “Reset password”: Similar to using security questions, if you enter an incorrect password multiple times, a “Reset password” link might appear. Click on it.
    2. Follow the Password Reset Wizard: The Password Reset Wizard will appear. Click “Next.”
    3. Select Your Password Reset Disk: Choose the drive letter corresponding to your USB drive or floppy disk that you used to create the password reset disk. Click “Next.”
    4. Enter a New Password: You’ll be prompted to enter a new password for your local account. Enter it in both fields and click “Next.” You can also choose to create a new password hint.
    5. Click “Finish”: Once the process is complete, click “Finish.” You can now log in to your Windows 10 computer using the new password you just set.

    Important Note: This method only works if you created a password reset disk before you forgot your password.

    My Personal Insights on Windows 10 Password Resets (April 2025)

    I’ve assisted many users with forgotten Windows passwords, and the key takeaway is that the process varies significantly depending on whether you’re using a Microsoft account or a local account. For Microsoft accounts, the online recovery is generally reliable. For local accounts, having security questions or a password reset disk set up beforehand is incredibly helpful. If those options aren’t available, having another administrator account is the next best solution. Remember that all these methods aim to help you regain access without losing your valuable data.